well played! congratulations!
-
Scam Alert. Members are reminded to NOT send money to buy anything. Don't buy things remote and have it shipped - go get it yourself, pay in person, and take your equipment with you. Scammers have burned people on this forum. Urgency, secrecy, excuses, selling for friend, newish members, FUD, are RED FLAGS. A video conference call is not adequate assurance. Face to face interactions are required. Please report suspicions to the forum admins. Stay Safe - anyone can get scammed.
-
Several Regions have held meetups already, but others are being planned or are evaluating the interest. The Calgary Area Meetup is set for Saturday July 12th at 10am. The signup thread is here! Arbutus has also explored interest in a Fraser Valley meetup but it seems members either missed his thread or had other plans. Let him know if you are interested in a meetup later in the year by posting here! Slowpoke is trying to pull together an Ottawa area meetup later this summer. No date has been selected yet, so let him know if you are interested here! We are not aware of any other meetups being planned this year. If you are interested in doing something in your area, let everyone know and make it happen! Meetups are a great way to make new machining friends and get hands on help in your area. Don’t be shy, sign up and come, or plan your own meetup!
You are using an out of date browser. It may not display this or other websites correctly.
You should upgrade or use an alternative browser.
You should upgrade or use an alternative browser.
New 10" X 54" mill ordered.
- Thread starter John Conroy
- Start date
DPittman
Ultra Member
Well the wait has been sort of grueling even for us on the sidelines, it has been fun to anticipate the arrival and I sense that pretty much everyone has shared in the excitement just like kids at Christmas. Who knew such a thing could even be fun for those of us on the sidelines. Thanks for sharing, I think it's safe to say we all are happy for you John.
Congrats John, I'm guessing the final location is prepped and ready.
As Kermit would say "it aint easy being green" (envy).
Now the whole garage has that "new machine smell" gotta luv it.lol
I like that they feel the need to brag about the power feeds being brand new.
Looking forward to the DRO install, I'm thinking maybe Santa will bring me one.
As Kermit would say "it aint easy being green" (envy).
Now the whole garage has that "new machine smell" gotta luv it.lol
I like that they feel the need to brag about the power feeds being brand new.
Looking forward to the DRO install, I'm thinking maybe Santa will bring me one.
Sure,,, go ahead,,,, twist the knife LOL😀.The ER40 wrench even fits the chuck Mike!
Brent H
Ultra Member
@John Conroy : Bravo for a safe landing!!! always awesome when you can say it "fit like a glove"
That will be one pimped out machine - awesome! hope to see lots of project pics as you make the machine your own!
Congrats! 🙂
That will be one pimped out machine - awesome! hope to see lots of project pics as you make the machine your own!
Congrats! 🙂
@John Conroy Wonderful job on the safe arrival of your mill, it will surely bring you hours of enjoyment I too have enjoyed following the journey and it has made me realize just the unthinkable amount of logistics going on worldwide, the amount of ships out there and how many containers on each and the amount of goods moving just mind boggling.
Congrats and enjoy😀
Congrats and enjoy😀
Thanks for all your comments and feedback guys. I started today cleaning and it took about 3 hours with scrapers, Varsol and WD40, and a toothbrush to get all the waxy stuff off. I removed all the way wipers to allow access to all the nooks and crannies and it came out looking great.


Last edited:
historicalarms
Ultra Member
It is drop dead gorgeous John. Looks better than a new car! Bet it sees a lot of luvin! My bride would make me put clothes on it.......
A picture of the head please?
Use the cloths from the "bride".....brides don't need much for clothing as a rule. 😛
Just curious, are both your X handles the conventional 'fixed to the leadscrew' or is one of them a 'push in to engage' type? Modern told me they are obligated to have one of the latter on, mandatory CDN? safety thing. I hated the push-in & ended up buying a 'spare'. But one needs to careful around a turning handle in power feed mode, which is probably what this requirement is all about.
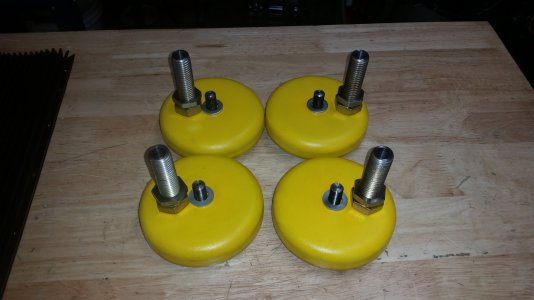
I spent today sorting out the leveling feet. Matt told me this is their first shipment of mills with a different design for foot mounting so he sent me ones with short 12mm studs that really don't offer height adjustability since the holes in the base are threaded 3/4"-10. I had to run a tap through all the holes to clear out all the sand, paint and other crap. I shortened the studs that came with the feet so 3/4" protrudes above the washer. I bought some 3/4"-10 X 2.5" bolts that are fully threaded and bored a 12mm hole .800" deep in the ends. The 12mm studs fits up into the end of the 3/4" bolt and I have about 1.25" of height adjustment on each corner, enough to deal with the slope of my shop floor. I machine off 1/2 the thickness of the lock nuts to allow as much adjustment as possible.


Attachments
Once I got that sorted I moved it to it's final resting place, exactly where my old mill was. I drilled and tapped four M6 bolt holes for my VFD enclosure mounting arm which is really meant for wall mounting a TV. I chose it so I could mount to a non vertical surface and still have the articulating arm level with the table. I had already test run this VFD but I had to change to acceleration and deceleration times from 3 seconds to 5 as I was getting over current errors occasionally on starts and stops. Other than that it runs like a top and is incredibly smooth and quiet.


Last edited:
All the handles are the non safety versions. As I found on my old mill you really have to be careful when using the power feeds.Just curious, are both your X handles the conventional 'fixed to the leadscrew' or is one of them a 'push in to engage' type? Modern told me they are obligated to have one of the latter on, mandatory CDN? safety thing. I hated the push-in & ended up buying a 'spare'. But one needs to careful around a turning handle in power feed mode, which is probably what this requirement is all about.
Well that snugged up to the heater with a playing card gap to spare LoL.
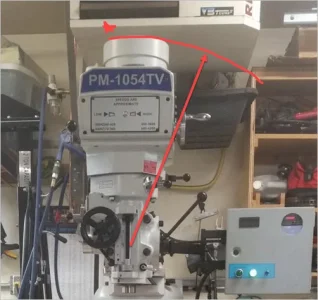
Dumb question (coming from the same guy that didn't consider potential interference of his garage door tracks vs ceiling height) - will you be able to rotate without motor can interfering?
Dumb question (coming from the same guy that didn't consider potential interference of his garage door tracks vs ceiling height) - will you be able to rotate without motor can interfering?
Attachments
Yeah it is taller than my old mill. There is about 4" of clearance to the furnace. Not enough height for my riser block unless I move the mill forward about 6". I haven't tried to figure out where the extra height is yet but it is about the same total height as the old mill after the riser block was installed.
Last edited:


