• Scam Alert. Members are reminded to NOT send money to buy anything. Don't buy things remote and have it shipped - go get it yourself, pay in person, and take your equipment with you. Scammers have burned people on this forum. Urgency, secrecy, excuses, selling for friend, newish members, FUD, are RED FLAGS. A video conference call is not adequate assurance. Face to face interactions are required. Please report suspicions to the forum admins. Stay Safe - anyone can get scammed.

Whelp, there goes the neighborhood.

Been a little bit limited on time to get at this, not to mention a little bit of project- lockup that I tend to get when I am having a hard time solving a problem. Plan A always worries the heck out of me when I have no plan B.....:rolleyes:
View attachment 45418
I was starting to think I was going to have to post a picture of the Cheez Wiz and dill pickle sandwich I made yesterday, just to show I made something.....:rolleyes:

However....... Plan A worked fairly well, so I have pictures. First I need to go puppy wrangling, need to get one of them Shetland roping ponies for herding them up....:p
The octopi are turning a jaundiced eye, and several fingers, at your dietary indiscretions. Does high blood pressure help with hammer forming?
 
The octopi are turning a jaundiced eye, and several fingers, at your dietary indiscretions. Does high blood pressure help with hammer forming?
Kinda...... I was stuck and spinning my wheels so I decided to take the rest of the day off and sit back. ..... Standing in front of the fridge I thought, " by the Jesus, how long since I had one of those!"..... So, I had two. :rolleyes:
....musta worked 'cause by the time I got to washing the last corner of crust down, I had a plan....:p
Don't usually have bottles of plastic cheese in the house, kids left it behind when they were out last....:cool:
 
Been very nice outside last few days and I have been more about getting some spring clean up done while I am still allowed to burn. Had huge die back on the hedge last year, so I made it a priority to get the dead wood cleaned up and burnt. I love this time of the year, and if the sun is out, so am I.
However, I did get the new patch panels welded in....
 
20240314_142255.jpg

So I don't stray too far off topic, I needed some weld in nuts, and since I happen to know a guy with a few 8mm taps and one 6mm and those were the sizes I needed, I figured I would make some. Those spiral machine taps are pretty cool, they made short work of it, back gears and a loose tailstock and it was all over almost before I started.
20240314_144447.jpg

Fresh off the band saw....

20240314_102445.jpg

....... and welded to the support piece. The strap that keeps the door from swinging too far forward attaches to it after I weld it into the rocker panel.
20240318_153417.jpg
20240318_153423.jpg
20240318_153428.jpg
20240318_153433.jpg
20240318_153449.jpg

..... and the whole dogs breakfast stuck into place. I am going to move on to the support ribs that the latches for the cab over mount to. This is the main goal of this project, everything else is just gravy on the fries..... I will come back to the floor pan once I have a game plan.
 
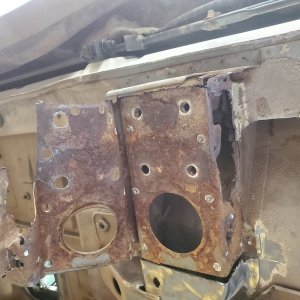
This is the rusted out rib that the cab over latch bolts to. I opened the side up a little bit so I could get a look inside to see how it was put together. There are 3 layers that will need to nest together quite tightly so that they can be spot (plug) welded together at final assembly.
20240324_132608.jpg

Starting to peel back the layers of the onion.


The good news is that it looks like I am going to need a dimple die........:p:cool:
 

Attachments

  • 20240324_132613.jpg
    20240324_132613.jpg
    543.8 KB · Views: 4
Tried editing my last post and decided to quit fixing it before it got any worse. :rolleyes:
20240325_092309.jpg

This is the middle layer for the most part, plus the front end cap and drabs of the outer layer that I left attached.
20240325_092314.jpg

And this is the outer skin,or what is left of it....
20240325_092520.jpg

I still have a little more dissecting to do on the middle layer to get back to solid metal. I think I am going to replace the right side all the way to the floor pan, and just trim the left side a little bit to make tying in the new piece a little easier. That side is still in good shape and to replace it, I would need to temporally remove the rib to the left just past the cut off in the last picture as it covers the tab that welds to the floor pan.
 
20240325_134402.jpg

I decided to make the outside first, it started out looking a little flat..... (This is actually the blank for the driver's side, it is just a mirror image of the passenger side)
20240325_134433.jpg

A little bit of smashing and bashing and it looks like a good start.
20240325_134456.jpg


Fit up needs a little more work, but will do that as all the bits start going together....... I hope.....:eek:
 
Decided to change gears a little bit today, and since I have barely turned a machine tool on in months, I figured that today is dimple die day.

20240326_095529.jpg

Back into the tickle trunk, way down at the bottom of the pile I found this little 3" stick of what smelled like 4140. Put a new belt on the bandsaw and liberated 2- 2" long pieces.
20240326_130839.jpg

Machines quite nicely....
20240326_130845.jpg

Top die finished and waiting for the bottom.
20240326_162047.jpg

Success!!!!!! Don't think you could wipe the smile off my face with a 2x4. It's a 2 1/4" hole and the sheet is 20 gauge, I put it in my non mounted 2 ton arbor press and was surprised by how little effort it took.
20240326_162122.jpg

The gap between the two halves is just enough to clear 16 gauge sheet metal, I made it so you can use a press, a bolt, or hammer to form the dimple.
 
Back
Top