• Scam Alert. Members are reminded to NOT send money to buy anything. Don't buy things remote and have it shipped - go get it yourself, pay in person, and take your equipment with you. Scammers have burned people on this forum. Urgency, secrecy, excuses, selling for friend, newish members, FUD, are RED FLAGS. A video conference call is not adequate assurance. Face to face interactions are required. Please report suspicions to the forum admins. Stay Safe - anyone can get scammed.

Still learning new things in fusion 360 regularly...

Hey! With only one blade to shoot through, they could have had faster machine guns!

I wonder what that would have sounded like? Prolly a bit like my grandma telling me not to touch the cookies she just baked. Ehh Ehh Ehh Ehh. LOL!
or had they been smarter from the start they'd have placed the guns in the wings in the first place.
 

Its hard to tell from picture angle, but are the 2 blades in succession at same pitch angle? If so, isn't there some biplane effect at this short inter-blade distance that the downstream blade should be at a slightly different pitch if its seeing a slightly different wake angle from upstream blade?

View attachment 31368
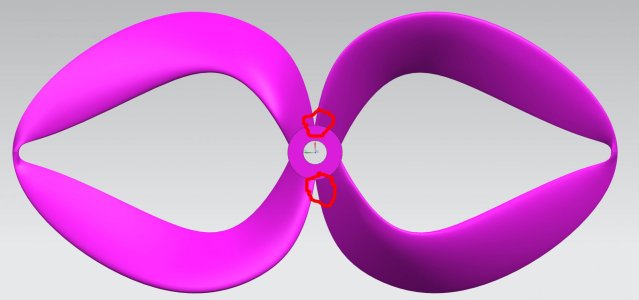
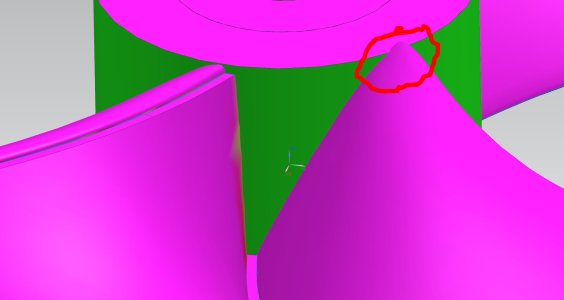
I am looking at a later iteration of this and wonder a few things. The one blade meets the hub at a higher point than the other (I mean on one loop). This is one problem with creating a partingline. Second and most important issue is that one side is exactly over the other in top view. This would mean that it is undercut, and impossible to create a partingline. If the two parts of the blade MUST be different, then the hub height should be increased slightly.(1-2mm)

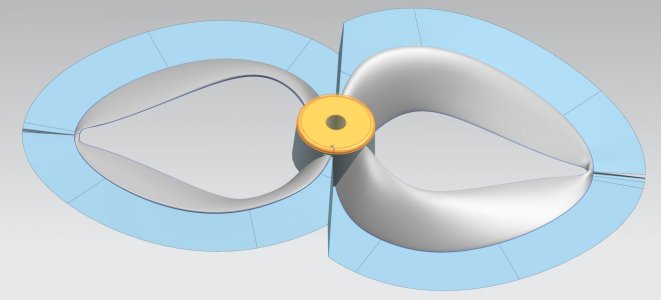
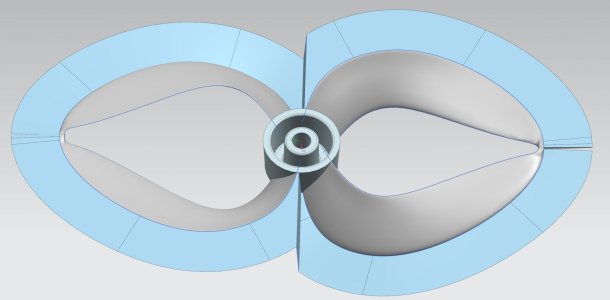
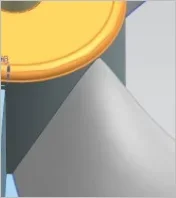
I would propose to increase you OD of hub to about 20 mm. This would allow the blades not to be over each other and have a transition on the hub if at least 5 degrees for seal-off. I am including pictures of the draft analysis. I also made a ribbon surface using the isocline (point of zero draft)(only 1mm wide (too small)).. But it illustrates the transition needed to go from leading edge to trailing edge. This feather edge would improve to good steel condition further from the hub. I did not look to seriously at the outer transition, as this is non critical to attach the two blades and can be easily altered without effecting anything. As for the hub growing, It can be cored put from the bottom to reduce weight (shell).
 

Attachments

  • Capture.JPG
    Capture.JPG
    87.1 KB · Views: 7
  • Capture1.JPG
    Capture1.JPG
    63.3 KB · Views: 7
I am looking at a later iteration of this and wonder a few things. The one blade meets the hub at a higher point than the other (I mean on one loop). This is one problem with creating a partingline. Second and most important issue is that one side is exactly over the other in top view. This would mean that it is undercut, and impossible to create a partingline. If the two parts of the blade MUST be different, then the hub height should be increased slightly.(1-2mm)

I would propose to increase you OD of hub to about 20 mm. This would allow the blades not to be over each other and have a transition on the hub if at least 5 degrees for seal-off. I am including pictures of the draft analysis. I also made a ribbon surface using the isocline (point of zero draft)(only 1mm wide (too small)).. But it illustrates the transition needed to go from leading edge to trailing edge. This feather edge would improve to good steel condition further from the hub. I did not look to seriously at the outer transition, as this is non critical to attach the two blades and can be easily altered without effecting anything. As for the hub growing, It can be cored put from the bottom to reduce weight (shell).

Background:
This is the latest version designed for injection moulding rather than 3D printing so there is no modified flat on the airfoils.

I made a mistake in the side elevation sketch for the right side blade. The height of the blade leading edges where they meet the hub should be the same since the radius is the same ergo the angle should be the same and therefore the height at the hub should be identical. I will revise this. I also could not fillet these blades at the hub due to the profile of the connection to the hub. I will try to fix that at the same time by revising profile that projects to the 3D shape of the hub.

In my model though the blade does not project above the hub... not sure why that shows as such on what you have. I'll also make the hub a little wider as you suggest.
The one blade projected above the hub because of two reasons. One, they are not the same as you said, and two the hub dia was increased in my picture. I raised the yellow surfaces 1.5 mm. Adding a fillet will create even more ugliness on a partingline... but show me two files, one with and one without (and your changes to blade on both.)

I am including two more pics showing the larger hub to remove undercut on partingline. I drew the outer partingline. Bad steep sealoff is still only 3.5 degrees, which is less than ideal. (5 minimum). I include a pic from bottom with shell command done to remove bulk and create more consistent wallstock.
 

Attachments

  • Capture.JPG
    Capture.JPG
    80.8 KB · Views: 6
  • Capture1.JPG
    Capture1.JPG
    90.1 KB · Views: 6
The one blade projected above the hub because of two reasons. One, they are not the same as you said, and two the hub dia was increased in my picture. I raised the yellow surfaces 1.5 mm. Adding a fillet will create even more ugliness on a partingline... but show me two files, one with and one without (and your changes to blade on both.)

I am including two more pics showing the larger hub to remove undercut on partingline. I drew the outer partingline. Bad steep sealoff is still only 3.5 degrees, which is less than ideal. (5 minimum). I include a pic from bottom with shell command done to remove bulk and create more consistent wallstock.

I should have time today to revise the file and send you a new copy...
 
I should have time today to revise the file and send you a new copy...
Another option to improve partingline conditions is to move the blades out from center. This would allow a smaller hub, ability to increase the shutoff angle and have more than 0.04 land at the top before the seal-off (little tiny sliver now, only 1mm). I don't know your constraints on overall OD (overall spin diameter).
 
Looks like @Aburg Rapid Prototype has some industrial strength software at his disposal, but I will offer a few points FWIW.

- where & how you terminate/transition your airfoil relative to the hub will likely have zilch implications on performance. Its all messy 'extra' turbulent flow for a number reasons outside the scope. So I recommend you use that fact to your advantage & make the mold makers job as pain free as possible in terms of parting line & parting plane.

- your airfoil nose likely has a 0,0 type coordinate. I would alter the hub so that that point occurs on the circular bub and not coincident with the fillet or any other feature that makes it a 3-way. ie. most likely the mold must part on the airfoil chord line & not be adversely affected by this other geometry

- its very rare for any kind of prop to not have a fillet in a transition like this hub. Its usually always 'better' aerodynamically/hydrodynamically but you may also run into other issues. Its the most stressed area of the entire prop, exactly where you don't want a corner. It will likely create issues with any kind of molding whether injecting plastic, reinforced resin, layups... All it takes is a void & bye-bye blade. Now with a fillet, that may or may not play nice with parting issues, that has to be re-examined.

1678301878633.png


Another thing I forgot to mention, might be a tight squeeze, but if your single part molds become a real bear, you might be able to solve some issues with these keyed type blade principles. That way your blade is one mold & the hub is another. Obviously some other big picture pros & cons, but just throw-in it over the fence. For bonus points you could have retracting folder haha
1678302772389.png
 
Looks like @Aburg Rapid Prototype has some industrial strength software at his disposal, but I will offer a few points FWIW.

- where & how you terminate/transition your airfoil relative to the hub will likely have zilch implications on performance. Its all messy 'extra' turbulent flow for a number reasons outside the scope. So I recommend you use that fact to your advantage & make the mold makers job as pain free as possible in terms of parting line & parting plane.

- your airfoil nose likely has a 0,0 type coordinate. I would alter the hub so that that point occurs on the circular bub and not coincident with the fillet or any other feature that makes it a 3-way. ie. most likely the mold must part on the airfoil chord line & not be adversely affected by this other geometry

- its very rare for any kind of prop to not have a fillet in a transition like this hub. Its usually always 'better' aerodynamically/hydrodynamically but you may also run into other issues. Its the most stressed area of the entire prop, exactly where you don't want a corner. It will likely create issues with any kind of molding whether injecting plastic, reinforced resin, layups... All it takes is a void & bye-bye blade. Now with a fillet, that may or may not play nice with parting issues, that has to be re-examined.

View attachment 31901

Another thing I forgot to mention, might be a tight squeeze, but if your single part molds become a real bear, you might be able to solve some issues with these keyed type blade principles. That way your blade is one mold & the hub is another. Obviously some other big picture pros & cons, but just throw-in it over the fence. For bonus points you could have retracting folder haha
View attachment 31903
Thanks for the feedback.

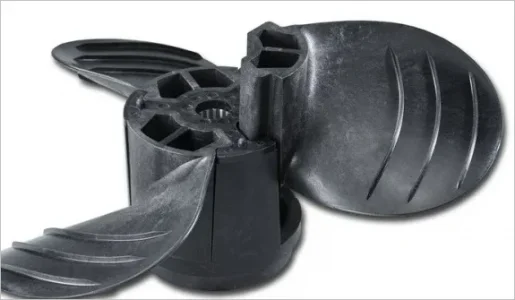
I'll have to keep that water prop in mind for future reference.

I'm trying to make this mould creation as easy as possible since I appreciate Matt's assistance so much!
 
Looks like @Aburg Rapid Prototype has some industrial strength software at his disposal, but I will offer a few points FWIW.

- where & how you terminate/transition your airfoil relative to the hub will likely have zilch implications on performance. Its all messy 'extra' turbulent flow for a number reasons outside the scope. So I recommend you use that fact to your advantage & make the mold makers job as pain free as possible in terms of parting line & parting plane.

- your airfoil nose likely has a 0,0 type coordinate. I would alter the hub so that that point occurs on the circular bub and not coincident with the fillet or any other feature that makes it a 3-way. ie. most likely the mold must part on the airfoil chord line & not be adversely affected by this other geometry

- its very rare for any kind of prop to not have a fillet in a transition like this hub. Its usually always 'better' aerodynamically/hydrodynamically but you may also run into other issues. Its the most stressed area of the entire prop, exactly where you don't want a corner. It will likely create issues with any kind of molding whether injecting plastic, reinforced resin, layups... All it takes is a void & bye-bye blade. Now with a fillet, that may or may not play nice with parting issues, that has to be re-examined.


View attachment 31901
I will wait for the next iteration from @TorontoBuilder to start making alterations. If he does not fillet it, that is better for me. I can add fillets no problem after I make slight adjustments to location of the blades related to the hub. I made a wrong statement in that I need them moved inboard to increase the space between, where it hits the hub, not the other way around.

Not also that there will be some nasty mismatch under the blades on the cone(hub), due to reversing the draft angle. The hole diameter was 2mm. I am assuming this MUST be not drafted to snugly fit on a shaft. Usually it would be drafted for molding. The part will shrink onto the the core-pin. Anyway, that is the least consideration at this point....
 
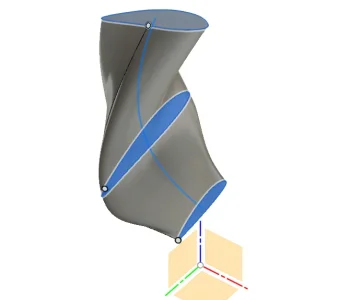
I finally got back to remodeling the propeller completely fresh and bam hit with a stupid issue. For some reason despite doing everything to same and sketching profiles with the same number of points fusion wants to reverse the points on one profile so it wont loft...

it twists and self intersects. I tried outside guiderails, centerline guide rails etc... to no avail. Going to redraw several profiles next. To quote one of my fav youtubers "Please stand by"

1678399609618.webp
 
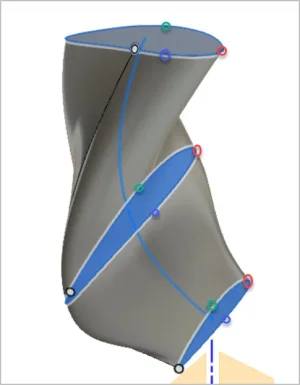
Not sure what/if F360 has for comparable features but SW & other modelers allow you define points on the loft sections & these become intersections of X number of 'control curves. So visualize your erroneous blue line would intersect all the leading edge 0,0 points, then another at various proportionate chord positions, finally ending with a curve defined by the TE. Basically what you have is the program performing a bad guess, so it needs to be guided.
 

Attachments

  • EDT-2023-03-09 5.47.39 PM.webp
    EDT-2023-03-09 5.47.39 PM.webp
    13.4 KB · Views: 2
Not sure what/if F360 has for comparable features but SW & other modelers allow you define points on the loft sections & these become intersections of X number of 'control curves. So visualize your erroneous blue line would intersect all the leading edge 0,0 points, then another at various proportionate chord positions, finally ending with a curve defined by the TE. Basically what you have is the program performing a bad guess, so it needs to be guided.
I need to check out solid works.

I did solve my issue, but I am not 100% sure what did it, changing the profile plane for one of the sketches, or redrawing all the sketches.

Since the errors often referred to tangency and self intersection I think it was the change to the profile plane. It was a small change too..

I changed plane one to give it an angled offset which was parallel to plane two.

1678410904251.webp
 
It could be that F360 handles it but just requires a certain workflow or workaround. Sometimes geometry is just plain complex & it dictates another approach. Not all cad engines are created equal. Another technique I have done is to deal in surfaces initially, then join them as solid. Sometimes surfacing commands can offer more control, construction points/lines/tangency... For example the upper airfoil is one surface, the lower is another. Get them shaped properly independently, then 'join'. Now depending on the program, this aspect can be choppy waters making it an airtight solid again without more fix-its. Rhino comes to mind (in a bad way) but maybe they have enhanced it since I left it.

Another tip: I have seen a fair number of issues resolved by making your trailing edge a single curve (a point viewed in section) as opposed to something else, especially a micro radius. Your wanky guide rail kind of smells like that problem. It usually rears its head with blended foils or more dramatic AOA change which you have in spades. Coming to a point is generally easier for modelers to digest mathematically. Then with hopefully good surfaces joined, just do a round-over or facet or whatever as a secondary operation to make the TE the desired shape.
I agree with this about making top an bottom single surfaces. Then extend them beyond until they intersect. Then trim them to each other. Sew them together and then drive a fillet at top and bottom. If you want to stay in solid, instead of sew. create a body that encompasses the top and bottom surfaces. Rotate it so it is pitched similar and then replace the faces of the simple solid with your top and bottom faces. On previous iteration I was noticing that the end near the hub actually went below the bottom surface (at hub) by about 0.0005. You might think this doesn't matter, but it does for sure. Certain constraints need to be established also. I would think the spin radius is important to your design intent.
 
You may get away with lofting sections as solids providing correct placement of control curves. Play around with this. But surfacing might be the next step. There are no hard rules, just experience. Generally you increase span wise control curve density near the nose of airfoil because that is where more relative shape change occurs & that's generally where the performance (polars) are mostly influenced by. You also may need a sufficient number of sections from root to tip & particularly for a low span blade like a boat prop & where you have so much geometric variation so close together. When you have significantly different root/midspan/tip profiles or camber is when the real fun starts, even on harmless looking flattish airplane wings.

Anyways, typically you are attempting to stay as true as possible with what the airfoil designer has worked so hard to achieve to generate that shape to begin with. But validating that an arbitrary sample cross section taken somewhere along the span actually represents the 'correct' blend based on multiple factors (varying sections, varying pitch, varying control curve density & direction, positional weighting...) is another matter. I could give you reasons why but put it this way, if you are cool with say 5% deviation & it looks smooth by geometric visualization tools (zebra strips, spline slope combs...) then call it good. Because the next level to truly evaluate conformance is a lot more difficult.
 
lol, just watched a bit of that, and was trying to find this thread to link it.

Side note, I'd be curious to see how all of our youtube recommended lists overlay with each other.
 
Here it is in Boat props.

Side note, I'd be curious to see how all of our youtube recommended lists overlay with each other.

I think you guys watch YouTube for a living...... LOL!

But that video is cool. Just WAAAAAAY too long for me. Where's the beef?

I can certainly see why you cnc guys are so fussed about cooling fluids and carbide tool life. It's a different world. Its very very cool. I'm even jealous. But I have no interest. I just want to make simple parts one at a time on a manual machine.

Now that propeller...... Wow!
When I started learning things, it was through books. Books have a lot of wealth of information but they often miss tips and tricks and short cuts that make life easy, as in right way vs fastest best way. YouTube did one thing very well that books don't, show you that little step/trick/missing info that nots mentioned but it is shown. Additionally, I skim through videos. 15mins in 30secs. If it's interesting then watch the whole thing.
 
I agree with this about making top an bottom single surfaces. Then extend them beyond until they intersect. Then trim them to each other. Sew them together and then drive a fillet at top and bottom. If you want to stay in solid, instead of sew. create a body that encompasses the top and bottom surfaces. Rotate it so it is pitched similar and then replace the faces of the simple solid with your top and bottom faces. On previous iteration I was noticing that the end near the hub actually went below the bottom surface (at hub) by about 0.0005. You might think this doesn't matter, but it does for sure. Certain constraints need to be established also. I would think the spin radius is important to your design intent.

about the bottom projection below the hub... and above the guide rail for that matter, I realized that is due to wrapping a single spline point around to create an airfoil profile. The pointed ends project beyond the control point. I resolved that by switching to using multiple splines per profile. But that just lends itself to surface modeling where perhaps I can get more accurate results.

I will try the surface modeling route.
 
Back
Top