I have had this exact same problem! It’s an operator error. The bed wasn’t clean enough. It’s easy to keep clean - wipe it down with IPA. I just wasn’t diligent. It ended up damaging my printer. Spool 3D got it fixed up for me.Hah! I lasted ~40 hours of printing on my Prusa MK3S+ (too many variants!) before the blob of doom just cost me the day getting it back together.
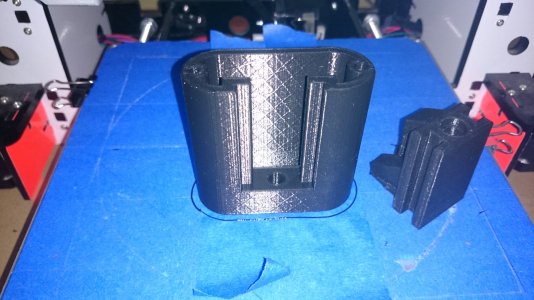
I'd made a bone-headed mistake: Not enough first layer to adhere well and somewhere in the second or third layer of a whole-platen print *pop* went a piece. The resulting blob wrapped around the entire lower hot end, including the heater and thermocouple wires.
That led to a complete tear-down and rebuild of the extruder. The south end of the extruder printed pieces are looking a little worse for wear after this. Assuming it passes calibration (still ongoing...), first job is to print all-new extruder head parts to have on standby.
I *really* like the open-source aspect to Prusa's setup.
-
Scam Alert. Members are reminded to NOT send money to buy anything. Don't buy things remote and have it shipped - go get it yourself, pay in person, and take your equipment with you. Scammers have burned people on this forum. Urgency, secrecy, excuses, selling for friend, newish members, FUD, are RED FLAGS. A video conference call is not adequate assurance. Face to face interactions are required. Please report suspicions to the forum admins. Stay Safe - anyone can get scammed.
-
Several Regions have held meetups already, but others are being planned or are evaluating the interest. The Calgary Area Meetup is set for Saturday July 12th at 10am. The signup thread is here! Arbutus has also explored interest in a Fraser Valley meetup but it seems members either missed his thread or had other plans. Let him know if you are interested in a meetup later in the year by posting here! Slowpoke is trying to pull together an Ottawa area meetup later this summer. No date has been selected yet, so let him know if you are interested here! We are not aware of any other meetups being planned this year. If you are interested in doing something in your area, let everyone know and make it happen! Meetups are a great way to make new machining friends and get hands on help in your area. Don’t be shy, sign up and come, or plan your own meetup!
You are using an out of date browser. It may not display this or other websites correctly.
You should upgrade or use an alternative browser.
You should upgrade or use an alternative browser.
Prusa mk4
- Thread starter Janger
- Start date
Probably the biggest cause of failures I've run into on a regular basis. Product lifting off the build plate.I have had this exact same problem! It’s an operator error. The bed wasn’t clean enough. It’s easy to keep clean - wipe it down with IPA. I just wasn’t diligent. It ended up damaging my printer. Spool 3D got it fixed up for me.
slow-poke
Ultra Member
Can you expand on the blue painters tape, do you print on the tape, or use the tack from the tape fir better adhesion?I find the blue painters tape works wonders for getting a good adhesion.. I'm only printing with PLA and use a low tech entry level printer.......but not for long. 😉
I have a glass build plate. I apply the blue painters tape to the glass. (Make sure the bed is level, adjust my height ...the tape adds a slight bit to the height) Then print Haven't had any fails using the tape. Let the bed drop down to below 60c and remove the item. You can tell when the tape is new there is more adhesion when you try to remove an item. As the surface of the tape wears out ,you can tell as the items get easier and easier to remove. Then I just reapply new tape.Can you expand on the blue painters tape, do you print on the tape, or use the tack from the tape fir better adhesion?

Sometimes when I'm Iazy.....I will just add a few strips of tape and print . (Like in the photo above. ) The original tape in that photo was pretty worn out and it was time to replace it, but I was busy and wanted to get this print going so I could do other stuff.
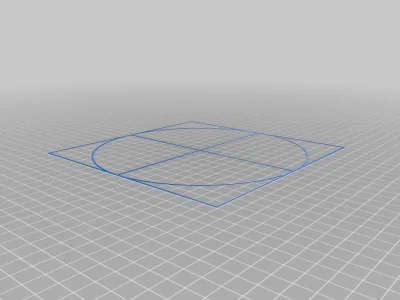
When adjusting the height after replacing the tape I always run one of these bed center calibration prints afterwards. I don't use it to center the bed, but to check the bed for level and see if I have a nice even "squish" on my first layer. I'm thinking maybe the proper squish also helps the first layer to stick better.

On a side note I'm always impressed how you can make such a thin gasket. There must be a use for a thin gaskets like this. Print it and when you use it the first time the heat would also help it seal better as it would melt the filament. (or maybe not ..lol)
Last edited:
Doubly-so on operator error. This parametric model I have for little sorting bins allows the production of parts with almost no base layer - just a contact ring. I looked at my slices and sure enough, that was turned on, and I should have heeded the warnings the slicer threw instead of blythely carrying on.I have had this exact same problem! It’s an operator error. The bed wasn’t clean enough. It’s easy to keep clean - wipe it down with IPA. I just wasn’t diligent. It ended up damaging my printer. Spool 3D got it fixed up for me.
The printer is back up and running, and as soon as some PETG filament arrives I'll be running off some replacement parts for the extruder head.
Gridfinity?This parametric model I have for little sorting bins allows the production of parts with almost no base layer - just a contact ring.
Gridfinity-rebuilt? It's a compatible OpenSCAD version found on github. I've modified it to print labels onto the tabs, though there remain some kinks to work out.Gridfinity?
I have my own version I started before I found this one. I might sink a few more hours into mine as the code quality/modifiability of this thing is pretty heinous.
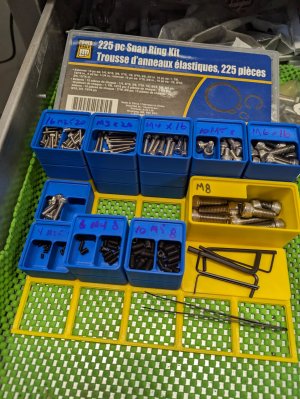
I should add that I particularly like the small (42mm x 42mm x 21mm) buckets with one or two dividers to hold the 3-8mm set screws that otherwise scatter everywhere when you knock the princess auto tray the come in...Gridfinity-rebuilt? It's a compatible OpenSCAD version found on github. I've modified it to print labels onto the tabs, though there remain some kinks to work out.
I have my own version I started before I found this one. I might sink a few more hours into mine as the code quality/modifiability of this thing is pretty heinous.

I particularly like the small (42mm x 42mm x 21mm) buckets with one or two dividers to hold the 3-8mm set screws that otherwise scatter everywhere when you knock the princess auto tray the come in...
Those look really convenient, but also fragile. I'd be a bit afraid I'd knock them over with my big claws. Do they fit in some kind of tray holder to keep them secure or are they meant to be individually packed into a drawer?
If they are anything like the Gridfinity system they fit together quite securely. And when the grid is filled up they are even more secure.Those look really convenient, but also fragile. I'd be a bit afraid I'd knock them over with my big claws. Do they fit in some kind of tray holder to keep them secure or are they meant to be individually packed into a drawer?
Doggggboy
Ultra Member
The Gridfinity system also allows for small magnets in the bottom the bins to interface with the base grid. I use the system without the magnets for some of the shop drawers to keep everything from piling up at the back. I have had zero luck with the non slip mats.If they are anything like the Gridfinity system they fit together quite securely. And when the grid is filled up they are even more secure.
You can see the grid tray in the bottom. The bins click into the grid, and nest in one-another the same way. They are quite secure.Do they fit in some kind of tray holder to keep them secure or are they meant to be individually packed into a drawer?
I don't have a nice way to pick up the whole grid yet, but I will.
You can also make up lids quite easily.
Yeah. That's why I like the 2-3 "unit" heights. A gridfinity height unit is 7mm, so they can be quite shallow, comfortably.Those look good PaulL, the biggest problem I have with the smaller bins is they are sometimes to deep, and I need needle nose or tweezers to get screws etc. out of them. I know, keep the bin full. That way you never drop the last and only one either.
To get parts out, there's a cylindrical scoop in the front so you don't get parts trapped in the corner.
And the OpenSCAD version: https://github.com/kennetek/gridfinity-rebuilt-openscad
It's snowing again so I'm guessing I'm going to work on my competing implementation 🙂
Doggggboy
Ultra Member
You can customize the height of the gridfinity bins in the F360 addon. I think you can print them in multiple of 7 mm.Those look good PaulL, the biggest problem I have with the smaller bins is they are sometimes to deep, and I need needle nose or tweezers to get screws etc. out of them. I know, keep the bin full. That way you never drop the last and only one either.
BaitMaster
Ultra Member
So my PRUSA MK3S+ is sold.... and my MK4 is here and up and running.... I'll summarize the things I've noticed right away after less then a day of print time on the mk4 but 200+days of print time on the Mk3S+...
1) All of the functionality that I had with Octoprint on the Pi on the Mk3S+ is basically included and integrated, minus the camera of course, in the MK4. It also works better then it did with the octoprint, and it comes with Prusa connect, which allows for access not on the local network. When I wanted to monitor off my local network with the 3S+ I had to set up ANOTHER Pi on the network with Zerotier integrated..... Much more hassle. The file names when you upload over the network stay the same now, on the octoprint they were shortened/changed.
2) Print times on some of the common prints my wife sells are DRASTICALLY improved. We are talking 12 hour print down to 7 hours. Another Print I did went from about 24 hours to 13. WOW.
3) The UI has some notable improvements. The LCD display shows a preview of what will be printed on the build plate, before you press go. That is SWEET as i have a few different variants of similar prints, and my wife can visually see what shes doing. NICE.
4) Assembly felt slightly easier then last time, but it did not come with the hard copy assembly manual which was a disappointment. Still came with a bag of Haribo.
5) The extruder design looks WAYY better. Machined metal parts, geared down now, way easier to service and replace a component on the extruder if necessary as there is a disconnection point on the extruder for all of the sub-items.
6) The load cell instead of the PINDA sensor looks awesome. Less messing with PINDA's.
7) The MK4 takes a USB stick and NOT an SD card. Sweet.
As far as problems are concerned, theres a few things in the software It would be nice if they changed on the prusa link/prusa connect end of things, but I'm sure they will.
I'm definitely a Prusa fan, and I'm not disappointed in this. I've spent what i consider to be much less time messing around with my printers then my friends/colleagues/acquaintances have with theirs. I assembled the MK4 and it printed 100% the first go, just like my MK3S+.
Last edited:
I‘m modelling some parts for a friend who sends them off to be 3D printed before he gets them CNC machined.
I have a couple of questions about the printing (slicer?) software thats used:
- Can you change the orientation of the model within the printing software, or does the model have to be made in the best orientation for printing?
- Does the printing software automatically generate the necessary supports for things like undercuts, or are they manually added?
