• Scam Alert. Members are reminded to NOT send money to buy anything. Don't buy things remote and have it shipped - go get it yourself, pay in person, and take your equipment with you. Scammers have burned people on this forum. Urgency, secrecy, excuses, selling for friend, newish members, FUD, are RED FLAGS. A video conference call is not adequate assurance. Face to face interactions are required. Please report suspicions to the forum admins. Stay Safe - anyone can get scammed.

Peerless Shaper Basement Install

francist

Super User
If you’re having trouble getting the pawl to engage reliably, try putting a bit more drag on the nut on the end of the lead screw. This is a very common thing that gets folks confused - the pawl just rocks back and forth without engaging or advancing the gear. What’s often happening is not enough drag on the nut and the screw is just rocking back and forth, a tweak of the nut just a hair will usually get you back in business.
 

YYCHM

(Craig)
Premium Member
The table feed (step over, in shaper talk) needs to be timed to the stroke so that the table advances as the cutter is returning.

PFCrank.JPG

The step over direction is controlled by which side of center this crank is set, it that correct?
 

RobinHood

Ultra Member
Premium Member
Correct.

There is some backlash on the table feed gear (the woodruff key is a bit sloppy). If the stroke length is not long enough to catch 2 teeth (IIRC), it will not start to feed by itself. Take out the backlash by hand with the crank first, then engage the power feed. Seemed to work for me that way.
 

francist

Super User
Yes and no, it works in tandem with the pawl knob. If the arm is fixed on one side of the eccentric the table motion will be synced with ram stroke, ie advance table on return stroke. Now if you flip the pawl so the arrow is the other way, the table will feed in the opposite direction but it will no longer be in sync with the ram and will advance at the same time as the cuttter is moving forward. You need to adjust both, you can’t cut on both table directions without changing which side of the eccentric the arm is fixed at. Regardless of which side the arm is fixed, the further it is from centre will increase the step over, the closer to centre will decrease your step over.
 

YYCHM

(Craig)
Premium Member
If you’re having trouble getting the pawl to engage reliably, try putting a bit more drag on the nut on the end of the lead screw. This is a very common thing that gets folks confused - the pawl just rocks back and forth without engaging or advancing the gear. What’s often happening is not enough drag on the nut and the screw is just rocking back and forth, a tweak of the nut just a hair will usually get you back in business.

Bingo! That solved the problem. It now power feeds in both directions reliably.

THANKS!
 
Last edited:

YYCHM

(Craig)
Premium Member
Yes and no, it works in tandem with the pawl knob. If the arm is fixed on one side of the eccentric the table motion will be synced with ram stroke, ie advance table on return stroke. Now if you flip the pawl so the arrow is the other way, the table will feed in the opposite direction but it will no longer be in sync with the ram and will advance at the same time as the cuttter is moving forward. You need to adjust both, you can’t cut on both table directions without changing which side of the eccentric the arm is fixed at. Regardless of which side the arm is fixed, the further it is from centre will increase the step over, the closer to centre will decrease your step over.

Yes, that was my understanding as well thanks.
 

francist

Super User
Yay! Just think, now you’ve got this figured getting your outdoor motion lights to come on and go off when you want is gonna be a cinch!
 

YYCHM

(Craig)
Premium Member
Correct.

There is some backlash on the table feed gear (the woodruff key is a bit sloppy). If the stroke length is not long enough to catch 2 teeth (IIRC), it will not start to feed by itself. Take out the backlash by hand with the crank first, then engage the power feed. Seemed to work for me that way.

I figured out the take the backlash out with the hand crank trick but that only appeared to work for one direction.

I'll take a look at that table feed gear issue thanks.
 

YYCHM

(Craig)
Premium Member
Yay! Just think, now you’ve got this figured getting your outdoor motion lights to come on and go off when you want is gonna be a cinch!

Not quite there yet LOL.

Is there an order for setting start of stroke and length of stroke? I had to chase that around a bit to get it where I wanted it. One seemed to affect the other.
 
Last edited:

francist

Super User
I usually set length of stroke first and then adjust the position of the ram (where the stroke begins and ends) second but I don’t know there’s a hard and fast rule. It just seems easier to me that way. Typically I’ll aim for at least half an inch longer on each end of the part.
 

YYCHM

(Craig)
Premium Member
Today I added the second shelf I wanted to the shaper stand....

Shelf.JPG

Geeze Home Depot seems expensive. $42 for 2 - 36" long perforated 1-1/4" angle, 4 - 5/16" nuts, bolts and washers and 2 - 3/8" X 3-1/2" bolts?

Next up will be the racking braces.
 
Last edited:

francist

Super User
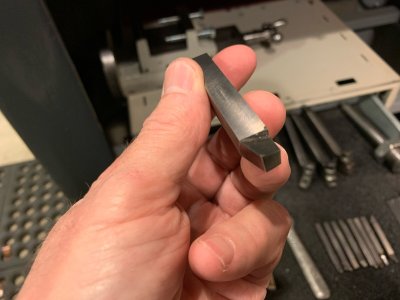
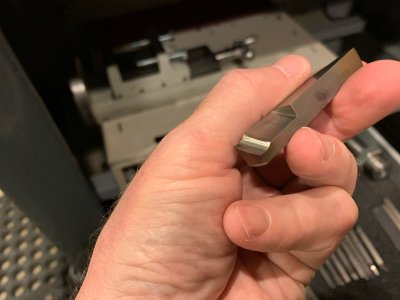
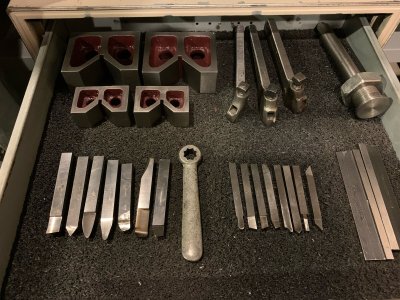
Okay, here you go. I regularly use 3/8” square HSS tool bits directly in the lantern post for most of my cutting. Those are the tools on the left. The smaller ones on the right are 1/4” square HSS and I use them for specialty profiles or of course tighter spots. They get used in the three Armstrong-style tool holders you see above them. These are not the regular angled holders you typically see with lathes, these hold the cutter at zero rake and have a “T” designation. They were made for tungsten carbide bits (hence the T) and are really hard to find.

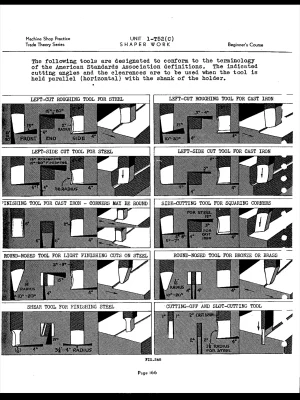
Most of these profiles are from the copious pages in that Shaper Work publication I linked to you earlier. Really great info in there. Others I design myself or have copied from someone else. My go-to rougher is the square nose tool I’m holding, and a nice finisher is the shear tool I’m holding in the other pic although getting your head into how the angles work can be challenging. One thing to remember about shaper tooling is that cutters like a bit of positive back rake, often in a kind of “scoop” or spoon shape, and require very little clearance angle because of the way they approach the work. Otherwise they’re a lot like lathe tools in my opinion anyways.

6F9AC84F-C1A7-46FE-A5C7-61E2F7D819E6.jpeg
C13A1424-AB70-4412-87AE-51B8B53E926E.jpeg
7D377880-EE62-4C88-B092-B28E36B194B6.jpeg
CD2C8FA0-FA13-4903-A532-274DBF189A85.png
 

YYCHM

(Craig)
Premium Member
Spent the last two days adding stiffening panels to the shaper stand.....

FStand.JPG

BStand.JPG

SStand.JPG

A big THANK YOU to @kevin.decelles for letting me have these panels (back). They were the perfect size and 20 gauge at least.

I don't think I need to worry about the stand racking now.

Craig
 

YYCHM

(Craig)
Premium Member
Today I remounted the belt guard....

BG1.JPG

All of the mounting brackets were badly twisted and bend out of shape.

BG2.JPG

Ended up straightening them out as best I could with the bench vise. This is the rear bottom bracket.

BG3.JPG

This is the front bottom bracket.

BG4.JPG

The front top bracket I had to replace....

BG5.JPG

It broke while attempting to straighten it out. There isn't much room under that belt guard. Getting things to stop rubbing ended up being an exercise in tweaking the mounting brackets screws until everything was clear. Hopefully she stays put.

HLatch.JPG

And I finally tweaked this hatch cover latch so the hatch stays in place now.
 

Dusty

(Bill)
Premium Member
Well done Craig you should have been a knee surgeon, I could use one!

Patient laying in surgery when the surgeon walks in. Hi doc can I ask you a question, well yes he says! Will this procedure prevent me from playing the piano? Doc replies no don't believe it would! Patient says that's great because I've never played the piano before. Groaner!
 

Dusty

(Bill)
Premium Member
Haha @Dusty! I am sure that when @David_R8 finishes the CNC plasma, @YYCHM gets the shaper going and @ShawnR gets the new lathe and 72x2 up to 100% we can start on your bionic knee! You will be able to kick a$$ across country!!

I'll do most anything to walk properly, play a piano, drive my vehicle or sip one of grandpa's pops. Not necessarily in that order. LOL

Forget about the piano, shop work, doing what I love best.
 
Last edited:

francist

Super User
And I finally tweaked this hatch cover latch so the hatch stays in place now.
Haha, those hatches are goofy. I have to give mine a good yank to open it up but then if I don’t get it juuust right when I put it back on it pops off halfway through a cut!

Your belt cover is interesting — mine is a different shape to go with the under mount drive system. Never really thought about that before.

-frank
 

YYCHM

(Craig)
Premium Member
Got curious as to how well the table trammed...

TramMeasurement.JPG

Left hand side fore and aft 0.0005"
Right hand side fore and aft 0.0025"
Rear left to right 0.0"
Front left to right 0.0025"

Hmmmm….. these numbers would seem to indicate that the table isn't flat as opposed to tipped? Any one else agree with that statement?

Looks like it rising (or dropping?) towards the front right hand corner.

I suppose that this may change depending upon how high or low the table is as well?

I don't think there is really anything that can be done about it though?

Also checked to see how the down feed dial was calibrated. Looks to be 0.001" per division.

Craig
 
Last edited:
Top