• Scam Alert. Members are reminded to NOT send money to buy anything. Don't buy things remote and have it shipped - go get it yourself, pay in person, and take your equipment with you. Scammers have burned people on this forum. Urgency, secrecy, excuses, selling for friend, newish members, FUD, are RED FLAGS. A video conference call is not adequate assurance. Face to face interactions are required. Please report suspicions to the forum admins. Stay Safe - anyone can get scammed.

Hendey T&G Lathe

Rauce

Ultra Member
I figured out the servo issue before clearpath got back to me.

The drive system has slop in it because of there’s a dog clutch in the countershaft assembly where you switch between high and low range speeds. I think this was tricking the servo into tuning itself incorrectly. I re-ran the auto tuning with unidirectional movement and it significantly better. Almost perfect at low speeds but still a little unstable and noisy at higher speeds.

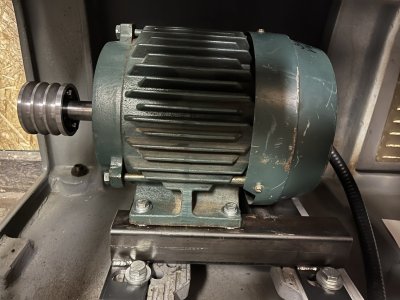
Then I spent some time doing calculations based on the torque curve and rpm range of the servo and compared it with the 3ph motor I had before.

The 3ph motor gives me a wider useful rpm range (it’s a 1800rpm motor and I’m assuming the maximum I would over speed it is 2x nominal). The servo tops out at 2400rpm. The servo has slightly better torque at low rpm (sub 500rpm) but the low range 8:1 back gear makes this kind of irrelevant. In short the 3ph motor will give me more power at the lower end of high speed setting if I use the right size sheave while still reaching the original maximum speed of the machine. As a bonus it will not require any more fussing around with a computer.

Not sure yet if I’ll hold onto the servo for a future project or sell it.
 

Rauce

Ultra Member
3ph motor back in with a new sturdier adapter for mounting. The frame size of the original DC motor was massive.

I also machined a new sheave for my ideal speed range/power curve. Triple sheaves for A/4L belts (not A/B) don’t seem to be readily available.

Ordered a better potentiometer with a really big knob for speed adjustment and a second SSR for the start/stop latching circuit. I also found a remote cable on eBay for the VFD display/keypad so that can be mounted with the rest of the controls.
 

Attachments

  • 6CECC77F-E2F5-4BAC-8A18-5ACBBCA9466A.jpeg
    6CECC77F-E2F5-4BAC-8A18-5ACBBCA9466A.jpeg
    413.9 KB · Views: 11

LenVW

Process Machinery Designer
Premium Member
Hey Ross,
I did not read all the previous posts about your new toy.

Are you adding a NEW WING to your shop ?
Space must be getting tight !!
 

Rauce

Ultra Member
There’s some re-organizing and purging that will need to happen. I’ll be moving the mill a bit as well.

I would like to rebuild the shop 16x20 or maybe a bit bigger in a few years too.
 

Rauce

Ultra Member
Chasing some noise in the drive system now. Rhythmic thumping. It’s not present when I run the motor with the clutch disengaged and spindle not spinning. With the clutch engaged it’s present and louder/higher frequency as speed increases.

Not sure if it’s coming from the spindle or the driven side of the countershaft clutch assembly. Going to continue changing one variable at a time to see if I can figure it out.
 

Rauce

Ultra Member
Awesome enclosure! Did you make that or buy it?
I just made the new plate. Cut to size, rounded the corners and did the holes for the switches.

For some context it goes on the left front cover of the base as seen in this photo. Same place the controls would have been originally.

The VFD will be mounted inside the same cover.
 

Attachments

  • IMG_6623.jpeg
    IMG_6623.jpeg
    697.4 KB · Views: 13

Susquatch

Ultra Member
Administrator
Moderator
Premium Member
I just made the new plate. Cut to size, rounded the corners and did the holes for the switches.

For some context it goes on the left front cover of the base as seen in this photo. Same place the controls would have been originally.

The VFD will be mounted inside the same cover.

I see. Well it looks great! Well done!
 

Rauce

Ultra Member
I sorted out the noise/vibration from the drive system. Turned out to be two things that were not adequately tightened. Up to be about 1000rpm I would say it’s reasonably quiet. Between there and the top speed of 2000 it’s a bit loud.

I’ve been working on the tailstock the last few days. My starting point was about 5 thou higher than the spindle center and not tight in the ways that it sits on.

Now it’s about 2 thou high and very close to being tight in the ways. The test bar I have that fits the tailstock is indicating very close to parallel with the ways.

It’s hard to tell since it’s not quite tight but I think I will have to make some adjustments by scraping to get it parallel with the carriage travel in the other direction.
 

Attachments

  • 72236B67-DBE3-43FB-A201-4DC3357EDDE0.jpeg
    72236B67-DBE3-43FB-A201-4DC3357EDDE0.jpeg
    561.9 KB · Views: 17
  • 17169F45-A029-414A-B50E-13D63A5E852A.jpeg
    17169F45-A029-414A-B50E-13D63A5E852A.jpeg
    451.2 KB · Views: 17
  • 02E7102B-C743-4012-B28D-BF1B4C7E8387.jpeg
    02E7102B-C743-4012-B28D-BF1B4C7E8387.jpeg
    522.4 KB · Views: 17

LenVW

Process Machinery Designer
Premium Member
I sorted out the noise/vibration from the drive system. Turned out to be two things that were not adequately tightened. Up to be about 1000rpm I would say it’s reasonably quiet. Between there and the top speed of 2000 it’s a bit loud.

I’ve been working on the tailstock the last few days. My starting point was about 5 thou higher than the spindle center and not tight in the ways that it sits on.

Now it’s about 2 thou high and very close to being tight in the ways. The test bar I have that fits the tailstock is indicating very close to parallel with the ways.

It’s hard to tell since it’s not quite tight but I think I will have to make some adjustments by scraping to get it parallel with the carriage travel in the other direction.
The knowledge gained by stripping down a machine will make you a better expert at the processes you complete with the equipment.
From the engineering design view . . . The better mousetraps are improved prototypes.
 

Rauce

Ultra Member
The tailstock has been the focus of my attention for the last week or so. It’s done now… maybe?

It’s a question of how good is good enough. The quill is parallel to the ways within 3 tenths over 4” in both the vertical and horizontal axis. Slightly better in the horizontal than the vertical.

The tailstock’s center is 7-8 tenths high relative to the headstock. This is right at the upper limit of the tolerance in the two books on machine reconditioning I’ve referenced. I’m somewhat leaning towards leaving it alone since getting good contact on all 4 bearing surfaces was not easy and trying to bring it down could mess things up.

To determine the center height more easily than how I did it before with a height gauge I put a test bar between centers and swept the top, averaging out the TIR at both ends.

I did a trade for spare parts with another owner of the same lathe and now have a set of gears for the low speed drive that are in much better condition than my original ones were. The headstock will have to come off one more time to get those installed. I may also try to get a pair of micro switches installed to act as an interlock so that the lathe cannot be started unless it is fully engaged in high (belt drive) or low (gear drive). This was a feature of the original drive system.

I’ve also started into scraping the saddle a little bit. There’s a challenging surface that can’t be reached with a normal push scraper so I’m working out how to approach that as well.
 

Attachments

  • 54C21340-C1C0-4388-8C7D-01E37E8C88E1.jpeg
    54C21340-C1C0-4388-8C7D-01E37E8C88E1.jpeg
    459.8 KB · Views: 11

LenVW

Process Machinery Designer
Premium Member
The tailstock has been the focus of my attention for the last week or so. It’s done now… maybe?

It’s a question of how good is good enough. The quill is parallel to the ways within 3 tenths over 4” in both the vertical and horizontal axis. Slightly better in the horizontal than the vertical.

The tailstock’s center is 7-8 tenths high relative to the headstock. This is right at the upper limit of the tolerance in the two books on machine reconditioning I’ve referenced. I’m somewhat leaning towards leaving it alone since getting good contact on all 4 bearing surfaces was not easy and trying to bring it down could mess things up.

To determine the center height more easily than how I did it before with a height gauge I put a test bar between centers and swept the top, averaging out the TIR at both ends.

I did a trade for spare parts with another owner of the same lathe and now have a set of gears for the low speed drive that are in much better condition than my original ones were. The headstock will have to come off one more time to get those installed. I may also try to get a pair of micro switches installed to act as an interlock so that the lathe cannot be started unless it is fully engaged in high (belt drive) or low (gear drive). This was a feature of the original drive system.

I’ve also started into scraping the saddle a little bit. There’s a challenging surface that can’t be reached with a normal push scraper so I’m working out how to approach that as well.
Your efforts are going to make that machine a precise instrument.
Must have a bit of free time on your hands.
Refurbishing accurate machinery is a painstaking and can be eye-opening.
Stay with it . . . Ross.
 

Rauce

Ultra Member
Eye opening for sure! I’m taking advantage of the time I have when I have it.

I did a bit of work this weekend. I pulled the headstock off and installed the gears that I got from another Hendey enthusiast in the US. The difference in wear was striking the old gear was .020” smaller on diameter. I had to drop the pinion inside the bed another .010” to get it fit. The shift is a bit stiff but once the gear are engaged there is clearance and it runs smoothly in low.

I now know for certain what my speed range is. Before I put the gears in I just had high (belt drive) where 15-120hz gives in 260-2100rpm. In low (gear drive) 15-120hz is 25-200rpm. I don’t anticipate using the upper range of the gear drive much because it is quite loud with the open straight pitch gears.

The thing that has me scratching my head is that the headstock alignment changed when I put it back on. I had it pretty much bang on before but now it’s around 7 tenths low at the end of a 12” test bar (averaging out TIR).

And to further complicate matters the axis of rotation of the headstock is slightly higher. No longer is the tailstock 8 tenths higher than the headstock they are now basically dead on. Which is counter intuitive. Reseating the head stock and cleaning the surfaces yields the same result. Totally bizarre.

I’ve decided to accept it. I don’t really see how it will change the accuracy of the machine. With the tailstock now dead on any turning with end support or between centers will be very accurate. And with the horizontal axis of the headstock alignment still very good (3-5 tenths out over 12” in the direction of tool pressure) it shouldn’t be an issue.

The rear gearbox for feed direction and engagement is also re- assembled and installed. Though it will come off later to get painted.
 

Attachments

  • 9C62AC29-B728-46B5-8043-E0593137CFAA.jpeg
    9C62AC29-B728-46B5-8043-E0593137CFAA.jpeg
    112 KB · Views: 11

LenVW

Process Machinery Designer
Premium Member
Keep in touch with your Hendey friends.
When equipment runs into 75 years old, it is harder to find sources of parts and ideas.
There may be some posts on VintageMachinery.com.
 

a smile

Lifelong hobby - cold iron
Premium Member
Great job @Rauce !

Just a note of Caution. WD-40 is a poor rust preventer but works great on stuff that got wet. WD stands for Water Displacing. I forget what the 40 meant but I have a faint recollection that it just stands for the 40th formulation they tested.

Although others will argue and perhaps even have other experiences, my own personal experience is that WD-40 is a lousy rust preventer. It evaporates way too fast and doesnt leave enough protectant behind. I can't begin to list all the things I thought I was protecting with WD-40 only to find them rusted like crazy later on. I've seen tests and reports that say otherwise. But there is nothing like personal experience to test their credibility.

The same company does make a special rust preventer though - It is called wd-40 Rust Specialist. I bought some but have not tried it yet.

My goto volume rust preventer is "Fluid Film". For my really good stuff I use Remington Gun Oil with VCI. The VCI part is essential. Not all Remington Oil has it. Stands for Volatile Corrosion Inhibitor. The stuff vaporizers and finds its way into every crack and crevice in the metal. Still wishing I could find some bulk VCI.

All the above is just my own experience based on living in Canada's worst Rust Zone (high humidity & high temp). All of Southern Ontario is bad but Windsor area is the worst.

So ya, by all means spray it down with WD-40 when it's raining, but follow up as soon as you can with proper rust protection.
I usually use WD40 to loosen or quickly lubricate rusty metal, or spray a layer on my metal table top and wipe it with a cotton cloth. This keeps my metal table clean and does not rust for a short time. Please do not use as a long-term rust inhibitor. I am also looking for a long-term rust inhibitor, if there is - please inform me together
 

Rauce

Ultra Member
I usually use WD40 to loosen or quickly lubricate rusty metal, or spray a layer on my metal table top and wipe it with a cotton cloth. This keeps my metal table clean and does not rust for a short time. Please do not use as a long-term rust inhibitor. I am also looking for a long-term rust inhibitor, if there is - please inform me together
LPS-3 is a good long term rust inhibitor. It dries to a sort of wax. Fluidfilm is also quite good.
 

Susquatch

Ultra Member
Administrator
Moderator
Premium Member
I usually use WD40 to loosen or quickly lubricate rusty metal, or spray a layer on my metal table top and wipe it with a cotton cloth. This keeps my metal table clean and does not rust for a short time. Please do not use as a long-term rust inhibitor. I am also looking for a long-term rust inhibitor, if there is - please inform me together

As above, Fluid Film and LPS-3 work reasonably well for longer periods.

But I have a test underway that started last fall evaluating a number of alternatives outdoors. It's not conclusive as its only a one-off comparison but it's better than any other info I have right now.

For now, the performance seems to track price. WD-40 Corrosion Inhibitor and Liquid Wrench Corrosion Inhibitor both seem to be holding up the best at 7 months in.
 
Top