-
Scam Alert. Members are reminded to NOT send money to buy anything. Don't buy things remote and have it shipped - go get it yourself, pay in person, and take your equipment with you. Scammers have burned people on this forum. Urgency, secrecy, excuses, selling for friend, newish members, FUD, are RED FLAGS. A video conference call is not adequate assurance. Face to face interactions are required. Please report suspicions to the forum admins. Stay Safe - anyone can get scammed.
-
Several Regions have held meetups already, but others are being planned or are evaluating the interest. The Calgary Area Meetup is set for Saturday July 12th at 10am. The signup thread is here! Arbutus has also explored interest in a Fraser Valley meetup but it seems members either missed his thread or had other plans. Let him know if you are interested in a meetup later in the year by posting here! Slowpoke is trying to pull together an Ottawa area meetup later this summer. No date has been selected yet, so let him know if you are interested here! We are not aware of any other meetups being planned this year. If you are interested in doing something in your area, let everyone know and make it happen! Meetups are a great way to make new machining friends and get hands on help in your area. Don’t be shy, sign up and come, or plan your own meetup!
You are using an out of date browser. It may not display this or other websites correctly.
You should upgrade or use an alternative browser.
You should upgrade or use an alternative browser.
Hendey T&G Lathe
- Thread starter Rauce
- Start date
bed goes for grinding tomorrow.
Great work @Rauce !
Looking very good
Where on earth did you find someone to grind the bed? And what is the extent of their work?
Rauce
Ultra Member
Single stage urethane from a paint shop my painter friend deals with. I don’t think it’s anything special but since it’s a urethane it will at least be more durable than enamel.What paint system did you end up going with?
Last edited:
Rauce
Ultra Member
Mississauga, DiPaolo Machine Tools.Great work @Rauce !
Looking very good
Where on earth did you find someone to grind the bed? And what is the extent of their work?
As far as I can tell they’re the only place around with a dedicated way grinding machine. Next closest I could find was Detroit and they never got back to me.
it’s not cheap but I’ve come this far and I didn’t pay that much up front for the machine so I’m making it happen. I have an original dimensioned drawing of the way profile for them to work off of. They’re pros and provide a full inspection report with how much they took off each surface.
Mississauga, DiPaolo Machine Tools.
Lathe Way Grinding - DiPaolo Machine Tools
This needs to be documented by someone who can actually find it down the road. @YYCHM???
I assume you sent them your bed stripped.
Rauce
Ultra Member
The bed is going on its own but they told me I could have actually brought it on the base if I wanted. Their machine is big (2m x 3m x 12m work envelope)Lathe Way Grinding - DiPaolo Machine Tools
This needs to be documented by someone who can actually find it down the road. @YYCHM???
I assume you sent them your bed stripped.
Last edited:
IIRC POR-15 is a "rust converter" and does nothing to protect bar metal. I'm working on a rusty truck frame and from the reviews of POR-15 and like products they need rust work properly and just peel off bare or painted metal.If I was going to, I think POR-15 is the stuff to use
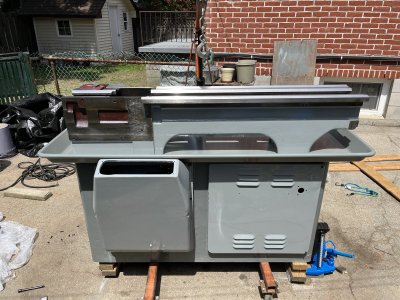
@Rauce - base looks good, the pan repair doesn't show.
The bed is going on its own but they told me I could have actually brought it on the base if I wanted. Their machine is big (2m x 3m x 12m work envelope)
Good news is that whatever they take off will move the head, saddle, steadrest, and tailstock equally.
Rauce
Ultra Member
Yes on this machine the head and tailstock sit on the same surfaces which works out great since those have the least wear and can get a minimal clean up pass.Good news is that whatever they take off will move the head, saddle, steadrest, and tailstock equally.
The change in height will need to be accounted for at the connection between the carriage and apron and where the back gears (mounted inside the bed) engage on the spindle. The back gears were shimmed at the factory so that's easy enough to just surface grind the shims to suit (they're around .125 or so thick right now). The carriage to apron is a little trickier and I'm waiting to see how much they take off to decide how to approach that one.
I got a little tour of the place, very cool facility. They do a lot of big machine rebuilds and cnc retrofits. I saw a big horizontal boring mill rebuild in progress and a big vertical turret lathe rebuild in progress. The VTL had a 200" chuck.
One of the other employees asked the manager half joking why they were taking on my piddly little job and he replied that "it was for the love of the trade" haha!
Yes on this machine the head and tailstock sit on the same surfaces which works out great since those have the least wear and can get a minimal clean up pass.
All good stuff @Rauce . Glad they took on your job for you. Nice that there are big shops that care about the trade!
But I don't understand your comment above. Don't they have to grind everything down to whatever the most wear is so it's all perfectly flat and even?
If so, that actually means taking the most off at the head and tailstock where it won't be worn at all.
In my view, this is no big deal because both ends get lowered by the same amount when they are grinded.
Now, if they are building up your ways before grinding, then that's a whole nuther matter!
Last edited:
Rauce
Ultra Member
I see what you’re getting at, I didn’t explain what I meant all that well…But I don't understand your comment above. Don't they have to grind everything down to whatever the most wear is so it's all perfectly flat and even?
Each surface that gets ground gets ground to lowest point along the whole length. On this machine the carriage rides on a set of double V ways that are only used for the carriage. Those have almost all of the wear. The surfaces the the headstock and tailstock are on have very little wear and so they don’t have to have as much taken off. Since the two are seperate pairs of surfaces the amounts taken off don’t have to match, they just need to be parallel etc.
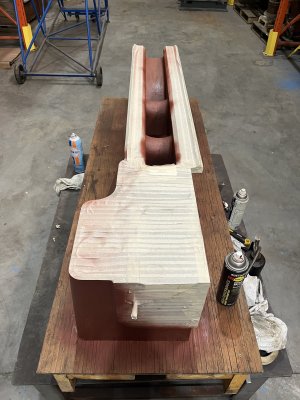
Here are photos of the exposed length of the bed. The carriage sits on the Vs and the headstock and tailstock on the flats and inside angles.


I see what you’re getting at, I didn’t explain what I meant all that well…
Each surface that gets ground gets ground to lowest point along the whole length. On this machine the carriage rides on a set of double V ways that are only used for the carriage. Those have almost all of the wear. The surfaces the the headstock and tailstock are on have very little wear and so they don’t have to have as much taken off. Since the two are seperate pairs of surfaces the amounts taken off don’t have to match, they just need to be parallel etc.
Here are photos of the exposed length of the bed. The carriage sits on the Vs and the headstock and tailstock on the flats and inside angles.
View attachment 24225
View attachment 24226
Gotcha. That makes sense as you explain. And yes, as long as they are parallel, and as long as the head and tailstock are on the same ways, that will be just fine.
Can't wait to see the final results!
IIRC POR-15 is a "rust converter" and does nothing to protect bar metal. I'm working on a rusty truck frame and from the reviews of POR-15 and like products they need rust work properly and just peel off bare or painted metal.
Not wanting to detract from post, but interested in where you got this info? I looked at this system a long time ago, but not in much detail. They use a lot of words likes 'stops rust' or 'prevents rust from spreading' which once could say about many coating systems. But I haven't come across anything that says it requires metal oxide to work. Maybe we should start a painting post - or maybe one already exists in which case I will move this
Attachments

Rauce
Ultra Member
POR15 is the brand, the rust converter “rust preventative coating” product that they sell is I think what they are best known for but they have a whole range of products including paint systems, primers, fillers etc.Not wanting to detract from post, but interested in where you got this info? I looked at this system a long time ago, but not in much detail. They use a lot of words likes 'stops rust' or 'prevents rust from spreading' which once could say about many coating systems. But I haven't come across anything that says it requires metal oxide to work. Maybe we should start a painting post - or maybe one already exists in which case I will move this
Rauce
Ultra Member
I figured I would post an update for anyone wondering, though it's not much of an update.
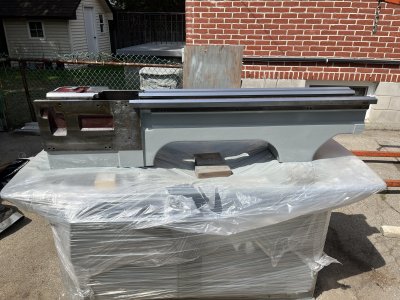
The base and chip pan are painted and the motor and intermediate pulley shaft are installed in the base. I've wrapped it up in skid wrap with a bunch of silica gel packs and VCI paper inside with a tarp over top. Should keep it in good shape for now.
The bed is still at the grinders. Right now they are saying February. They seem to be busy and it's a small time project for them so not much I can do when there's no other options in the province.
I've also been busy so I haven't done a whole lot on the remaining pieces, though I should have the repainted headstock back together soon.
Rauce
Ultra Member
Things are happening!
As detailed in the lathe bed grinding thread, the bed has been ground and I have started to work on it this week.
First step was cleaning off dust and coolant. Then I masked off all the areas that will remain unpainted and started with a couple coats of primer. In the most visible areas I’m going to sand the primer to find low spots and do a bit of spot filling with bondo. Once I’m happy with that I’ll take it home (it’s in the warehouse at work right now where it’s easier to move around with a forklift/overhead crane). At my place my painter friend will come and do the top coat before I land it on the base.
Attachments

Rauce
Ultra Member
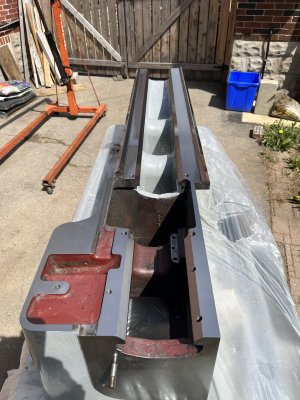
The bed is on the base!
The bed got its top coat on Thursday evening and it’s been baking in the sun since then. I lifted it up to pull out all the plastic sheeting to land it properly and bolt it down.
I need a break from the sun now but I’d like to do a blue check with the headstock casting later today. If everything checks out there I’ll be installing part of the back gear assembly inside the bed and reassembling the spindle inside the headstock next.
Once that’s done I won’t require a crane for any further assembly so I’ll be moving it inside my shop.
I had a moment of inspiration today regarding the door on front right of the base cabinet. This would have originally housed a bunch of electrical components back when this had a motor/generator drive. This door opens the wrong way for access once it’s in my shop and behind it is just empty space. I think I will build a sheet metal liner that bolts on where the door is with shelves inside so I can store things like chucks there.
Attachments
")
TorontoBuilder
Sapientia et Doctrina Stabilitas
the only way this could look better is if it was painted bright orangeThe bed is on the base!
The bed got its top coat on Thursday evening and it’s been baking in the sun since then. I lifted it up to pull out all the plastic sheeting to land it properly and bolt it down.
I need a break from the sun now but I’d like to do a blue check with the headstock casting later today. If everything checks out there I’ll be installing part of the back gear assembly inside the bed and reassembling the spindle inside the headstock next.
Once that’s done I won’t require a crane for any further assembly so I’ll be moving it inside my shop.
I had a moment of inspiration today regarding the door on front right of the base cabinet. This would have originally housed a bunch of electrical components back when this had a motor/generator drive. This door opens the wrong way for access once it’s in my shop and behind it is just empty space. I think I will build a sheet metal liner that bolts on where the door is with shelves inside so I can store things like chucks there.
")