• Spring 2024 meetup in Calgary - tentative date Saturday, April 20/2024. Other regions are also discussing meet ups. If you want one in your area get going on organizing it! discussion
  • We are having email/registration problems again. Diagnosis is underway. New users sorry if you are having trouble getting registered. We are exploring different options to get registered. Contact the forum via another member or on facebook if you're stuck. Update -> we think it is fixed. Let us know if not.
  • Spring meet up in Ontario, April 6/2024. NEW LOCATION See Post #31 Discussion NEW LOCATION

Craig's Craftex CX706 Comes Clean

Chicken lights

Forum Pony Express Driver
Sorry correction here they are used to grease the from sprocket on the bar along with the bearings in the clutch (repaired chainsaws and built log cabins during
My UNIV days).
I know the tool you’re talking about, nobody ever greases bar tips. Run ‘em till they blow and replace the tip

Grease attracts/holds dirt, arguably greasing bar tips shortens life so arguably no grease is better
 
Never blew a tip, but have worn out a bar or 2, grease when I fill gas and chain oil.

Its part of maintenance for best performance, just like oil for lathes and mills, lubing your ways is the same.

BTW When that sprocket blows it can tear the chain, I've seen the injuries when that happens, I'll pass on the injuries. Lube it is.
 
Last edited:

Chicken lights

Forum Pony Express Driver
At most they burr up a few teeth, I’ve never seen a chain get wrecked blowing a bar tip. We used to get 20-30 minutes of run time on one tank of gas, nobody is carrying a grease gun to lube a bar tip that often, doesn’t matter if you’re in the bush or up a tree all day, it’s not practical
 

Susquatch

Ultra Member
Administrator
Moderator
Premium Member
At most they burr up a few teeth, I’ve never seen a chain get wrecked blowing a bar tip. We used to get 20-30 minutes of run time on one tank of gas, nobody is carrying a grease gun to lube a bar tip that often, doesn’t matter if you’re in the bush or up a tree all day, it’s not practical

Holy Crap! It's amazing to me what kinds of discussions we get into on here sometimes.

Ive always held the view that the bar should get lubed before every use - one squirt on each side, rotate the chain manually a bit and another squirt on each side.

I used my saws for days on end through many many many tanks of fuel and never greased them more than that once before use each day. So no, I don't take the grease with me.

Frankly, I'm prolly much more likely to be guilty of running my saw without chain oil. That flipping tank is just too small and there is no warning that its empty. And it doesn't seem to matter if I use summer, fall, or winter oil. Winter oil seems to disappear way too fast so I rarely use it. I think it's designed for the north pole. I wish they sold Jungle oil. And before everyone goes ape on me for buying cheap saws, I've had my share of cheap saws, but have switched to Industrial grade Husquavarna or Jonsored saws for the last 40 years or so.

I'm no full time lumber jack, but I use a chain saw a LOT. Enough so that I own a chain sharpener (looks a lot like a chop saw with a grinding wheel).

But it gets interesting. I actually think @Chicken lights might be on to something. The very first thing to go on each and every chain saw I ever owned is the bar itself. It wears thin and then starts warping till the saw won't cut straight anymore. And that's despite a crap load of chain oil in there and daily greasing.

Why is that? Is it normal or is that dirt and grit getting trapped in grease? I have no idea. But I can see arguments both ways. Glad I didn't design chain saws for a living......

Edit - I have a Husqy bar on my big saw right now that needs to be replaced. When I do that, I'll take the old bar apart and see if I can figure out what it's cause of death was.
 
Last edited:

Chicken lights

Forum Pony Express Driver
Holy Crap! It's amazing to me what kinds of discussions we get into on here sometimes.

Ive always held the view that the bar should get lubed before every use - one squirt on each side, rotate the chain manually a bit and another squirt on each side.

I used my saws for days on end through many many many tanks of fuel and never greased them more than that once before use each day. So no, I don't take the grease with me.

Frankly, I'm prolly much more likely to be guilty of running my saw without chain oil. That flipping tank is just too small and there is no warning that its empty. And it doesn't seem to matter if I use summer, fall, or winter oil. Winter oil seems to disappear way too fast so I rarely use it. I think it's designed for the north pole. I wish they sold Jungle oil. And before everyone goes ape on me for buying cheap saws, I've had my share of cheap saws, but have switched to Industrial grade Husquavarna or Jonsored saws for the last 40 years or so.

I'm no full time lumber jack, but I use a chain saw a LOT. Enough so that I own a chain sharpener (looks a lot like a chop saw with a grinding wheel).

But it gets interesting. I actually think @Chicken lights might be on to something. The very first thing to go on each and every chain saw I ever owned is the bar itself. It wears thin and then starts warping till the saw won't cut straight anymore. And that's despite a crap load of chain oil in there and daily greasing.

Why is that? Is it normal or is that dirt and grit getting trapped in grease? I have no idea. But I can see arguments both ways. Glad I didn't design chain saws for a living......

Edit - I have a Husqy bar on my big saw right now that needs to be replaced. When I do that, I'll take the old bar apart and see if I can figure out what it's cause of death was.
Couple things- the replaceable tip bars are considered the “pro” bars, the non-replaceable are “homeowner” grade bars. Is there that much difference in the bar rail quality? I don’t know for sure, but my experience is more with “pro” saws

Cutting crooked- your drive sprocket, chain, bar rails and bar tip work together, once your bar rails get a little loose and your chain gets a little thinner it introduces slop from side to side that a new bar/chain won’t give you, however you can generally still cut straight with worn gear.

Sharpening- you have hook, drags and cutter angle. Hook is how shallow or deep you’re filing (grinding), drags is the funny piece ahead of the cutter for depth of cut (think wood plane), cutter angle is exactly that. I’m a fan of the Oregon file guides, I never caught on to filing free hand. If your hook drag and cutter angle are even it shouldn’t matter if you have a new link next to a half worn link it “should” cut the same

If you really wanted to be geeky they sell different gauge chain drive links, so in theory an 0.053 bar that’s sloppy you switch to an 0.058 chain (numbers from memory) but again nobody that I know of does that

Bar oil- most saws are designed to get two gas fills for one oil fill (roughly), but anytime the saw was empty we filled both as habit, I agree in summer it seems to eat it and it’s a PITA but we never ran them dry, even hydraulic oil or used engine oil was better than nothing. They smoke like a chimney running hydraulic oil

I guess also cutter angle should be straight across, some guys cheat and file a duck bill which sorta works but it’s more work to fix once you hit steel or a rock
 

Susquatch

Ultra Member
Administrator
Moderator
Premium Member
I just skimmed a few logging forums for info on greasing chain saws.

I have no idea how knowledgeable the members there are. My review is just a cruise of what is there.

First of all, it seems there are three types of bars. I did NOT KNOW THAT! Solid bars with no chain gear, replaceable gear ends, and non replaceable gear spot welded bars. Lots of different opinions of treatments for each.

Seems to be a mixed bag of sentiments.

Some say never grease - just use till it wears out. Some say grease occasionally. Some say grease religiously.

Some who switched methods say they started greasing and failed bars and others say the opposite. I found zero technical advice at all. All purely anecdotal. Im sure the OEM's all say to grease regularly.

Regarding dirt in the gear most seem to suggest the grease sort of pushes it out and away. Sort of the same way farm equipment bushing grease works. I dunno - plunge cutting can't do that I don't think.

Can't wait to hear what our own membership thinks.....
 

Susquatch

Ultra Member
Administrator
Moderator
Premium Member
Couple things- the replaceable tip bars are considered the “pro” bars, the non-replaceable are “homeowner” grade bars. Is there that much difference in the bar rail quality? I don’t know for sure, but my experience is more with “pro” saws

Cutting crooked- your drive sprocket, chain, bar rails and bar tip work together, once your bar rails get a little loose and your chain gets a little thinner it introduces slop from side to side that a new bar/chain won’t give you, however you can generally still cut straight with worn gear.

Sharpening- you have hook, drags and cutter angle. Hook is how shallow or deep you’re filing (grinding), drags is the funny piece ahead of the cutter for depth of cut (think wood plane), cutter angle is exactly that. I’m a fan of the Oregon file guides, I never caught on to filing free hand. If your hook drag and cutter angle are even it shouldn’t matter if you have a new link next to a half worn link it “should” cut the same

If you really wanted to be geeky they sell different gauge chain drive links, so in theory an 0.053 bar that’s sloppy you switch to an 0.058 chain (numbers from memory) but again nobody that I know of does that

Bar oil- most saws are designed to get two gas fills for one oil fill (roughly), but anytime the saw was empty we filled both as habit, I agree in summer it seems to eat it and it’s a PITA but we never ran them dry, even hydraulic oil or used engine oil was better than nothing. They smoke like a chimney running hydraulic oil

I guess also cutter angle should be straight across, some guys cheat and file a duck bill which sorta works but it’s more work to fix once you hit steel or a rock

Good stuff @Chicken lights . I read similar things on the logging forums.

I think I'll just continue to replace bars when they get loose or thin.

To be honest, I can't complain about my chain saw experiences. At least not since I stopped buying cheap saws. The good ones are worth the coin. They start, they run, and they cut trees. The cheap department store ones don't start, don't run, and don't cut many trees. I think they are deliberately designed to do nothing more than improve my swearing skills.

I don't think any of my bars have had replaceable noses. I will have to look into that. Who knows, it might even improve my bar life!
 

Chicken lights

Forum Pony Express Driver
I just skimmed a few logging forums for info on greasing chain saws.

I have no idea how knowledgeable the members there are. My review is just a cruise of what is there.

First of all, it seems there are three types of bars. I did NOT KNOW THAT! Solid bars with no chain gear, replaceable gear ends, and non replaceable gear spot welded bars. Lots of different opinions of treatments for each.

Seems to be a mixed bag of sentiments.

Some say never grease - just use till it wears out. Some say grease occasionally. Some say grease religiously.

Some who switched methods say they started greasing and failed bars and others say the opposite. I found zero technical advice at all. All purely anecdotal. Im sure the OEM's all say to grease regularly.

Regarding dirt in the gear most seem to suggest the grease sort of pushes it out and away. Sort of the same way farm equipment bushing grease works. I dunno - plunge cutting can't do that I don't think.

Can't wait to hear what our own membership thinks.....
Most saws also (or at least the “pro” lines) also have an adjustment for the bar oiler, to increase or decrease the flow

Proper chain tension is key, too, while we’re talking chain
 

Susquatch

Ultra Member
Administrator
Moderator
Premium Member
Most saws also (or at least the “pro” lines) also have an adjustment for the bar oiler, to increase or decrease the flow

Proper chain tension is key, too, while we’re talking chain

Ya, both mine have an oil adjustment. Both are set to minimum. It's still too much.

I religiously keep my tension adjusted for a small gap but not enough to let the chain clear the guide. That means an adjustment after a few minutes of use.

Hey, I should take a second here to promote my favorite chain saw of all! It's a 20V Dewalt Rechargeable Saw. It's amazing. It's always ready to go on a moments notice. Electric start...... LOL! And it's more than enough saw for the odd small job. I love it! You would never use it to saw up a big tree for firewood, but for sawing the odd branch or cutting a tree that fell into a farm field into moveable chunks, it's the cat's ass! I use mine so much that I've worn it out in two years. But I'm not complaining. I'm just gunna go buy a new one! It was worth every penny I paid for it on sale, price matched, at TSC (now Peavy Mart).
 
For about 4 years I worked for a friend of mine servicing tree service saws and selling them (Jonsered and Huskies mostly) as a student.

There is a special tool to pinch bars back into shape (as the slots wear or the users pry's with them and causes them to spread). The second biggest issue is bar wearing unvenely than this causes spread (both wear induced and actual physical spreading). The solution is check and grind it square as required and most spread or wear spread can be avoided.

I all my years I have never had to replace a tip (personal tip) , chains and a few bars yes, but no tips.

My saw of choice is a Jonsered 920 (90cc) with an 18" bar balance, little vibration 18-19lbs (not an up the tree saw). Had it since new, cuts like a beast which it is.

Trick to setting tension is know which side you cut on (top or bottom) and apply pressure to that side as you set the tension. If you are cutting both sides (tree service) adjust the best you can and don't bais the tension either way.

BTW the chain oil greatly reducess bar wear, even if it seems excessive.
 

trlvn

Ultra Member
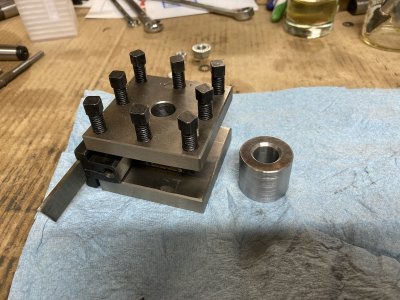
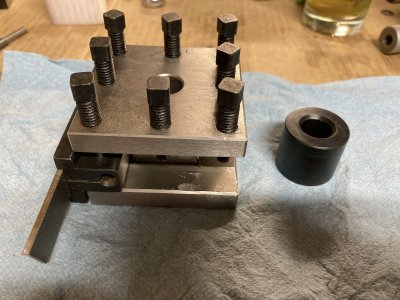
Little update. I'd mentioned much earlier that I wanted to be able to use the 4-way tool post that came with the machine. The QCTP is taller overall than the 4-way and so I sized the threaded stud for that. To use the 4-way, I needed a "washer" a little over an inch thick! Super simple job but it gave me an excuse to try blackening.

I found that a store 20 minutes from me carries Jax "Iron, Steel & Nickel Blackener" for a reasonable price:


Before and after pictures below:

IMG_4612_before.JPG IMG_4618_after.JPG

Very pleased with the result. I'll be doing this a lot in the future!

And the parting tool works really well in the 4-way tool post.

Craig
 

DPittman

Ultra Member
Premium Member
Little update. I'd mentioned much earlier that I wanted to be able to use the 4-way tool post that came with the machine. The QCTP is taller overall than the 4-way and so I sized the threaded stud for that. To use the 4-way, I needed a "washer" a little over an inch thick! Super simple job but it gave me an excuse to try blackening.

I found that a store 20 minutes from me carries Jax "Iron, Steel & Nickel Blackener" for a reasonable price:


Before and after pictures below:

View attachment 24510View attachment 24511

Very pleased with the result. I'll be doing this a lot in the future!

And the parting tool works really well in the 4-way tool post.

Craig
That does look good. I've only had used gun "blue" (copper sulfate?) and it sort of works but doesn't come out that black and rich.
 

trlvn

Ultra Member
Meandering tale of woe follows...

A little backstory...I had a 0XA-size QCTP on my old Atlas 618. One of the first things I did back then was get a 3d-printed dial indicator holder. I really liked it. It made it a breeze to dial in parts in the 4-jaw chuck and check how far off centre a part was both near the chuck and at the free end. Quick and simple. The 3D model came from Thingiverse (free) and I printed it at a local library (about $10 for the use of the printer). The only drawback was that printing took hours and the library didn't want the user to wander off while the print was in progress.

With that experience in hand, I looked for an AXA-size dial indicator holder for this lathe. There weren't a lot of models on Thingiverse but I eventually settled on one. Through Kijiji, I found a guy 20 minutes away that offered to print it for $14. Great, I thought. That beats a full day hanging around the library. After a few days, he had the part done and I picked it up. That's when the devil started popping out of the details.

First, the indicator was supposed to be secured to the holder via a screw through the lug on the bottom. On all my indicators, that hole in the lug is offset from the back of the indicator by the same amount. And none of them fit the printed holder. The difference was about 0.1 inches, give or take. Also, the indicator holder had a curved relief area that was supposed to clear the round dial. Not enough. To get around these problems with fit, I actually did a little offset turning (picture one section of a crankshaft) that accounted for the misalignment and spaced the indicator out enough so that the dial would fit.

But that wasn't the only problem. When I got the indicator into the holder and onto the QCTP, I found that: a) the indicator was held too high such that the plunger was above the center line of my lathe, and b) that the indicator was held too close to the centre such that the tip of the indicator was past center even with the cross slide fully wound out.

So I decided to give up on the printed holder and try again. I selected another model that was based on one that Blondihacks had created. Her Precision Matthew's machine is almost identical to my Craftex. On Thingiverse, they call it a "remix" when someone creates a new model that is just a minor modification of another model. I chose a remix of her model as it seemed to incorporate a couple of minor tweaks that would improve on the original. Visually, it seemed to place the indicator further away from center so I hoped that would alleviate the one problem.

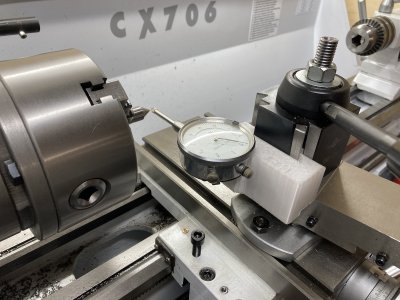
My guy (in Milton) printed the second indicator holder for me. It's better...but still far from perfect. It too holds the indicator too high above center and while it is slightly better than the first one, the tip of the indicator's plunger is still just past center even with the compound fully wound out:

IMG_4623 indicator holder in place.jpg

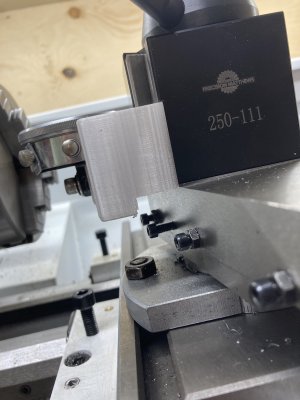
To work around the height problem, I milled away a corner of the indicator holder:

IMG_4624 overhang on compound.jpg

If I put a bigger part in the lathe (like a flywheel casting or whatnot) this setup isn't going to work. I won't be able to easily get the indicator in position to check for runout.

Eventually, I think I'll make my own indicator holder out of aluminum. One of my auction box lots included a dovetail cutter that, I think, is sharp enough for aluminum. Then I too can waste a bunch of stock trying to cut an appropriate size dovetail! (That's my takeaway from another thread on this site!)

Craig
 

trlvn

Ultra Member
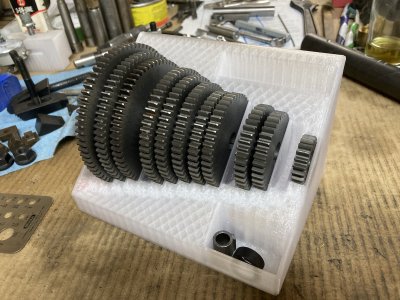
BTW, not all 3D-printed parts are a problem. I also had my guy print a tray to hold my lathe's change gears. That worked out really well:

IMG_4626 gear tray.jpg

The empty slots are for the gears that are currently on the lathe. Beneath each slot the print shows the number of teeth on the gear. If I had really steady hands, I might be able to use something like nail polish to make the lettering stand out better. Nonetheless, I'm quite happy with the tray.

Craig
 

Susquatch

Ultra Member
Administrator
Moderator
Premium Member
Then I too can waste a bunch of stock trying to cut an appropriate size dovetail! (That's my takeaway from another thread on this site!)

I totally love your change gear holder. I'd really like one like that for mine.

May or may not be my post that you refer to. Here is the wasted stock from my Toolpost Grinder Tool Holder. I prefer to think of all that waste as future parts hiding inside the scrap. LOL!

20220422_151319.jpg

I freely confess that part of designing the fixture was developing a process (with help from other members) that maximized the useful "scrap" at the end of the project.

Here is the final part too.

20220421_153605.jpg

I like the concept for your indicator holder too. I usually prefer to use a dial test indicator on a NOGA magnetic holder attached to the tool post or cross-slide.
 

Rauce

Ultra Member
Meandering tale of woe follows...

A little backstory...I had a 0XA-size QCTP on my old Atlas 618. One of the first things I did back then was get a 3d-printed dial indicator holder. I really liked it. It made it a breeze to dial in parts in the 4-jaw chuck and check how far off centre a part was both near the chuck and at the free end. Quick and simple. The 3D model came from Thingiverse (free) and I printed it at a local library (about $10 for the use of the printer). The only drawback was that printing took hours and the library didn't want the user to wander off while the print was in progress.

With that experience in hand, I looked for an AXA-size dial indicator holder for this lathe. There weren't a lot of models on Thingiverse but I eventually settled on one. Through Kijiji, I found a guy 20 minutes away that offered to print it for $14. Great, I thought. That beats a full day hanging around the library. After a few days, he had the part done and I picked it up. That's when the devil started popping out of the details.

First, the indicator was supposed to be secured to the holder via a screw through the lug on the bottom. On all my indicators, that hole in the lug is offset from the back of the indicator by the same amount. And none of them fit the printed holder. The difference was about 0.1 inches, give or take. Also, the indicator holder had a curved relief area that was supposed to clear the round dial. Not enough. To get around these problems with fit, I actually did a little offset turning (picture one section of a crankshaft) that accounted for the misalignment and spaced the indicator out enough so that the dial would fit.

But that wasn't the only problem. When I got the indicator into the holder and onto the QCTP, I found that: a) the indicator was held too high such that the plunger was above the center line of my lathe, and b) that the indicator was held too close to the centre such that the tip of the indicator was past center even with the cross slide fully wound out.

So I decided to give up on the printed holder and try again. I selected another model that was based on one that Blondihacks had created. Her Precision Matthew's machine is almost identical to my Craftex. On Thingiverse, they call it a "remix" when someone creates a new model that is just a minor modification of another model. I chose a remix of her model as it seemed to incorporate a couple of minor tweaks that would improve on the original. Visually, it seemed to place the indicator further away from center so I hoped that would alleviate the one problem.

My guy (in Milton) printed the second indicator holder for me. It's better...but still far from perfect. It too holds the indicator too high above center and while it is slightly better than the first one, the tip of the indicator's plunger is still just past center even with the compound fully wound out:

View attachment 24545

To work around the height problem, I milled away a corner of the indicator holder:

View attachment 24546

If I put a bigger part in the lathe (like a flywheel casting or whatnot) this setup isn't going to work. I won't be able to easily get the indicator in position to check for runout.

Eventually, I think I'll make my own indicator holder out of aluminum. One of my auction box lots included a dovetail cutter that, I think, is sharp enough for aluminum. Then I too can waste a bunch of stock trying to cut an appropriate size dovetail! (That's my takeaway from another thread on this site!)

Craig
An indicator with less travel, like 0.5”or 0.25” might give you a bit more room.

I know when I had one printed for my AXA toolpost some of the models were designed around a smaller indicator (both in travel and dial size).
 
I found that a store 20 minutes from me carries Jax "Iron, Steel & Nickel Blackener" for a reasonable price:


Has anyone ever tried using some old dark evaporust as a steel blackener??? I was really impressed recently at how black it made my shiny steel parts!!!
 

trlvn

Ultra Member
An indicator with less travel, like 0.5”or 0.25” might give you a bit more room.

I know when I had one printed for my AXA toolpost some of the models were designed around a smaller indicator (both in travel and dial size).
You are right about the shorter travel dial indicators leaving more room. I have one that would fit (a "Baker" with 1/2 inch travel) except that the little lock knob for the dial is on the opposite side from my other indicators and fouls against the body of the indicator holder. I don't _really_ need the lock gizmo. I just know that if I take it off, it will be lost forever. That might end up being a worthwhile tradeoff.

One of the 3D models that I looked at referred to some specific model of Shars indicator that would apparently fit...and no others. The comments seemed to indicate that Shars appears to have discontinued that model.

Craig
 

6.5 Fan

Ultra Member
Premium Member
Made a big mess of my 706 today:rolleyes:, decided to totally drain the gearbox oil, that means taking off the front panel as the drain plug is 3/4"above the bottom. A lot of paper towels later to soak up the oil that i didn't catch and i got to examine the gear box internals. Lots of black gunk in the bottom. I may put in a lower drain hole for the future. The apron drain is on the bottom so no issue there except getting small dish to catch the oil. Plan on picking up a QCTP in the near future.
 

Susquatch

Ultra Member
Administrator
Moderator
Premium Member
Made a big mess of my 706 today:rolleyes:, decided to totally drain the gearbox oil, that means taking off the front panel as the drain plug is 3/4"above the bottom. A lot of paper towels later to soak up the oil that i didn't catch and i got to examine the gear box internals. Lots of black gunk in the bottom. I may put in a lower drain hole for the future. The apron drain is on the bottom so no issue there except getting small dish to catch the oil. Plan on picking up a QCTP in the near future.

I do not understand why drain holes, sight holes, and fill holes are not a better deliberate part of the plan for all machinery.

It could always be worse though. My Bush-Hog ( brush cutter / stalk chopper) has no drain at all. Gotta turn that sucker upside down to drain it. Worse, the fricking thing accumulates condensation all summer / winter long and when that freezes, there goes the bottom bearing! And worse still, the gearbox has dual chambers (top and bottom) so you can't even suck the fricking thing out. I just want to scream!
 
Top