• Scam Alert. Members are reminded to NOT send money to buy anything. Don't buy things remote and have it shipped - go get it yourself, pay in person, and take your equipment with you. Scammers have burned people on this forum. Urgency, secrecy, excuses, selling for friend, newish members, FUD, are RED FLAGS. A video conference call is not adequate assurance. Face to face interactions are required. Please report suspicions to the forum admins. Stay Safe - anyone can get scammed.

Craig's Craftex CX706 Comes Clean

Chips, we have chips!

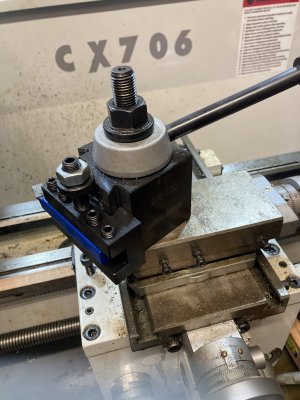
I finally got lathe pretty well cleaned up and lubricated, bolted to the bench and it was time to have at it. The first thing I want to do is get the quick change tool post mounted. I need a bigger, longer bolt for that so I decided to start with 5 inch 9/16-18. The idea is to turn the head down to fit in through the compound like the original:


View attachment 24031

All I could get was a Grade 8 bolt and the interrupted cut seems to have knocked the cutting edge off my tool bit. And what a pain finding shims to get it close to centre height. Now I need to dig out the grinder and refresh the cutter. Then finish reducing the head thickness and turn it to the right diameter.

Still...CHIPS!!

Craig

You sound just like the VERY HAPPY CAMPER that I would be if I were you! There is something about those first chips...... Oh ya!

Congrats to you!

I made the same part for another member who also has a new BB Lathe.

It turns out that the bolt wasn't imperial. It was really metric m16-1.5. I'd be checking that carefully if I were you. The nut that goes on that bolt is kinda special and I wouldn't be wanting to use anything else.

Especially if you want to add a hand tightener arm later.

I know you said that all you could find was Grade 8. But why did you choose a Grade anything bolt? There is no need for grade anything on that bolt. The application is extremely low torque compared to what a bolt like that needs to handle. I ended up getting a standard 3/4" bolt and making a new one out of that. As a farmer, I can get bolts cheaper than stock so that's what I usually use anyway.
Argh, it really is a metric bolt! The unthreaded portion of the bolt is/was a little bit over 14 mm (14.12). And the 18 tpi gauge fit the threads really well. I didn't have any other 9/16-18 stuff around to check with. It is so close that nut supplied with the QCTP threads onto the 9/16-18 bolt almost the full depth of the nut. And then jams. It must have 1.4 mm thread spacing--which I believe is completely non-standard!

The supplied nut is nothing special, though. Just a hex nut with a flange. (19mm wrench size but of course that's almost identical to 3/4 inch!) I think I'm just going to use a 9/16-18 nut and bolt for this.

Regarding the grade, I went to Bolts Plus because they almost always have fasteners in stock when I need something a bit different. The guy there told me that 9/16-18 (aka UNF) is pretty uncommon. The only ones they had in stock were Grade 8. I had been thinking about starting with a socket head cap screw but he said they would have to special order something in that length and threading. So rather than drive all over town, I took what he had.

I agree that the size and threading is utterly overkill for the application. I thought about using an smaller bolt but then the QCTP wouldn't register well. Would probably need to add a sleeve to keep it centred.

Craig

I see. And I believe in my heart of hearts that I really do. This would be the third time I've hit this issue.

That thread is not very common. I think they do that on purpose. &#@$

A different diameter and thread creates other problems inside the tool post. Other members have tried that and didn't fare well.

Basically, I would get a bigger bolt and use that to make a smaller one. You have a lathe right? So make a part that is easily made on a lathe! In this case, for itself. Just do a downtown job of measuring the original and duplicate it for the length and size you want.

The difficulty of course is that you have to use the old tool post to do it. And that means a cycle of assembly / disassembly / PIA.

But it really is a perfect little lathe project.

Alternatively, you can measure it up, send the dimensions and info to me, and I'll make one for you shipping included. (Insert big happy susquatch smile here).

That said, you really should just do it yourself! Make it a personal challenge to do it on the first crack.
 
Argh, it really is a metric bolt! The unthreaded portion of the bolt is/was a little bit over 14 mm (14.12). And the 18 tpi gauge fit the threads really well. I didn't have any other 9/16-18 stuff around to check with. It is so close that nut supplied with the QCTP threads onto the 9/16-18 bolt almost the full depth of the nut. And then jams. It must have 1.4 mm thread spacing--which I believe is completely non-standard!

The supplied nut is nothing special, though. Just a hex nut with a flange. (19mm wrench size but of course that's almost identical to 3/4 inch!) I think I'm just going to use a 9/16-18 nut and bolt for this.

Regarding the grade, I went to Bolts Plus because they almost always have fasteners in stock when I need something a bit different. The guy there told me that 9/16-18 (aka UNF) is pretty uncommon. The only ones they had in stock were Grade 8. I had been thinking about starting with a socket head cap screw but he said they would have to special order something in that length and threading. So rather than drive all over town, I took what he had.

I agree that the size and threading is utterly overkill for the application. I thought about using an smaller bolt but then the QCTP wouldn't register well. Would probably need to add a sleeve to keep it centred.

Craig
I didn’t know they made a UNF for 9/16? 9/16 is a fairly common bolt size I never gave that any thought. You’re right though on the tap chart they list it.

In my non-engineering experience once you get to 1/2” you can tighten the snot out of it, to the point it won’t loosen. So the UNF argument of holding more torque is moot.

Now I want to look at what I have at the shop, someone needed to borrow a 9/16 thread chaser and whatever I had to lend him worked

The things you learn around here
 
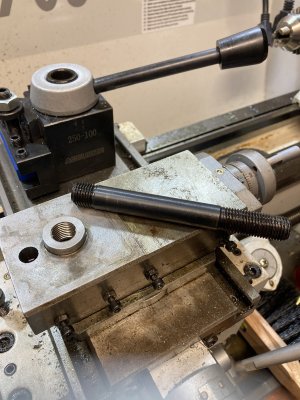
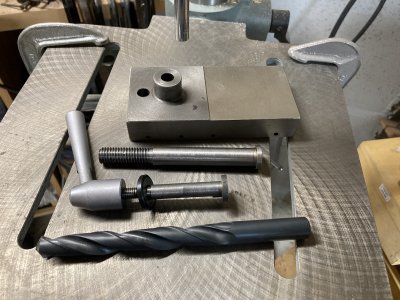
I finally got enough time in the shop to get my QCTP mounted to the new lathe. The following are the relevant parts:

IMG_4593 parts.jpg


At the top is the compound as it comes from the factory (ie with the boss and 10mm hole). Below that is the new 9/16" mounting 'bolt' that I turned. I had previously disassembled the factory components and carefully measured the head of the supplied bolt. It was a light press fit in the compound and I think it was secured with some LockTite. After a bit of heat, the arbor press convinced it to come out. Note that there is a small index pin (just visible at the bottom of the old part) that prevents it from rotating when you tighten the tool post down..

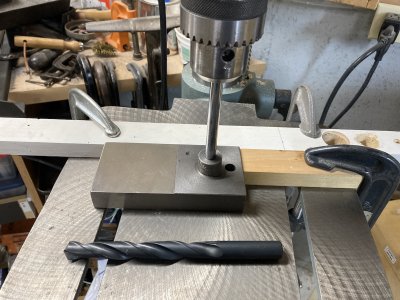
To locate the existing hole, I used a short 10mm rod held in the drill chuck. BTW, I'd planned to do this drilling operation on the mill. But the 9/16" drill (shown above) is too big for the chucks I have on the mill which max out at 1/2". Only my drill press had a big enough chuck.

IMG_4595 align before drilling.jpg


The actual drilling went easily--cast iron is so sweet! I had expected the hole to be a little oversize bit it was a very snug fit on my new bolt.

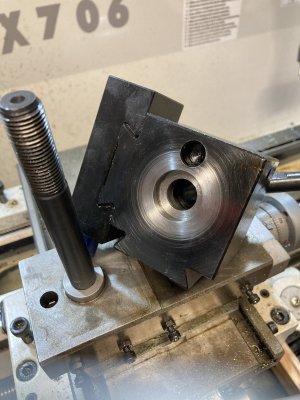
Now, I moved to the mill to remove the boss:

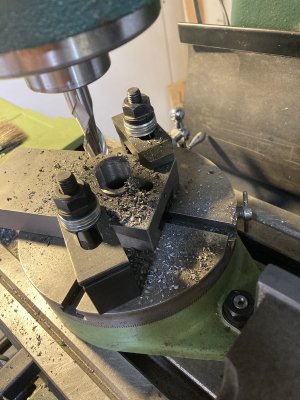
IMG_4598 milling off boss.jpg


I did plunging cuts to remove the bulk of the boss. Only the final clean up cut was made using the rotary table. This is the first time I've used my little rotary table 'in anger'!

I didn't want to use a large diameter end mill to remove the boss all in one cut since such cutters have a little relief in the centre and might leave a slightly higher surface towards the centre.

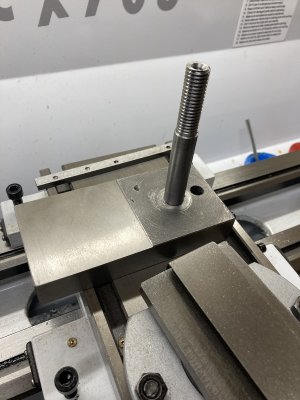
All went well and a trial fit of the new parts is shown below:

IMG_4600 test fit.jpg


Craig
 
There was just one more step:

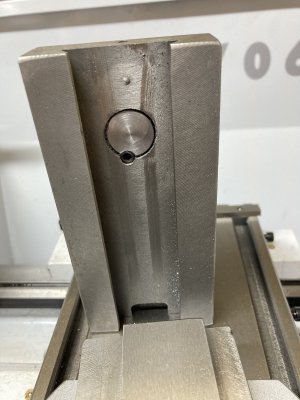
IMG_4601 lock with set screw.jpg


I used LockTite to secure the new bolt in place and then drilled and tapped for a set screw to prevent it from turning or falling out. I used a fine thread set screw since the 'head' of the bolt is only about 0.150" thick and I wanted a few threads to engage. LockTite might have been enough by itself but I figured why not go all the way and provide a mechanical lock between the parts.

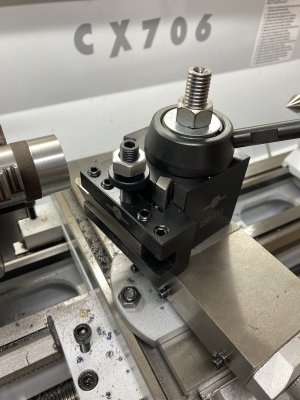
Here is the new quick change tool post in place:

IMG_4602 done.jpg


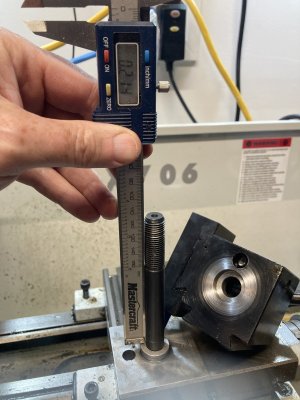
Yes, I made the bolt a bit long and then forgot to cut it down before assembling everything with LockTite. I may still do that and modify the handle that came with the 4-way tool post to fit the new bolt.

Seems to work well. You can see that I'm done a couple of test cuts without running into any problems.

Craig
(Apologies if you saw a version of this post on another site.)
 
There was just one more step:

View attachment 24279

I used LockTite to secure the new bolt in place and then drilled and tapped for a set screw to prevent it from turning or falling out. I used a fine thread set screw since the 'head' of the bolt is only about 0.150" thick and I wanted a few threads to engage. LockTite might have been enough by itself but I figured why not go all the way and provide a mechanical lock between the parts.

Here is the new quick change tool post in place:

View attachment 24280

Yes, I made the bolt a bit long and then forgot to cut it down before assembling everything with LockTite. I may still do that and modify the handle that came with the 4-way tool post to fit the new bolt.

Seems to work well. You can see that I'm done a couple of test cuts without running into any problems.

Craig
(Apologies if you saw a version of this post on another site.)

I've never seen a compound with a locating post on top of it like that. Usually, they are flat or have a t-slot. The difficulty of making a compound with that feature on it makes me wonder what the post was for. This makes me wonder if it wouldn't have been better to bore out the tool post to accommodate the post on the compound......

It's also interesting to me that so many BB users are making this modification in various ways. I've done it myself for two other people now and several members have done it too. You have to wonder why BB doesn't smarten up and make the cross slide adaptable to either kind of tool post. Then they could sell the better tool post as an optional upgrade.

Anyways, very nicely done and nicely documented too.
My last lathe, a Churchill Cub III from the 50's had a boss system like that for the original 4 way tool post. Though the boss fit in a bore and could be removed. So in that case modifying the compound for a QCTP didn't require permanent metal removal.

I think the T slot type compound is a remnant of the old lantern tool posts that were standard way back and that also happen to work quite well with QCTPs
 
I've never seen a compound with a locating post on top of it like that. Usually, they are flat or have a t-slot. The difficulty of making a compound with that feature on it makes me wonder what the post was for. This makes me wonder if it wouldn't have been better to bore out the tool post to accommodate the post on the compound......

It's also interesting to me that so many BB users are making this modification in various ways. I've done it myself for two other people now and several members have done it too. You have to wonder why BB doesn't smarten up and make the cross slide adaptable to either kind of tool post. Then they could sell the better tool post as an optional upgrade.

Anyways, very nicely done and nicely documented too.

It wasn't feasible to bore out the QCTP as that would have removed a threaded section that holds the whole thing together! (Boring it out had been my first plan.)

I believe Busybee sells a QCTP as an upgrade for this lathe. I haven't examined one to see how they deal with the problem of the boss.

I'm also curious if the boss is present on other import lathes. The Precision Matthews 10 inch, King Canada, Grizzly, Harbour Freight and others are very clearly manufactured from the same set of castings as my Craftex. I know PM supplies a QCTP with their version of the lathe as well as the 4-way toolpost. I asked on the PM forum on HobbyMachinist about this issue but didn't get an answer. I suspect that PM does a similar modification to each of the lathes that they sell but I don't know for sure. Incidentally, if the 4-way toolpost that PM includes is to be useful, I believe they would have to drill it out to the same size as the QCTP.

Craig
 
But the 9/16" drill (shown above) is too big for the chucks I have on the mill which max out at 1/2".
Most drill bits have soft shanks that can be turned down in the lathe, I've done this a few times to clean off the burrs from spun chucks and have turned 1/2" shank down to 3/8"shank. I know, a little late but this project but there will be others.
Is there enough meat to bore and tap the original handle to fit the new bolt?
 
@Canadium posted about a push-style oiler in another thread which reminded me that I had gotten a similar one in an auction box lot. I cleaned it up today and I'm actually very pleased with the way it works with the ball oilers on my CX706.

#26

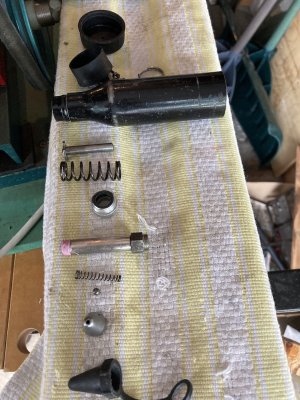
My oiler, a Umeta 43, had been used for grease so I used mineral spirits and brake cleaner to clean up the innards.

IMG_4605 oiler parts.jpg


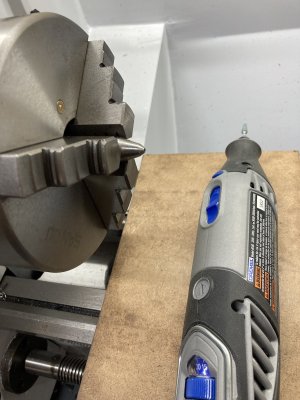
The tip of my oiler was too big to fit the oil ports on the lathe. I was surprised to find that the tip is hardened steel. Files wouldn't cut it at all. Eventually, I put a little grinding stone in my Dremel and successfully 'sharpened' the tip to the necessary size. What size is that, you ask? Just about 2.6 mm. I poked a 2.6 mm hole through a scrap of aluminum and used that to test the fit of the tip so I wouldn't have to keep moving it in and out of the lathe chuck.

IMG_4608 oiler tip shaping.jpg


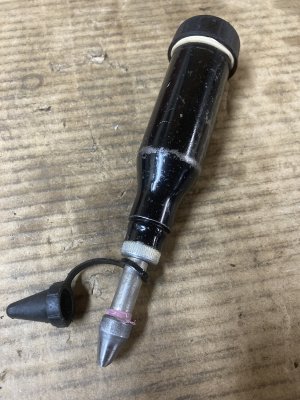
And here it is:

IMG_4610 Umeta push oiler.jpg


It delivers a nice size shot of oil with a single push stroke. There is just the slightest amount of weepage were the piston goes into the body of the oiler.

But alas...there are 2 oil ports that are in the bottom of the T-slots on the cross-slide. The tip of the oiler is too big get down into the T-slot so I can't reach them. Argh. For now, I'm going to use the oil can that came with the lathe for those 2 ports and wipe up the mess that results.

Craig
 
@Canadium posted about a push-style oiler in another thread which reminded me that I had gotten a similar one in an auction box lot. I cleaned it up today and I'm actually very pleased with the way it works with the ball oilers on my CX706.

#26

My oiler, a Umeta 43, had been used for grease so I used mineral spirits and brake cleaner to clean up the innards.

View attachment 24358

The tip of my oiler was too big to fit the oil ports on the lathe. I was surprised to find that the tip is hardened steel. Files wouldn't cut it at all. Eventually, I put a little grinding stone in my Dremel and successfully 'sharpened' the tip to the necessary size. What size is that, you ask? Just about 2.6 mm. I poked a 2.6 mm hole through a scrap of aluminum and used that to test the fit of the tip so I wouldn't have to keep moving it in and out of the lathe chuck.

View attachment 24359

And here it is:

View attachment 24360

It delivers a nice size shot of oil with a single push stroke. There is just the slightest amount of weepage were the piston goes into the body of the oiler.

But alas...there are 2 oil ports that are in the bottom of the T-slots on the cross-slide. The tip of the oiler is too big get down into the T-slot so I can't reach them. Argh. For now, I'm going to use the oil can that came with the lathe for those 2 ports and wipe up the mess that results.

Craig

I saw something similar to that at @Brent H s place when I was there before the meet n greet. I don't believe he modified the tip like you did though.

I liked his and I like yours too.

For anyone else who is interested, these little greasers are available at most places that sell chain saws. They are used the grease the top rail guide.

Like you, one like that wouldn't fit all the oilers on my lathe either. Especially not the one that lubricates my cross-slide handle. It's under another part and it can only be accessed from an angle and won't depress the ball stop if approached head on. I'm stumped.

We need a collective solution for this problem that will work for all of us and all the whacky places we have to get oil to. If happily spend a little coin to get something that worked better than what I have.
 
Craig I had the same situation with my qctp in the end I put the bottom of the tool post in the lathe and turned a boss on it to retain the most threads, I opened up the hole in the compound to match the boss and I also milled out more area of the bottom of the compound to allow more meat on that part too. I can take some pictures after work if you want

It wasn't feasible to bore out the QCTP as that would have removed a threaded section that holds the whole thing together! (Boring it out had been my first plan.)

I believe Busybee sells a QCTP as an upgrade for this lathe. I haven't examined one to see how they deal with the problem of the boss.

I'm also curious if the boss is present on other import lathes. The Precision Matthews 10 inch, King Canada, Grizzly, Harbour Freight and others are very clearly manufactured from the same set of castings as my Craftex. I know PM supplies a QCTP with their version of the lathe as well as the 4-way toolpost. I asked on the PM forum on HobbyMachinist about this issue but didn't get an answer. I suspect that PM does a similar modification to each of the lathes that they sell but I don't know for sure. Incidentally, if the 4-way toolpost that PM includes is to be useful, I believe they would have to drill it out to the same size as the QCTP.

Craig
I was able to bore out my QCTP by 1/4" and then reduced the boss on my CX706, then drill and tap for the stud. I can still use the original tool post if I want with a custom stud.
 

Attachments

  • IMG_1327.JPG
    IMG_1327.JPG
    407.7 KB · Views: 13
  • IMG_1328.JPG
    IMG_1328.JPG
    509.9 KB · Views: 14
  • IMG_1329.JPG
    IMG_1329.JPG
    417.2 KB · Views: 15
  • IMG_1330.JPG
    IMG_1330.JPG
    350 KB · Views: 14
I saw something similar to that at @Brent H s place when I was there before the meet n greet. I don't believe he modified the tip like you did though.

I liked his and I like yours too.

For anyone else who is interested, these little greasers are available at most places that sell chain saws. They are used the grease the top rail guide.

Like you, one like that wouldn't fit all the oilers on my lathe either. Especially not the one that lubricates my cross-slide handle. It's under another part and it can only be accessed from an angle and won't depress the ball stop if approached head on. I'm stumped.

We need a collective solution for this problem that will work for all of us and all the whacky places we have to get oil to. If happily spend a little coin to get something that worked better than what I have.
Sorry correction here they are used to grease the from sprocket on the bar along with the bearings in the clutch (repaired chainsaws and built log cabins during
My UNIV days).
 
I was able to bore out my QCTP by 1/4" and then reduced the boss on my CX706, then drill and tap for the stud. I can still use the original tool post if I want with a custom stud.
It seems that piston-style QCTPs can be modified the way you did. My wedge-style would have very little holding it together if I did that.

Craig
 
It seems that piston-style QCTPs can be modified the way you did. My wedge-style would have very little holding it together if I did that.

Craig

Makes sense. All the ones I worked on were piston style.
 
Sorry correction here they are used to grease the from sprocket on the bar along with the bearings in the clutch (repaired chainsaws and built log cabins during
My UNIV days).

Ya, I know how it works. My terminology just wasn't perfect. What I called the top rail guide is actually a sprocket at the end of the bar. But that quibble doesn't matter - the point I was making is that you can get one of these little greasers at most places that sell and service chainsaws.
 
Back
Top