• Scam Alert. Members are reminded to NOT send money to buy anything. Don't buy things remote and have it shipped - go get it yourself, pay in person, and take your equipment with you. Scammers have burned people on this forum. Urgency, secrecy, excuses, selling for friend, newish members, FUD, are RED FLAGS. A video conference call is not adequate assurance. Face to face interactions are required. Please report suspicions to the forum admins. Stay Safe - anyone can get scammed.
  • The 2026 Calgary Area Meetup is set for Saturday May 30th at 10am. The signup thread is here! Robinhood has graciously offered to host the meetup again this year. Please note that you MUST RSVP to the notice linked above if you wish to come.

3D Printer Happened

Bambu Handy App.
Bottom of screen select devices
Top right select beehive icon.
That brings up settings page.
Select AMS settings.
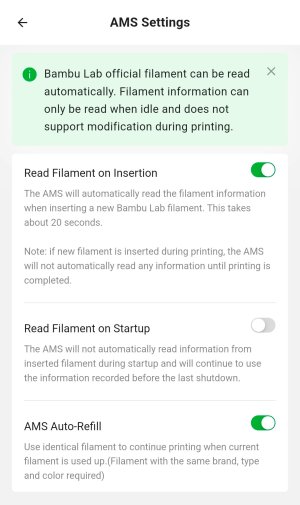
4th from the top select Remaining Filament Estimation

Is that an iPhone app John? Seems my app is different. There is no 4th option.

Screenshot_20260711_144154_Bambu Handy.jpg
 
Maybe if you enable read filament on startup it might then add the other checkbox.

Didn't work. I'm thinking the AMS version works differently. Odd that the older one works but the newer one doesn't. I'd bet they got complaints cuz it wasn't accurate so they dumped it.

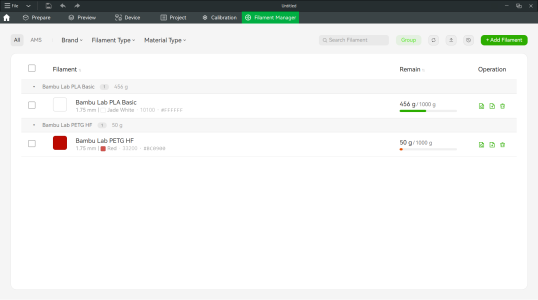
I'll prolly just weigh them to know for sure. I might also start a log to keep track of what I use. There is a filament library in the handy app and prolly in the desktop program too. I wonder if that has notes for such things.
 
Ok, so power is finally back here again. Generator is even put away till next time.

I'd like to tackle a collet rack. And I'd like to make one for 5C collets first since I have so many. Perhaps 30 collets. The tray needs to go in a drawer and not covered. No space wasting labels either.

Something like this:

View attachment 83933


I'd like to stay out of CAD for this project if I can. That's intentional so we can help members who have not purchased a printer yet because they don't want to have to learn CAD.

Can I turn the 25 collet tray into a 30 collet tray without using cad? Can that be done in Bambu's print program?

If I can do that, can I rearrange the holes like a bees wax frame staggered so it's more space efficient using the Bambu printer program? Or is that clearly into CAD territory?

To be clear, I'd like to stay out of CAD for this project, but I am not averse to using CAD myself. I just want to explore the boundaries.

PS - the cereal boxes I got from Amazon came today. The tray I made for the Fillament spool and humidistat fit it perfectly.

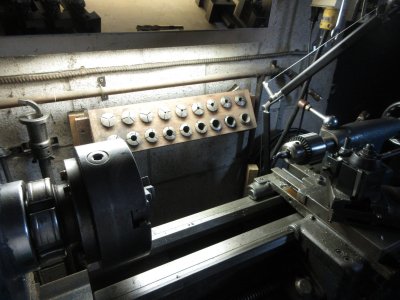
Here is my C5 Collet holder. Made from a Black Walnut log that I milled and came off of the Niagara Escarpment. Took 20 minutes to make, finished with WD-40. No Smart Phone App required.

IMG_6696.JPG
TonyK.

Grimsby Ontario Canada.
 
Didn't work. I'm thinking the AMS version works differently. Odd that the older one works but the newer one doesn't. I'd bet they got complaints cuz it wasn't accurate so they dumped it.

I'll prolly just weigh them to know for sure. I might also start a log to keep track of what I use. There is a filament library in the handy app and prolly in the desktop program too. I wonder if that has notes for such things.
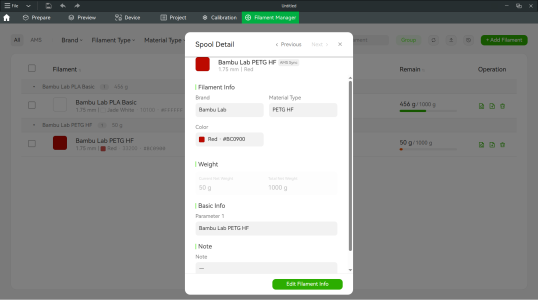
It has to be there but just not properly initialized. In fact my PETG black spool listed 0gm and black. I clicked on the left icon of the 3 on the right.

1783819049330.png

And then Edit Filament Info button on the bottom. Changed the weight to 50gm and colour to red. We'll see if it sticks. Need to think of something to print.
 

Attachments

  • 1783819116903.png
    1783819116903.png
    130.7 KB · Views: 0
Here is my C5 Collet holder. Made from a Black Walnut log that I milled and came off of the Niagara Escarpment. Took 20 minutes to make, finished with WD-40. No Smart Phone App required.

Don't forget that the 5C collet tray is only a means to an end, not an end in and of itself. I need one anyway, but the main goal is to learn how to use the printer in a structured way.

Truth is that a Walnut tray would be waaaay better than a block of PLA. But,...... I'll learn nothing. The goal is not a 5C Collet Tray, it is to learn how to use the 3D Printer in a structured way.

The good news is that I'm getting there. Yesterday, I made this:

Screenshot_20260711_221233_Bambu Handy.jpg

Screenshot_20260711_221202_Bambu Handy.jpg

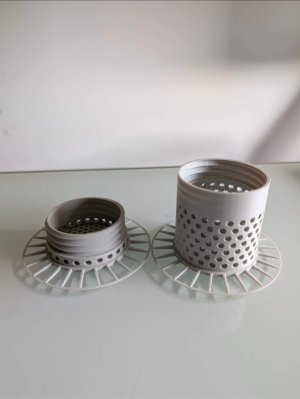
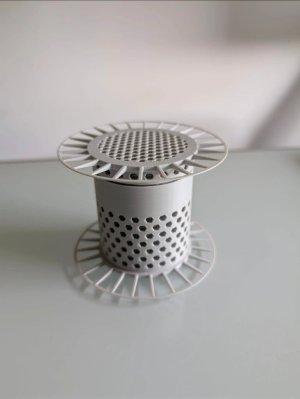
It's a dessicant holder that fits into the center of a filament spool.

Can't make that out of Walnut.

There are other ways to dry filament of course. But that isn't the point. The point is to make things with my 3D printer that can't be easily made using conventional methods AND to make prototypes for evaluation of my ideas and design concepts. As others have said and I am learning, the former is probably already available somewhere on the many 3D model sites. The latter requires me to learn a 3D CAD program. Even if I never get to the latter, the former will be enough to make me happy. Be nice to get the win-win though.
 
For my needs you are proving to me that I need to learn CAD and find a program that is much easier to use than CAM BAM, hence my reluctance to dive into this. Just a bad all around experience rising from my past. Maybe a 3D scanner would be a start, not sure of the cost.

As for the spool, I would turn a few shapes on my lathe and make the spool. Question, did you draw this out or use a file from someone else? Possibly adding the holes?

TonyK.

Grimsby Ontario Canada
 
For my needs you are proving to me that I need to learn CAD and find a program that is much easier to use than CAM BAM, hence my reluctance to dive into this. Just a bad all around experience rising from my past. Maybe a 3D scanner would be a start, not sure of the cost.

Yes, your needs may be different and you may need cad. But don't assume that is necessarily true. It is absolutely amazing what is out there already to go. Have you got a particular project in mind? Or maybe a category of projects?

As for the spool, I would turn a few shapes on my lathe and make the spool. Question, did you draw this out or use a file from someone else? Possibly adding the holes?

Yes, I could turn the basic shape on my lathe. But all those holes would drive me crazy.

The whole thing including holes and threaded cap was on MakerWorld. I just used a google search to find what I wanted.


I'm going to search for a quill stop next. Mine is missing and I need a quick replacement.
 
Yes, your needs may be different and you may need cad. But don't assume that is necessarily true. It is absolutely amazing what is out there already to go. Have you got a particular project in mind? Or maybe a category of projects?


Yes, I could turn the basic shape on my lathe. But all those holes would drive me crazy.

The whole thing including holes and threaded cap was on MakerWorld. I just used a google search to find what I wanted.


I'm going to search for a quill stop next. Mine is missing and I need a quick replacement.
I was about to start printing this one when it dawned on me that Bambu spools have a larger hub diameter than some of the other spools I have.
I found this one that has a smaller diameter variation for other brand spools.
 
Yes, your needs may be different and you may need cad. But don't assume that is necessarily true. It is absolutely amazing what is out there already to go. Have you got a particular project in mind? Or maybe a category of projects?


Yes, I could turn the basic shape on my lathe. But all those holes would drive me crazy.

The whole thing including holes and threaded cap was on MakerWorld. I just used a google search to find what I wanted.


I'm going to search for a quill stop next. Mine is missing and I need a quick replacement.
I want to fabricate car parts for older cars that I am working on. Not generic, but OEM style parts or at times custom parts for an engine swap. Or to take a part and remake it and offset the holes. Can the Bamboo print metal? I realize that the part needs to be sent out afterward for sintering. That would be my ultimate interest.

TonyK.
Grimsby Ontario Canada
 
No Bambu lineup cannot print metal. The typical industrial process is Laser Powder Bed Fusion (LPBF) - DMLS (Direct Metal Laser Sintering) or SLM (Selective Laser Melting). Mike on our forum had some nice model engine heads made through a service you send CAD files to. Its getting less expensive & better all the time. But its a mass/time based pricing thing so expensive for large things. And pro's & cons depending on the part.

I have read about metal infused 3DP filaments but I dont think its a hobbyist level thing yet. It has some industrial level associated processes to sinter/support etc AFAIK
 
Can the Bamboo print metal?

Nope, the Bambu can't do that. They were working on a sintered metal system back when I was still in industry. As @PeterT says, it's here. But not in my pay grade.

There are probably lots of old car parts out there for 3D printers, but I'd guess not the ones you want. It's certainly do-able though.

Throw us a few examples and let's see what we can find for you.
 
Well for reproduction of parts - take a look at the recent handheld 3D Scanners. A properly scanned part can capture fine detail as well as an accurately dimensioned part.

Now I'm not suggesting to rush out and buy one - but there are many people who offer the scanning and model editing as a service. The result is an "accurate" 3D digital solid which can be 3D Printed, sintered or milled.

To take that further - there are offshore companies that offer 3D printing services in metal for a realistic price ($$/gram) which can work well for smaller parts. They take the .STEP or .STL files and return a sintered, plastic or machined part in your choice of material. Turnaround seems to be about 5 days.

Just another option.
 
Nope, the Bambu can't do that. They were working on a sintered metal system back when I was still in industry. As @PeterT says, it's here. But not in my pay grade.

There are probably lots of old car parts out there for 3D printers, but I'd guess not the ones you want. It's certainly do-able though.

Throw us a few examples and let's see what we can find for you.
I need at times plastic trim parts in a Fiat X1/9 model years 1979 to 1989. Plastic becomes brittle and breaks. The 2 hand latch in the drivers door pillar is a perfect example. The latch handles are metal but the body of the latch is plastic. If that could be 3D printed, now we have something. There is one person selling CNC aluminum bodies and if I had a G Code file I could machine it from a solid block of aluminum stock with my TOS FN20. Hence, we are back at the CAD problem again.

TonyK.

Grimsby Ontario Canada.
 
Hence, we are back at the CAD problem again.

We should both try Alibre. Many give it high marks for ease of use. My problem is that I was a fighter pilot on Catia. So far I can't find anything nearly as intuitive, forgiving, or easy to use. And the differences are like lava rivers between me and getting stuff done. I have a really hard time getting used to Fusion sketches and doing things in the right order. Catia never seemed to care - it just worked. I might have to resort to taking a Fusion Class.

One of us should consider getting a decent scanner. As I understand it, there are phone based scanners but I've not seen or used one. My daughter is a wizz at CMM. She says I'm a big chicken - "Just drink the coolaide dad, you will be just fine and happier for it".
 
We should both try Alibre. Many give it high marks for ease of use.
Rats. I need a washer for a repair project. Needs a 10.1mm hole, 2.2mm thick and 20mm diameter. What to do...
Normally I'd go straight out to the lathe and work off a paper sketch. Hmmm. Sketch... Using my older Alibre Design user interface...

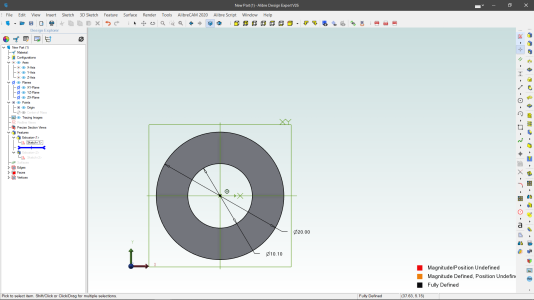
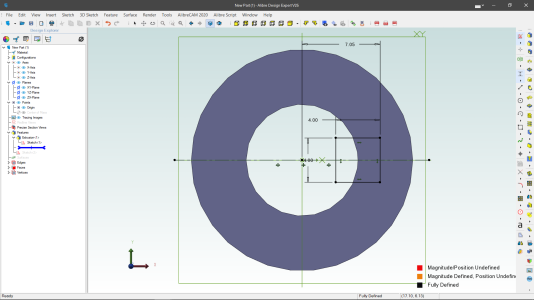
First a circle that is 20mm diameter. Notice the highlighted blue circle on the RHS.
Then the second circle for the hole that is 10.1mm diameter.
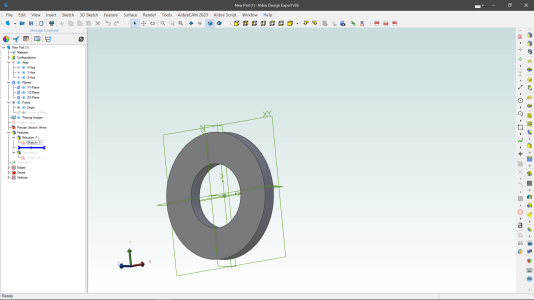
1783899551460.png
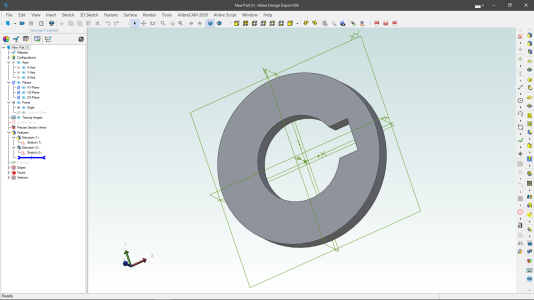
Then we extrude this to 2.1mm thick.
1783899576847.png
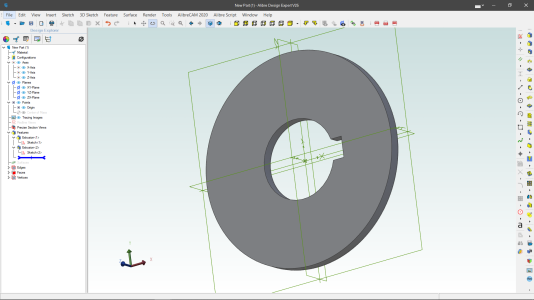
Then save and also save as an STL file to be able to 3D print a sample.

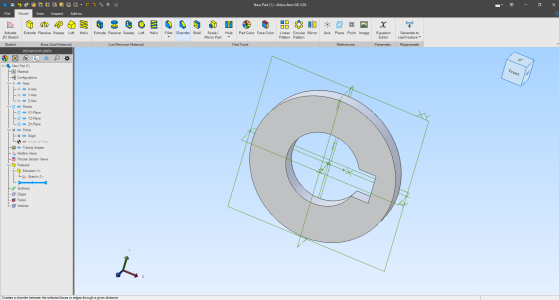
Oops... I forgot, I want a slot for a 4x4mm key that has 2mm into the ID of the washer.
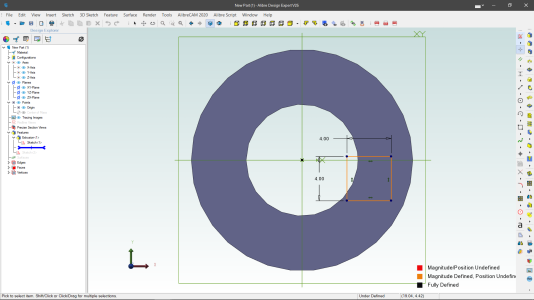
First draw a 4x4mm square.
1783898534497.png

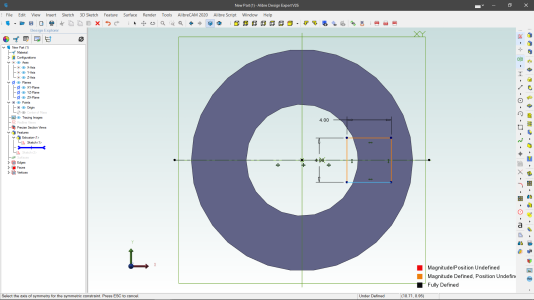
Next we need it symmetrical on the axis.
So use the symmetry tool.
1783898624918.png

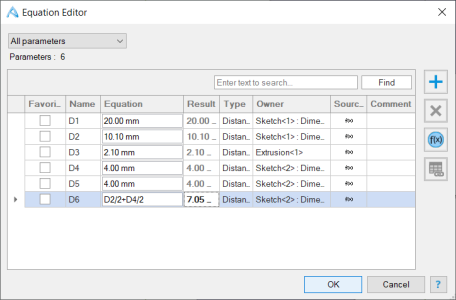
Finally we want it 2mm deep. This is a place where we can use the concept of parametric CAD. The diameter of the hole is 10.1mm so the depth of the slot would be diameter/2+keyway/2. But what if I change the hole size?

1783898891147.png
Results in
1783898941997.png

Now just extrude cut.
1783899159037.png
Now if I want a 40mm washer that has a 15mm hole with the 4mm key I change two parameters; the outer diameter and the hole size in the first sketch. The key slot is still the correct depth.
1783899334790.png

I'll let @DavidR8 do the same thing using Alibre Atom.
 
@jcdammeyer
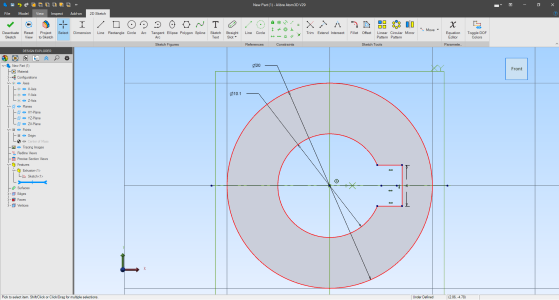
I drew the two circles, added the square but I dimensioned it to be 2mm from the horizontal line, achieving the same thing as the symmetrical constraint.

Trimmed off the bits of the square that were hanging out in the bore and extruded it.
1783900380190.png

1783900149059.png
 
Back
Top