• Scam Alert. Members are reminded to NOT send money to buy anything. Don't buy things remote and have it shipped - go get it yourself, pay in person, and take your equipment with you. Scammers have burned people on this forum. Urgency, secrecy, excuses, selling for friend, newish members, FUD, are RED FLAGS. A video conference call is not adequate assurance. Face to face interactions are required. Please report suspicions to the forum admins. Stay Safe - anyone can get scammed.

Other Sears Craftsman Garden Tractor

Wouldn't you just luv to be able to scam the scammer?

Glad to hear you walked.
Never got that far. As soon as he said that we could make an arrangement on here I realized his English was lacking and wasn't interested in a live view so I sent him an email I was no longer interested. And truthfully, the tractor looked way too nice in the photos for $1100.
 
So the engine is apart. Well head is still on and piston still in sleeve.
Sure is nice to have all the tools on hand. Gear puller, impact wrench, parts washer although it's a bit small for a complete engine I did manage to wash out the bottom pan.
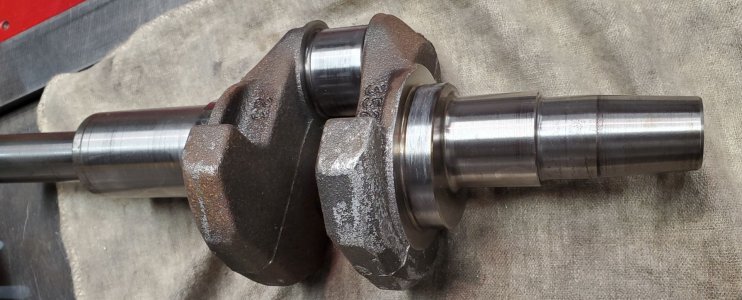
The aluminum collisions can be clearly seen on the crank weights and the offset bearing has some melted aluminum traces on it. I think 1000 grit paper will probably remove that.
There was a small amount of aluminum dust and grit up by the valve lifters. I think what I'll do is set the entire engine into the parts washer and just flush the top and the push rod clearance holes.
Once it's running again do an oil change after 1 hour and again after 10 and likely that will get rid of all of it that I haven't washed out.
CrankShaft.jpg
 
Parts washer question. I've always used Varsol but I have a vague memory of an additive to help wash engine parts. Like 1 part in 20. But searching the net doesn't bring anything particular to mind. A search on the Canadian Tire website doesn't help.
This is the type, although not the brand, of parts washer that I have.
It had old varsol in it and I added some more. Been years.
Anyway, it's time to clean it out and I can either use more Varsol again or maybe something like this instead?
 
New issue. The oil seal on the magneto side looks in good shape but the spring retainer that holds the rubber against the shaft popped out. After flailing for 20 minutes trying to get it back around (while the seal is still in place I think I've figured out that it's likely not possible so the best thing to do is order a new one. .
Ah well, only another $9. Ordered the bits and pieces today. The broken balancer arms won't be here until next Saturday so other than a bit of cleaning this part of the project is on hold until then. Meanwhile I can continue to clean the deck and make my own adaptor for the PTO cable.
To keep the spring in place, pack the seal with Vaseline or grease, unless you just happen to have tranny assembly grease. Keeps the spring in place while you install it
 
Only damaged the back part removing it. The actual seal surface is still intact but no matter there's a new one on the way. What's puzzling is how the spring came off in the first place.

MagnetoSeal.jpg
 
Don't forget, a '64 MGB has a straight cut gear for 1st so no synchromesh. You have to be stopped or be really good at double clutching. And speaking of the gearbox. Unlike the Datsun 510 or other newer cards with multiple wedge teeth the MGB had 3 larger tangs. They wore pretty quickly.
However, rebuilding an MGB transmission is an experience I am glad I had. Same with the Datsun which didn't need it but I thought it was fun to do.
 
My particular car also had no working synchro between 2nd and 3rd. Taught me a ton about double clutching! Should have repaired it, but never got up the nerve to crack open the transmission. Today that would probably be just fine...
 
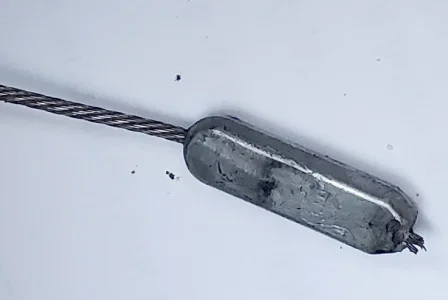
Recall this image for the cable end and what it's supposed to look like.
1685470738830-png.34969

Here's what it looks like in the tractor.
BrokeCableEnd.webp
No hook.
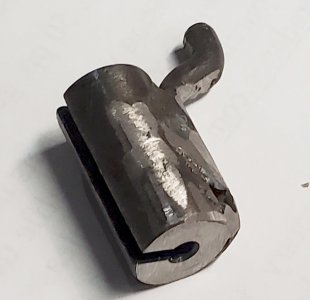
Now I knew this would happen since I haven't used the MIG welder in a few years. Couldn't get the feed or current right. Wire kept melting in the nozzle and jamming. Eventually I got enough steady beads to weld the hook onto the metal adaptor I turned on the lathe and slotted on the milling machine.
The hook was a piece of 3/16" steel that I heated with the oxy/accet. torch and did some blacksmithing on to give it the hook and a flat section to go against the flat section milled on the adaptor.
SideViewAdaptor.jpg

It looked much nicer before I started welding it. I thought about brazing it but the one brass rod I had was covered in crumbly flux and I didn't have any other flux on hand. Guess I could have silver soldered it.
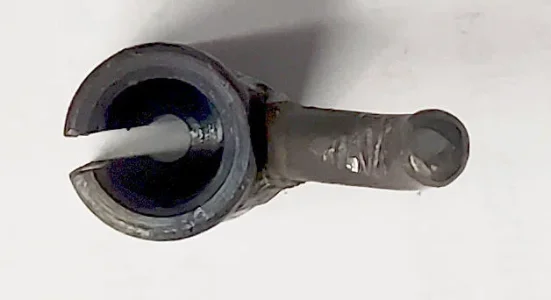
Here's the top view that shows the Letter P hole almost all the way through and the 1/8" hole the rest of the way. Used a slitting saw on the mill to cut the groove for the wire.
TopViewAdaptor.webp

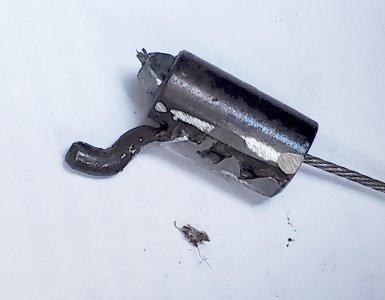
And finally with the broken end inserted into the adapter. One the paint dries I'll keep the broken piece inside the adapter with hot melt glue or else epoxy.

FittedAdaptor.jpg

It fits through the PTO lever arm and hangs down as it should. Now if I was billing my software/electronic consulting rate I lost a lot of money on this. Heck if I was being paid minimum wage I lost a lot of money on this since the replacement cable is only $26.

But it was fun. Really need to take a MIG welding course. The most disappointing part of the whole thing.
 
If it holds it's all good.
Aside from practice one of the things that helped my MIG welding was knowing the voltage of the four taps on my little Millermatic. I used a voltmeter to measure the voltage while I held a steady position.
Once I knew the voltage then a chart like this was a huge help to get me in the ballpark. Only so much can be done with four fixed voltage settings but it's a start.
 
Back
Top