• Scam Alert. Members are reminded to NOT send money to buy anything. Don't buy things remote and have it shipped - go get it yourself, pay in person, and take your equipment with you. Scammers have burned people on this forum. Urgency, secrecy, excuses, selling for friend, newish members, FUD, are RED FLAGS. A video conference call is not adequate assurance. Face to face interactions are required. Please report suspicions to the forum admins. Stay Safe - anyone can get scammed.

Other Sears Craftsman Garden Tractor

jcdammeyer

John
Premium Member
I was given this tractor. So far my only costs are the PA Engine hoist. the legs don't spread apart far enough so I have to use the floor jack to get the wheels above the rails and then lift it higher to get at the engine mounting bolts.
1685313022482.webp

Trouble is, moving it out onto the driveway also resulting in something connected to the PTO lever snapping and now the lever flops around. I can see a loose cable end under the battery compartment.

Finally (or at least so far) other than it needs a new battery, cam shaft it looks like the front RHS plastic bushings have shifted and so the front steering is a bit floppy. Not to mention metal on metal.

1685313221059.webp

Not sure what to do next. Since it's up there I might as well remove the engine and pull the cover to see if the CAM did any damage when the decompression pivot broke. The tractor is 12 years old and there isn't really a Sears anymore. The part number doesn't show up in searches on google. Although I imagine there are parts to be had.

Never rebuilt a garden tractor before.
 
I've got an engine here that might have the decomp usable. The electric solenoid that is suppose to shut off the fuel didn't, the engine filled with fuel and when it was turned over it hydro locked and fired breaking the rod and possibly piston.

It's here if you want it.
 
Last edited:
Everything is all tidied up. Many many years ago I bought a Mastercraft Impact socket set that was on sale for 50% off or some thing like that. Never have used it. I had a set that has served me well but no U-Joint adaptor for it. Usually used the 1/2" Craftsman drive if I needed it. Well this time it came in handy since two of the bolts are offset from the frame and hard to get at and it also had a nice extension. So a few blips from the impact wrench and bada bing bada boom; five bolts removed.

So here we are. Need to set it upright, drain the oil and pull the bottom off. Smallest engine the bench has ever seen. A few 2L Turbo Saabs have visited.

1685318344549.webp
 
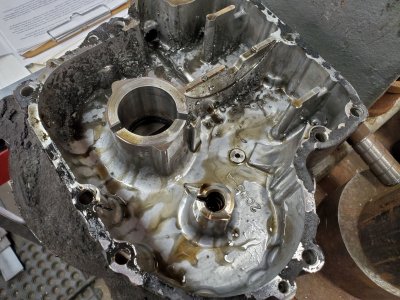
Oh wow! :(

You have to see this in real live to see how bad this is. Not just the little parts from the decompression cam part (which is missing) but the large bracket around the crank has also been pounded to death. There's so much crud in here that we really are looking at a total tear down just to clean it. Since it's from 2011 it likely needs boring and a ring job etc...

Not worth it when PA has a brand new one for about $1300 which is still cheaper than a $2200 to $3000 for a brand new one.

Now this one also needs the front RH pivot dealt with, PTO cable replacement and a new battery and the key is really badly bent. The blades could stand replacement. I wonder what shape the gearbox is in. At this point a new one is looking more attractive.

CrankcaseWithBits.jpg
 

Attachments

  • OilPanWithBits.jpg
    OilPanWithBits.jpg
    489.8 KB · Views: 13
Rats. I never should have looked this up on Amazon.ca. I can have it here by June 1st. Guess I'd better take it apart a bit further and see what else is broken. This piece I could even machine myself if I had the measurements.

1685398879400.webp
 
You’d think that with that much internal carnage that the poor thing would cease to function thereby limiting further damage.
 
No. Here's what I suspect because this series of B&S engines has a very poorly designed method of compression release. Top left of the image on the rag is the steel flyout weight that turns a half round pin. This pin is recessed into the CAM and when you are cranking it prevents the valve from completely closing. So the starter doesn't have to work really hard to turn over the engine. Once it gets up to speed the weight flies out and the pin turns so the flat side is up. Now the valve closes and compression and intake suction work and the engine runs.

The weight flies off because of the poor design. Now the engine is hard to start. The weight is large enough that it can jam between the casing and the counterweight. And if you can get the thing running it rattles around a bit cracking the cast aluminum which then shatters.

Again, if you can get it to run (which I did) it now spins without the counterweight attached and the shards are all on the bottom. But of course the vibration is horrendous, the governor and oil flinger which has had the wings clipped no longer works right and the whole thing shakes and runs rough.

Because it's a mower from 2011 I know it will also require a carb rebuild. Far east CAMs sometimes fail after a couple of hours running so it's best to use the original B&S which are $120 or so compared to $45 for the far east ones. However, as an experiment to see if I can rebuild this it's cheaper to just buy a far east CAM.

It's $1232 including FedEx ground and taxes for a brand new engine.

What's holding me up at the moment is my Torx T45 is too large and the T40 is loose in the connecting rod bolts. I wonder if there's a T42 or T43... And they are torqued pretty tight. To clean all the crap I think I really should pull the crank.

It's easy to see how this turns into a long drawn out Project #42.
 
So instead of spending $26 on a new cable and the time to install it I thought about this as a solution. The existing cable tang at the end is broke at the red line. I doubt it's steel. Likely some sort of alloy crimped onto the cable.
1685470738830.png

If I start with a piece of brass highlighted in orange and use the 4 jaw on the lathe I can turn the respective diameters and then mill the green flat area.
1685470899249.png
Part off the orange bit. Slot in to the hole with the slitting saw.
With the hole and slot down the middle I can slip in the wire and broken crimped part and then add a bit of epoxy to hold it in place.
1685470983110.png
I could even make this out of steel instead of brass. Rust over time could be an issue.
Am I overthinking this?
 
Quick question. I pulled the conn rod end cap since the crank has to come out to replace the counter weight parts and clearly it's been damaged too. I used a T40 (T45 too large) but now that the screws (7x1.0mm) it's clear why the T40 didn't fit well.

What are these screw heads?
Is there driver part number somewhere that I can order one?

I drilled out the one side that had been compressed and cracked.

CloseupConRodHole.jpg

The cracked pieces came off. Probably shouldn't reuse it but it's $100 or so for a replacement.

DrilledConRodEndCap.jpg
 
The B&S part number is 791118 and it shows up in the various places but without specs. I measured 1mm pitch with my thread gauge and it looks to be 7mm diameter which matches the taps and dies I have on hand. It's a bit of a tight fit on the die and I don't want to risk it. But its not a proper T40 fit.
 
The B&S part number is 791118 and it shows up in the various places but without specs. I measured 1mm pitch with my thread gauge and it looks to be 7mm diameter which matches the taps and dies I have on hand. It's a bit of a tight fit on the die and I don't want to risk it. But its not a proper T40 fit.
I wonder if there’s a B&S or lawn tractor forum that could shed some light on it.
Is there a manual available for this beast?
 
Back
Top