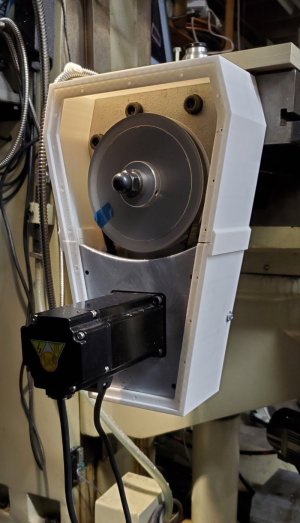
Looks great. Very clean.The paint has cured enough that I can at least put the covers on the Y axis. The X axis is still a work in progress. Rather than print 42 renditions of the bottom part of the X axis cover I think it will be easier just to mill the motor mount casting to the correct dimensions. Leaving it as cast was fine but now it's too wide to match the back casting.
View attachment 68912
-
Scam Alert. Members are reminded to NOT send money to buy anything. Don't buy things remote and have it shipped - go get it yourself, pay in person, and take your equipment with you. Scammers have burned people on this forum. Urgency, secrecy, excuses, selling for friend, newish members, FUD, are RED FLAGS. A video conference call is not adequate assurance. Face to face interactions are required. Please report suspicions to the forum admins. Stay Safe - anyone can get scammed.
-
Several Regions have held meetups already, but others are being planned or are evaluating the interest. The Calgary Area Meetup is set for Saturday July 12th at 10am. The signup thread is here! Arbutus has also explored interest in a Fraser Valley meetup but it seems members either missed his thread or had other plans. Let him know if you are interested in a meetup later in the year by posting here! Slowpoke is trying to pull together an Ottawa area meetup later this summer. No date has been selected yet, so let him know if you are interested here! We are not aware of any other meetups being planned this year. If you are interested in doing something in your area, let everyone know and make it happen! Meetups are a great way to make new machining friends and get hands on help in your area. Don’t be shy, sign up and come, or plan your own meetup!
You are using an out of date browser. It may not display this or other websites correctly.
You should upgrade or use an alternative browser.
You should upgrade or use an alternative browser.
JCDammeyer's 42 projects
- Thread starter jcdammeyer
- Start date
Thanks. Looks like that paint was discontinued in January 2023 so finding some sort of chemical that could accelerate the curing process is likely not going be available. Nothing else will get painted until everything is ready to be painted. Then just leave everything for the requisite 10 days or so and do something else. Like go on vacation...Looks great. Very clean.
Wouldn't be a decent forum if we didn't also post failures as opposed to successes.
I thought I had it clamped well enough. Probably did. But without flood coolant the feed was too high for the 4 flute bit and slotting. Did fine on the two edges and then I had to hit E-Stop. Picture is worth 1000 words.
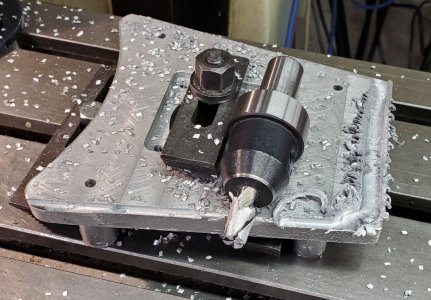
I thought I had it clamped well enough. Probably did. But without flood coolant the feed was too high for the 4 flute bit and slotting. Did fine on the two edges and then I had to hit E-Stop. Picture is worth 1000 words.

Picture is worth 1000 words
Ouch! That hurt!
Does it still smell in there? Or did it all stay in your underwear?
I was so careful. Clamped and blocks underneath.Ouch! That hurt!
Does it still smell in there? Or did it all stay in your underwear?
Probe the hole several times after homing.
Edited the G-Code to not start spindle and changed travel clearance.
Set Z=0 to 2" above and did a dry run to make sure i had clearance.
Enabled spindle and reset Z to top of casting.
As it was doing the back side and the WD-40 vapourized I thought "Maybe I should slow the feed a bit".
Well 25 ipm was too fast. The air jet wasn't on enough. Slotting with a 4 flute in cast junk aluminum not a great idea.
Melted metal stuck in the flutes.
Now at the mall having a burger while I ponder what to do next.
Now at the mall having a burger while I ponder what to do next.
Did you empty the mall out? I would not want to sit next to you.
A&W is only accessed by old folks so there's lots left...Did you empty the mall out? I would not want to sit next to you.
slow-poke
Ultra Member
I put a feed speed pot on my control board, and I use it a lot. Probably the most used control of all.As it was doing the back side and the WD-40 vapourized I thought "Maybe I should slow the feed a bit".
Well 25 ipm was too fast. The air jet wasn't on enough. Slotting with a 4 flute in cast junk aluminum not a great idea.
Agreed four flute mill and aluminum not a great combination. It always seems okay until it's not.
Alright. Status report time.
Making progress with the two flute 3/8" end mill and 5 IPM still at 2500RPM spindle speed. Air on harder and I could actually use the shop vac to suck up many of the chips. Nice too, how the table covers fit since this piece was smaller than the vise base.
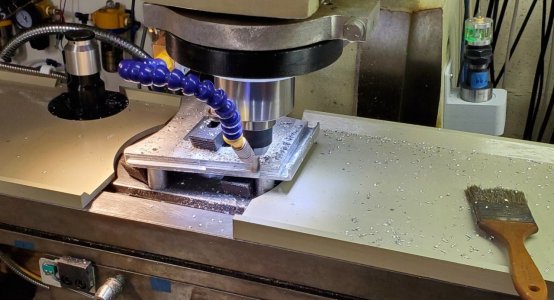
Now why am I doing this? After about 3 tries at a 3D print cover for this lower half I realized the real problem was that the casting was just a tad too wide and when moved down to tighten the belt made things even worse. So a narrower and shorter motor mount makes the original cover suddenly fit perfectly. Here's the completed one only a little worse for wear from the mistake.
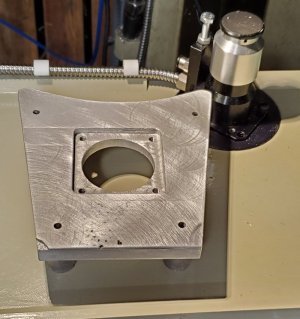
But wait you might ask. If I'm using CNC to mill this X axis motor mount how am I driving the X axis and how did I know the covers will now fit properly?
Easy Peasy. Just make a temporary motor mount.
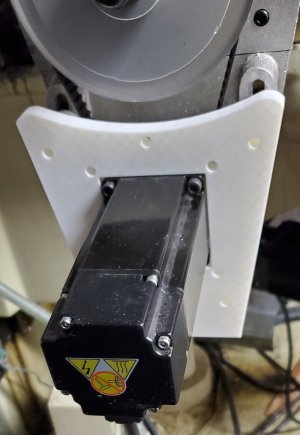
Making progress with the two flute 3/8" end mill and 5 IPM still at 2500RPM spindle speed. Air on harder and I could actually use the shop vac to suck up many of the chips. Nice too, how the table covers fit since this piece was smaller than the vise base.

Now why am I doing this? After about 3 tries at a 3D print cover for this lower half I realized the real problem was that the casting was just a tad too wide and when moved down to tighten the belt made things even worse. So a narrower and shorter motor mount makes the original cover suddenly fit perfectly. Here's the completed one only a little worse for wear from the mistake.

But wait you might ask. If I'm using CNC to mill this X axis motor mount how am I driving the X axis and how did I know the covers will now fit properly?
Easy Peasy. Just make a temporary motor mount.

And no... I did not poop my pants although the medication for the gout that showed up a couple of days ago certainly makes me want to...Did you empty the mall out? I would not want to sit next to you.
Is that enough information 😛
Done! Before I paint all of them I think I want to 3D print a wrench holder that I've mocked up with wire. Especially since the paint takes so long to cure.
The plate holding the draw bar wrenches would cover the "FORCE International" label but then with House of Tools no longer around who really cares.
And that's a better place for the wrenches instead of all over the place. I have two others used for the hold downs and the vise bolts but they don't get a lot of use unless I'm using them...
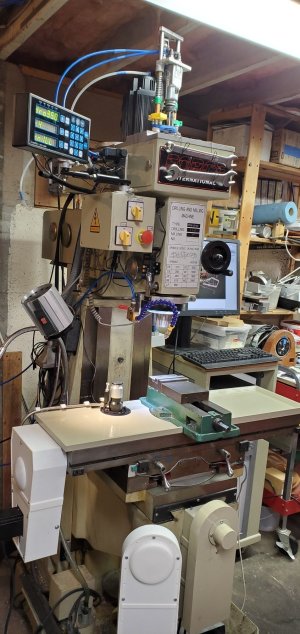

they don't get a lot of use unless I'm using them...
Hmmmmm...... Something really strange about that......
I realize you are just yanking my chain but what I meant was that if I'm not moving the vice around or using T-Slot based clamps to hold work then the two wrenches just sit on a table beside the mill. Always in the way.Hmmmmm...... Something really strange about that......
OTOH, until I finish the new rendition of the power draw bar the two wrenches hung up on wire there are used all the time.
And my wife says I'm strange. Have you been talking to her?
And my wife says I'm strange. Have you been talking to her?
Nope, no way! That would go against the unwritten honour code here.
Ya, just yanking your chain. It made me laugh so I thought I'd try to share the fun.
KeeponDragon
no problems... just challenges
So, I haven't read all 31 pages...but seeing the CNC work...and the 3D printing along with it...to achieve goals...
If no one else has heard of him...I'd like to suggest a quick watch (and I mean that as his longest video so far is still under 50 mins)
NotAnEngineer on YT...he's an Aussie...with a well thought out mind, a clever wit...and get this...a scratch built but definitely never truly done working on CNC mill...
I believe his trade is more of fabricobbler maker of things, as his 9-5 is at a props making shop.
I laughed at every video...because he is not shy about sharing his mistakes...I can't say anything he does is educational...but what it is...is a clear message...do not fear projects out of your scope of skills...
A friend told this about the picture of my mill with the completed belt covers:
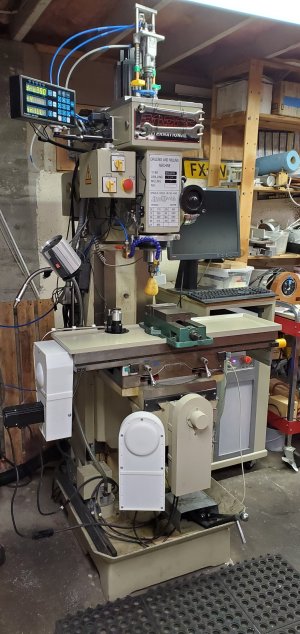
So I thought I'd oblige him and send him another photo more in keeping with that concept.Looking at the mill picture, I got a distinct feeling of a fully decorated Christmas tree .... and am thinking .... "and a partridge in a pear tree "


