• Scam Alert. Members are reminded to NOT send money to buy anything. Don't buy things remote and have it shipped - go get it yourself, pay in person, and take your equipment with you. Scammers have burned people on this forum. Urgency, secrecy, excuses, selling for friend, newish members, FUD, are RED FLAGS. A video conference call is not adequate assurance. Face to face interactions are required. Please report suspicions to the forum admins. Stay Safe - anyone can get scammed.

JCDammeyer's 42 projects

You could try a softer grade of TPU. Some of it is pretty soft.
You could also try some silicon baking pans. My wife has some that are much thicker than the silicon baking sheets.
Those look interesting. Didn't see them today when I was there. But SWMBO tagged along and I can't always be as slow as I'd like.

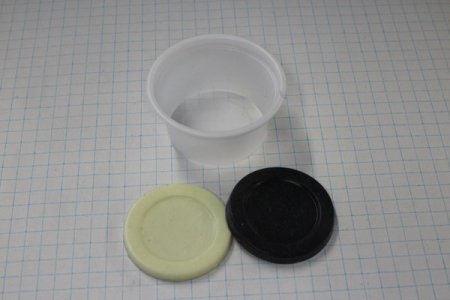
I've printed a second TPU gasket. The first is silicone sealed into the lid. I've also silicone sealed the other TPU O-Rings for the other containers. Tomorrow I'll see how that worked out.

I have a different idea that may be the ideal solution. Cdn. Tire still carries the replaceable gaskets used for canning jars. If I recreate the containers to have a smaller neck and opening to use standard canning jar lids and have them recessed so they don't interfere with the rollers that turn the container then I can use COTS (Commercial Off The Shelf) lids and gaskets.

I'm worried about softer TPU gumming up the print head. Plus just the cost of buying it.

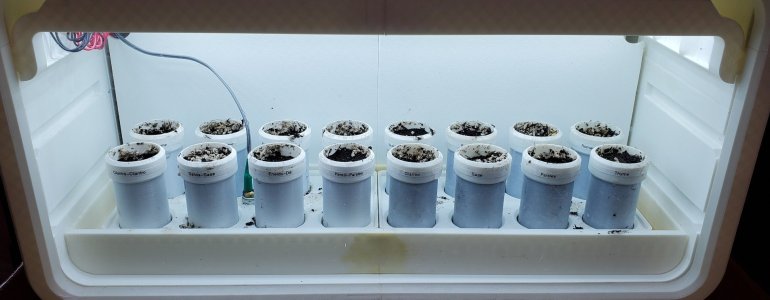
In this way the rock tumbler can have multiple containers, one for each grit.
 
That flex seal spray could likely make a decent gasket since it would settle smooth. I think...

I've used it & I don't think suitable compared to just harvesting baking silicone of the right thickness. The spray on is quite thin, it would take multiple coats to build up thickness & involves fussy masking. Its mor intended as a static coating, not really intended to be torqued on which will happen every time you screw the lid. The liquid is more viscous but even that would be quite thing. I tried coating tool handles to mimic like a set of pliers. It kind of works but did not bond like factory stuff.

IMO sheet stock is really the best option. The trick will be how to cut it reasonably precisely. At minimum a hard template you push down on material & slice with Xaxcto. A die is overkill.
I would bet the original one was molded. Now I do have some 2-part silicone that could be poured into a 3DP ring mold. The issue is its very soft durometer. I think 29 (oh what the heck is that scale now?) anyway willing to try if you run out of options. That damn lid is going to set you back $100 by the time its done - but we must succeed! LOL
 
I have used the spray on type as in the dark can in the bottom picture. I can't see it being any use to you in your application. I was amazed by this product though. Several years ago I moved my 20 year old septic tank and in the process had to remove and reinstall the pvc pipes. As a result there was a leak somewhere between an ooze and a dribble, wet, old, slimy, dirty concrete. I was expecting to spray it on an watch it flow away but no, it flowed right into the leak and after maybe five coats a minute apart the leak was gone and a nice clean dry matte black finish was left.
Also, unrelated but about canning lids. My wife holds the world title of best dill pickle maker ever. She has been making them for over 30 years. We have boxes of jars and lids and all that stuff everywhere plus cupboards full of food. This year she did 80 large jars of dills and after a month or so we could hear the odd popping sound and on inspection it was evident that the seals on the jars were failing and the pickles were spoiling. Probably about a fifty percent failure rate. Pissed she called Bernardin and they said they had changed their seal material a few years back and you no longer sterilize the lids in boiling water, just rinse and use. No apologies or nothing, the new lid boxes look exactly the same but the new procedure is printed in the instructions but how many of us would re read the instructions on a new bottle of LocTite ? Why couldn't they have changed the color on the box or printed " new and improved " or something so one would notice the change. Bastards. No Christmas pickles for anyone this year, Johnny comes first.
Rant over.
 
Actually this may be the best option for your bottle gasket. You can generate 3DP a female mold of the ring to whatever dimensions work, then press in silicone mold putty (or pour in depending on the product). I've used this stuff in the past, the properties & material quality does vary a bit. But its pretty close to what you would be getting in sheet form AFAIK. I don't think you would need a mold release, it is kind of engineered for that purpose. But I'm saying don't try Vaseline or some such homebrew solution as it may inhibit cure & actually create problems. My experience with this is more with composite products where the silicone acts as a mold from which to pull epoxy-type composite parts. I'd recommend a female ring mold & then use a flat plate to squeeze excess to final thickness. Maybe a bleed channel if you want to get fancy.

 
pretty much exactly your application if you look at examples in comments

1738346111394.png
 
pretty much exactly your application if you look at examples in comments

View attachment 58985
Funny. I had totally forgotten that I had this stuff sitting on a top shelf in a shop cupboard.
I bought it before I had a 3D printer to make molds to create plastic LED stair light containers. I molded one out of WEST Epoxy and it went really well. But then the 3D printer arrived and so many things changed.

1738451355933.png


Now although I've not yet been able to make a container that doesn't ooze a bit of water through a seam or around the lid area the one container with a standard large size mason jar lid has been running with rocks and water for about 20 minutes and no sign of water oozing out. The lids are from Walmart and although I had to buy 10 the cost, ($1.52 ea), was comparable to the amount of 3D filament and some sort of sealing material.

1738451516048.png
 
I had totally forgotten that I had this stuff sitting on a top shelf in a shop cupboard
Very similar durometer to what I have, which is pretty squishy but give it a try since you have it. Samples I poured into a graduated cup plain & with black pigment additive. The combination of a 3D printer to make molds & this pour in silicone is actually a pretty useful combination
 

Attachments

  • 01022503.jpg
    01022503.jpg
    29.5 KB · Views: 7
About the Herbus plant growing system. I'm so close to planting the herb seeds. I have Home Assistant talking to the GrowCube. I'm waiting for some 22g stranded hook-up wire from Amazon. I have 20g and 24g but in this case here I want 22g.

The little ESP8266 module with ESPHome software is also recognized by Home Assistant and provides Temperature, RH and controls 4 relays. One for the Seed Starter LED light strips. One for the Plant Growing Light Strips, a FAN control if the Herbus gets too warm and potentially a second solenoid or pump to add water to the see starter.

I took a Gridfinity 2x4 box, removed the box part to just have a tray and then added stand offs to hold everything. Once it's wired and the LED strips work I can plant seeds. So exciting. Who would have thought.

Hmmm. I guess I should make a box for the two 12V power supplies. I need almost 3A and the 1.5A units I have were free. The little module in the photo makes the 5V for the ESP8266 and the relay board.

RelayController.jpg
 
Watching @Mcgyver YouTube channel (just arose from the ashes like a Phoenix haha) reminded me of another lead for repurposed household silicone object. He shows a 'pet mat'. I didn't look too hard, some only reference the nominal thickness by the upturned perimeter lip, but obviously the sheet is much thinner. Might be a good source of stock.

Making PTFE Teflon Model Engine Gaskets the Easy Way​


Finally I've planted seeds. Now to wait for a few weeks to see if any sprout. One tray has the herb seeds we bought at Walmart in Puerto Vallarta and the others are standard Mackenzie seeds plus a few I had lying around. Should be interesting if the really old ones in the package with the $0.35 price will germinate.

Here's the growing environment parameters. The light is switched on automatically at 6AM and off at 10:30PM by Home Assistant.

1740956463781.png

No automatic watering set up on the seed tray yet. Although I did build a probe out of a 10-32 brass screw drilled out with a 3mm bit on the Unimat DB200. A standard 16g house wire just slips in and with a bit of epoxy is water tight. It's designed to detect when the watering tray is full and then shut off the pump.

1740956686001.png

1740956761097.png
 

Attachments

  • SeedsPlanted.jpg
    SeedsPlanted.jpg
    185.6 KB · Views: 5
  • SeedPackets.jpg
    SeedPackets.jpg
    502.1 KB · Views: 5
Just about finished one of the 42 projects.
Decision: Try and fix it and get the same poor quality prints compared to the SOVOL-06 and Bambu X1C or... scrap it.
Now I have some linear bearings and motors for building part of another of the 42 projects which is the tool changer for the mill. The controller board is what failed so it's really just scrap but the display could be salvaged. The plastic is garbage or recycling.

1741048096075.png
 
In the process or tidying up the bits and pieces like the 5 stepper motors and linear bears and rails I pulled down a larger box that has a large number of guide rails, toothed belts and DC Servo Motors with Encoders all from DEC printers.

The motors are 24V, 5W which means they draw no more than 1/4A. I've got servo motor drivers for 100V motors up to 20A and a couple of Gecko DC Servo motor drivers.

I have 15 of these little puppies. If we can find an inexpensive motor driver that can talk to the quadrature encoder on the back of the motor they make nice little closed loop drives. I even tried one on my JGRO CNC router which is why this one is mounted on a board. It didn't have any problem moving the carriage IIRC.

Anyway, just putting it out here if anyone has suggestions.

1741052908475.png
 
Last edited:
In the process or tidying up the bits and pieces like the 5 stepper motors and linear bears and rails I pulled down a larger box that has a large number of guide rails, toothed belts and DC Servo Motors with Encoders all from DEC printers.

The motors are 24V, 5W which means they draw no more than 1/4A. I've got servo motor drivers for 100V motors up to 20A and a couple of Gecko DC Servo motor drivers.

I have 15 of these little puppies. If we can find an inexpensive motor driver that can talk to the quadrature encoder on the back of the motor they make nice little closed loop drives. I even tried one on my JGRO CNC router which is why this one is mounted on a board. It didn't have any problem moving the carriage IIRC.

Anyway, just putting it out here if anyone has suggestions.

View attachment 60855
Just bought 5 of these on Amazon.
1741055451087.png


The same driver chip is available from Digikey for $19.08 each so this is a bargain.
 
And finally got around to 3D printing a 'poop chute bin'.


I've been using an old ice cream container but it's wider and loose. This new one is held on with magnets and doesn't stick out as far as the external spool holder which can still hold a spool above it.

Chalk another one off the list of 42 things to do. Only 42 left...
 
So I thought I'd take on the work bench for the 3:1 tool and Arbor press and corner notcher. I glued together the legs many years ago. They were sitting on a crate and on top of them were a bunch of casting flasks.

Anyway, got the legs off. Looked at the crate and couldn't remember what was in it. Well what do you know. There they are. Didn't remember that I had that many. Pots, Rotary switches, Capacitors, resistors...

OMG. What am I going to do with all that.

1741065637352.png
 
Back
Top