• Spring 2024 meetup in Calgary - tentative date Saturday, April 20/2024. Other regions are also discussing meet ups. If you want one in your area get going on organizing it! discussion
  • We are having email/registration problems again. Diagnosis is underway. New users sorry if you are having trouble getting registered. We are exploring different options to get registered. Contact the forum via another member or on facebook if you're stuck. Update -> we think it is fixed. Let us know if not.
  • Spring meet up in Ontario, April 6/2024. NEW LOCATION See Post #31 Discussion NEW LOCATION

Bridgeport Project

Susquatch

Ultra Member
Administrator
Moderator
Premium Member
Try using wet toilet paper instead of grease (soak in oil). I did not realize it was an open bearing on both sides - grease would have a tendency to squirt right through.

Assuming it's the same as the top bearing, it's only open on one side. It is odd though cuz the top bearing was open toward the gears. But for some reason, the bottom bearing is open toward the housing (assuming it is one sided like the top bearing is)! Go figure!

If I thought it was open on both sides, I would not have even bothered to try the grease. So no worries.

I will try the oily toilet paper before I make a puller.
 

Susquatch

Ultra Member
Administrator
Moderator
Premium Member
Try using wet toilet paper instead of grease (soak in oil).

Tried the oily toilet paper. Worked better than plain grease but still no go.

So I started making an inside collet today. Figured out a way to force a tight fit. The top side will be threaded to fit the slide hammer as discussed earlier. But I'm gunna drill out the bottom side of the collet a bit bigger than the slide hammer thread to allow the collet ears to bend a bit easier and also to take a tight fitting button. The button will be positioned at the top of the slits in the collet before the Collet is inserted. After that, the collet can be inserted into the bearing till the lips snap into place behind the bearing. The button is then pushed to the bottom to hold the collet ears solidly against the bearing ID and the lip behind the bearing. I'll drill and tap the button 1/4-28 so it can also be pulled back up to the root of the slots so the collet can be withdrawn if need be. I can't see how that could ever be needed, but easy to do and better safe than sorry.
 

Susquatch

Ultra Member
Administrator
Moderator
Premium Member
My bottom bearing IS OUT!

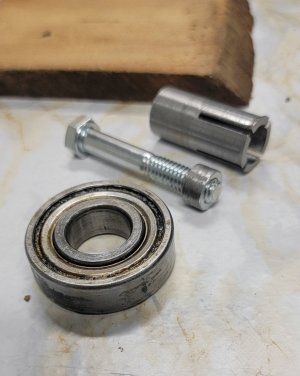
Here are a few pics of the collet, button and bearing.

20210720_130642.jpg

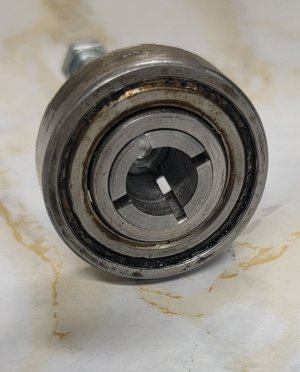
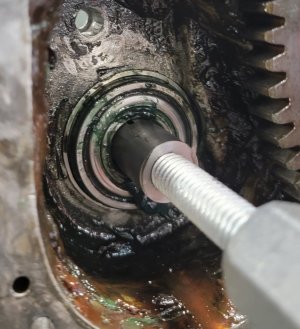
This shot shows it in the top bearing and if you look down inside, you can see the button ready to be pushed into place to expand the collet tight to the bearing.

20210720_130909.jpg

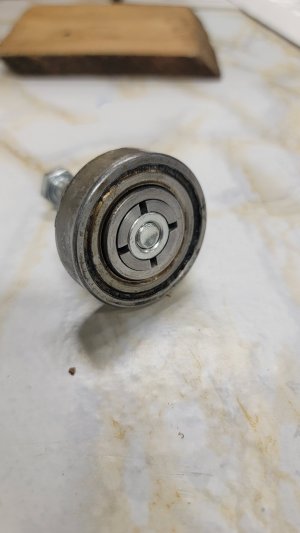
Here it is assembled in the top bearing. Button pushed into place

20210720_130806.jpg

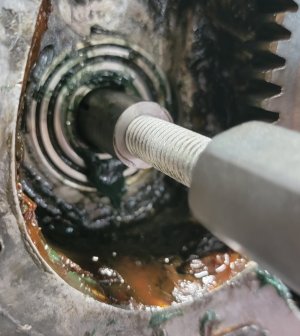
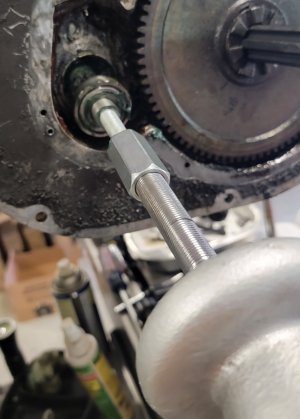
Here it is in the actual troublesome bottom bearing with the button pushed into place and my slide hammer screwed into the top of the collet.

20210720_131455.jpg

And here it is after a few FIRM taps on the slide hammer. It moved!

20210720_131652.jpg

And here it is out! Woooo Hoooo

20210720_131807.jpg

@architect - if you don't feel like making your own version PM me your address, and I'll loan you mine. It would probably work with a puller type assembly in place of the slide hammer, but there is something about shock loads...
 

Susquatch

Ultra Member
Administrator
Moderator
Premium Member
There were a few improvements made as I made the collet. First off, I didn't thread the collet for the 5/8-18 of the slide hammer itself. That would have left too little metal behind and the collet might have come apart on a thread line. Instead, I threaded it for 3/8 and used an adapter that came with my slide hammer.

Second, I didn't thread the button for 1/4-20 either. Instead, I made it 5/16 because that allowed me to simply turn down a 5/16 nut to use as a button precluding the need for more threading. Besides, the bigger the nut, the easier it is to chuck it in the lathe.

Third, it turned out to be quite difficult to insert the collet in the bearing. Those ears just were not very springy. So I made the nose a tiny bit smaller by adding an end ramp and then tapped it into place with a small hammer using the 3/8 slide hammer adapter as a guide.

But all in all it worked Great. It's out. Now I just have to wait for parts.
 

RobinHood

Ultra Member
Premium Member
Good work on making the collet and eventually getting the bearing out. Obviously a pretty tight fit in the bore since the two other methods did not work.
 

Susquatch

Ultra Member
Administrator
Moderator
Premium Member
Good work on making the collet and eventually getting the bearing out. Obviously a pretty tight fit in the bore since the two other methods did not work.

Thank you.

And yes, it was a VERY tight fit. It took a fairly stiff whack on my slide hammer to move it. Even then, at first it only moved 25 thou or so per blow.

In my mind's eye, I am thinking ahead that I'll need a pretty decent driver to properly seat the new bearing.

Oh yes, and you might be interested to know that the bottom bearing was the same as the top bearing. It was only closed on one side and very poorly at that.
 

RobinHood

Ultra Member
Premium Member
Oh yes, and you might be interested to know that the bottom bearing was the same as the top bearing. It was only closed on one side and very poorly at that.

Thanks for the update.

You think those were the original bearings, or were they replaced at one time? What you think caused them to fail?
 

Susquatch

Ultra Member
Administrator
Moderator
Premium Member
Thanks for the update.

You think those were the original bearings, or were they replaced at one time? What you think caused them to fail?

To answer your question, let me begin with the fact that it is a pretty darn good Bridgeport clone. As far as I can tell, the vast majority of parts are totally interchangeable.

Although I'm fairly certain that it has been worked on, it is in really great shape. Most of it is practically new. Any work that has been done is mostly superficial.

The most obvious sign of low usage is the very low backlash, the lack of any visible or measurable wear on the lead screws, and the condition of the bed. All appear to be original.

The most obvious sign of any work done on it is the sectional drive belt. I doubt it is original.

Without a lot of usage, it would be hard to believe the bearings themselves were ever replaced long enough ago to have already worn out again.

My guess is that the bearings are original. Mainly because it would be fairly difficult to even find crappy bearings like those today.

I'll see if I can find any markings on them later tonight.

I believe they failed because the bull gear cover was not installed properly. All the cover screws were loose, both alignment pins were worn, and so were the alignment pin holes. This allowed the top to wobble around which misaligned the bearings which ultimately led to their failure.

To be truthful, that's really nothing more than a partially educated guess on my part.
 

RobinHood

Ultra Member
Premium Member
Actually, looking at the picture of the top bearing, it seems to be a SKF 6203, Made in Italy. If the bottom one is the same, I would call them decent quality bearings.
 

Susquatch

Ultra Member
Administrator
Moderator
Premium Member
Actually, looking at the picture of the top bearing, it seems to be a SKF 6203, Made in Italy. If the bottom one is the same, I would call them decent quality bearings.

I'm really impressed that you could read that in the photos. I had to put the bearing under a lighted magnifying glass to see anything at all. In fact, the first time I looked, I DIDN'T see anything. I had to look twice. But yes, you are correct, they are "SKF 6203-Z ITALY" bearings.

Although they are quite smooth with no brinelling that I can detect, they have a ton of play in them. But that may not be their fault.
 

RobinHood

Ultra Member
Premium Member
I have been tearing machines apart for quite some time. Mostly without any manuals. One gets pretty good at identifying items/components and developing disassembly / assembly sequences. That’s what makes it fun for me. Also trying to find out what the sequence of events were that most likely lead up to the failure in order to remedy the problem and at the same time improve the system to hopefully prevent future failures.

That’s why I asked you if you had a theory on how/why the bearings failed.
 

Susquatch

Ultra Member
Administrator
Moderator
Premium Member
Good stuff @RobinHood. I have practically zero experience with machinery.

But I did accident reconstruction, fire investigation, product failure, and product development during various phases of my previous career in the auto industry. Unless someone died, it was usually very enjoyable. So I understand your interest.

In fact, if you are following my Hartford thread, you will note that I plan to add extra alignment pins to the gear cover to try and prevent this from happening again.
 

RobinHood

Ultra Member
Premium Member
Those are good skills to have - critical thinking / analysis of processes.

Yes, I saw your proposed improvement of the Hartford mill. Hopefully that will take care of things.
 

Susquatch

Ultra Member
Administrator
Moderator
Premium Member
Yes, I saw your proposed improvement of the Hartford mill. Hopefully that will take care of things.

The bearings arrived. They are fully enclosed. Normally fully enclosed bearings do not need grease or oil. So I'm wondering if I need to pack them or not. Got all Allen head screws to hold the cover on too.
 

Brent H

Ultra Member
@Susquatch : you don’t need to pack sealed bearings. They will happily spin about in the grease that you pack in for the gears.

a few changes over the years - mostly due to folks ignoring the lubrication schedule of the mill resulted in a change out of many bearings to the sealed ones. The updated quill bearings are sealed and no oil required etc etc
 

historicalarms

Ultra Member
Just a heads-up on the sealed bearings. When we were actively farming, using machines with a zillion sealed bearings in them, we discovered, after having a few bearing failures on very new bearings that the amount of grease installed inside those bearing was almost nil in some....so we started injecting our own grease in every new bearing before it was mounted....bearing life expectancy increased substantially after that.
We had an old livestock syringe that we filled with grease and just lifted the lip of the bearing seal with the hypo needle, inserted it a small amount and push grease into the roller track.
 

Chicken lights

Forum Pony Express Driver
Just a heads-up on the sealed bearings. When we were actively farming, using machines with a zillion sealed bearings in them, we discovered, after having a few bearing failures on very new bearings that the amount of grease installed inside those bearing was almost nil in some....so we started injecting our own grease in every new bearing before it was mounted....bearing life expectancy increased substantially after that.
We had an old livestock syringe that we filled with grease and just lifted the lip of the bearing seal with the hypo needle, inserted it a small amount and push grease into the roller track.
They make a needle grease gun tip, it’s got a grease zerk fitting on the end of it. No tools needed to change anything. But I know on the farm you just used what was handy
 

Susquatch

Ultra Member
Administrator
Moderator
Premium Member
Wow. Too much info that doesn't fully jive with what I see in my new bearings or with what I know about bearings from my previous career in automotive - which is VERY different from what I see in farm equipment.

So the main issue as I see it reading all your inputs is sealed VS shielded VS shielded and sealed VS open.

My old bearings were open on one side and shielded on the other. They were not sealed. There is no question about the fact that they needed lubrication - either grease or oil.

My replacement bearings from H&W (NTN 6203z) appear to be shielded but I do not know if they are sealed. So I looked them up in NTN's database. Apparently, they are shielded but not sealed.

If they were sealed, I would trust a quality manufacturer like NTN (made in Canada) to put the right amount and kind of grease in them to last the bearings lifetime.

But since they are only shielded and not sealed, they need a regular supply of clean high quality grease or oil. Unfortunately the shields make it difficult to grease them. So I put grease into the bearing cup and pressed the bearings in until grease started to come out from behind the shields. Sort of the reverse of using grease to remove the bearings hydraulically. I have also packed them with grease on the cavity side of the gear housing.

Hopefully this repair will last me for as long as I own and use the mill.
 
Top