• Scam Alert. Members are reminded to NOT send money to buy anything. Don't buy things remote and have it shipped - go get it yourself, pay in person, and take your equipment with you. Scammers have burned people on this forum. Urgency, secrecy, excuses, selling for friend, newish members, FUD, are RED FLAGS. A video conference call is not adequate assurance. Face to face interactions are required. Please report suspicions to the forum admins. Stay Safe - anyone can get scammed.
  • The 2026 Calgary Area Meetup is set for Saturday May 30th at 10am. The signup thread is here! Robinhood has graciously offered to host the meetup again this year. Please note that you MUST RSVP to the notice linked above if you wish to come.

3D Printer Happened

I can never understand why someone has a 70" big screen TV and watches a movie on a 3" smart phone screen.
My wife sits on her couch and watches her shows on her phone while she knits. I sit on my couch and watch my stuff on my laptop. The 60" big screen in the middle of the room sits blank....About the only thing I watch on the bigscreen is MotoGP.

As for 3D printing, the great question is how do I take an idea that I can see being machined from a block of aluminum and now make that happen on a 3D printer? CAD? And if so, how complicated is that program for that to happen?

As I read through the post, many that have a great amount of knowledge on the subject jump in and comment with terms that I now have to Google to figure out what they are talking about. Somehow I missed what Benchy is, google stated that it was tug boat. How did a table with 4 legs turn into a Tug Boat? Then there a lot of terms that I just don't know the meaning. Like anything else, for me to learn I have to have a want. To get past the want and to build I need to understand the method, so far that is murky.

Cad is the path you want to creating your own models. It's as easy or complicated as you want or need. Tinker cad is a pretty simple interface, and easy to pickup if you want to just make simple shapes like drawer organizers, or things like collet holders. A more complex cad system would be needed for making something like a engine block casting pattern....But some people are wizards of tinkercad. I personally like Rhino. Been using it for over 20 years now so it fits like a glove, and most of my designs come from it. Very cheap considering how powerful it is.

"benchy" got it's name because it was a whimsical little print that was the "benchmark" all 3d printer owners/builders/tinkerers could easily and relatively quickly print to see how their printers stack up against others. Both in quality, and in print time. It's become somewhat obsolete now that they're printed so quick and easily, but back in the day it was something more than just a toy boat.... What seems like a simple print used to actually be a challenging one with retracts, and overhangs curved vertical walls etc...It tested all aspects of your 3d printer build hardware and software.
 
As I read through the post, many that have a great amount of knowledge on the subject jump in and comment with terms that I now have to Google to figure out what they are talking about. Somehow I missed what Benchy is, google stated that it was tug boat. How did a table with 4 legs turn into a Tug Boat? Then there a lot of terms that I just don't know the meaning. Like anything else, for me to learn I have to have a want. To get past the want and to build I need to understand the method, so far that is murky.

Keep posting, I will keep following and your efforts will explain the whole process, well that is what I am hoping.

I've deliberately stayed away from googling things. I like the way the members explain things and I especially like the way such dialog helps other members like you. There are quite a few members on the 3D fence. I know @CWret is interested too and I know he feels like we do.

I'd like it very much if this thread helps members like you know what you would be getting into even if it only serves to save you from spending money on something you will never use. But it would be even better if it gets you to buy something you will love.

As for 3D printing, the great question is how do I take an idea that I can see being machined from a block of aluminum and now make that happen on a 3D printer? CAD? And if so, how complicated is that program for that to happen?

That might be the biggest issue of all. This one scares me even more than the printer. I don't think you can go from idea to model without cad. But I do think you can go from someone else's idea to a model without cad. Maybe I'm wrong. We will see. Either way, there are lots of guys on here who know cad even better than 3D printing. Plus there are some really simple cad programs. Search on tinker to see what @Dan Dubeau and his kids have done.
 
@Dan Dubeau and his kids have done.

I should clarify this, "I" don't use tinker cad. My Son has played around with it a bit, but to date, has not designed anything that he's printed with it. Both of my kids, and my Wife have the bambu handy app on their phones/tablets, and have printed stuff all on their own from browsing other peoples designs on the app.

I've been trying to push my Son to use tinker cad more, but interests need to develop naturally. He's more into coding, gaming, and game related coding than making physical things like me. My Daughter is the one most likely to follow my footsteps. So far there's no need for anyone else in the house to learn CAD because they just get me to do it. Nice to be needed I guess.....

I only know about tinker cad from his noodling around with it, and a few youtubers that use it (names escape me). As far as I know it's probably the easiest and simplest "cad" software for absolute beginners to start drawing 3 dimensions shapes. Although I'm not really up to date on everything that's out there anymore. I've settled in my "rut" and good luck getting me out at this point....
 
This is what I like about this forum, I am learning things, while I don’t have a Bamboooo printer some of these things brought up here are going to help me with my what seems to be a dinosaur printer. At the very least there will be some answers to my questions, while I must admit a few of shortened terms have me head shaking and scratching, I know that I can ask what that means and get an answer and not be considered an idjet.
So for myself and some others in the same boat, rowing on the same side, THANK YOU..!!
Just remember. We're here to help... that is... to help you spend your money...
 
I know @CWret is interested too and I know he feels like we do.
Yep. Very interested but nervous about the plunge due to the learning curve. The CAD component is one of my biggest stumbling blocks.
20 something years ago I attempted to learn autocad light. Even took a 2 day introduction course. But just didn’t stay focused long enough to get the hang of it. One issue is that I have excellent drafting skills- with the help of a couple of triangles I can produce 3 views of an object very quickly. The guys at work called my drawings CraigCad. And similar to what Dan said
So far there's no need for anyone else in the house to learn CAD because they just get me to do it. Nice to be needed I gues
I was surrounded by guys that could do CAD in their sleep so why should i bother learning.

As Susq said - I am on the fence- I’ve been following this thread closely and appreciate everyone’s comments - but I’m still on the fence.
 
I am going to try see if there is some way to draw, then take a picture/scan it and shoot that to some kind of cad? and put a dimension or 2 in, it dimensions the rest, I check how it looks and send it to the printer, and looky that, a perfect plastic object printed. This is possibly a very big LOL and a dream, but it’s mine, I tell you it’s mine, all mine. Slightly/extremely insane laughter throughout the cave.
OR, I just have to learn the program, VERY VERY SIMPLE CAD FOR VERY COMPUTER ILLITERIT OLD GUYS, that can’t spell either.
 
I am going to try see if there is some way to draw, then take a picture/scan it and shoot that to some kind of cad? and put a dimension or 2 in, it dimensions the rest, I check how it looks and send it to the printer, and looky that, a perfect plastic object printed. This is possibly a very big LOL and a dream, but it’s mine, I tell you it’s mine, all mine. Slightly/extremely insane laughter throughout the cave.
OR, I just have to learn the program, VERY VERY SIMPLE CAD FOR VERY COMPUTER ILLITERIT OLD GUYS, that can’t spell either.
You can take a picture with a cell then turn that in to a base stl file. Then modify the base shape after. Used to take a dozen steps in the old days. Now it’s as easy as uploading the picture and you get the stl file. Makerlab, there are several. For simple stuff You can use the sketch tool in tinkercad, I find it works pretty easy.
 
@DavidR8 and I were discussing CAD the other day. For some of us where programs like Fusion just don't click the https://www.alibre.com/atom3d/ program is something different. For me it's always been so easy compared to any other CAD program I try.
It's not expensive for the ATOM version and it's yours for life. No cloud. Easy to transfer to a different computer.
 
Ok, so power is finally back here again. Generator is even put away till next time.

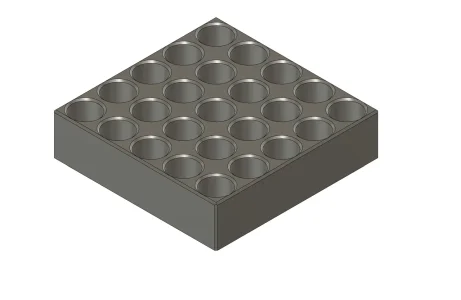
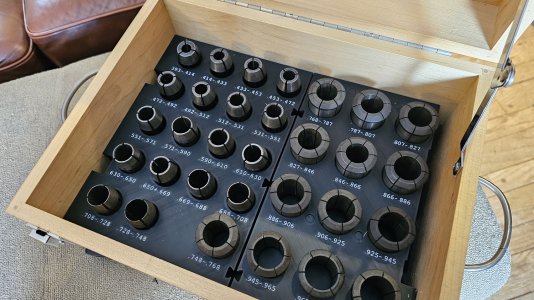
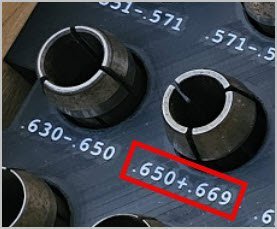
I'd like to tackle a collet rack. And I'd like to make one for 5C collets first since I have so many. Perhaps 30 collets. The tray needs to go in a drawer and not covered. No space wasting labels either.

Something like this:

screenshot-2026-02-19-132452.webp


I'd like to stay out of CAD for this project if I can. That's intentional so we can help members who have not purchased a printer yet because they don't want to have to learn CAD.

Can I turn the 25 collet tray into a 30 collet tray without using cad? Can that be done in Bambu's print program?

If I can do that, can I rearrange the holes like a bees wax frame staggered so it's more space efficient using the Bambu printer program? Or is that clearly into CAD territory?

To be clear, I'd like to stay out of CAD for this project, but I am not averse to using CAD myself. I just want to explore the boundaries.

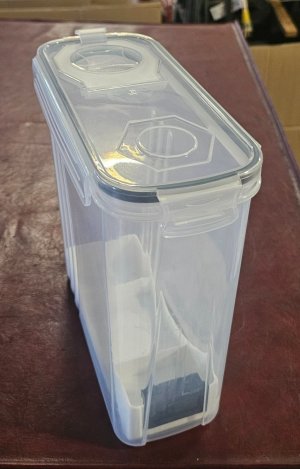
PS - the cereal boxes I got from Amazon came today. The tray I made for the Fillament spool and humidistat fit it perfectly.
 
Well yes there are some simple boolean operations possible within the slicer. I haven't tried this for a while so maybe others can chip in.

The block can be cut with a planar slice to produce a single row of 5 holes. This part can be copied and arranged alongside its mate to make a 6x5 arrangement.

An STL file is a baked polygon mesh, not a parametric feature tree. The existing 25 holes are permanent geometric voids. You cannot select and move them with the slicer.

The overall scale can be changed in X, Y, Z together or independently

You can create primitives such as a cylinder (or a negative shape cylinder = a hole) and position them.

I'll warn you its crude, frustrating and difficult to produce anything useful this way without some basic CAD capability.

More valuable are prepared .STL and .STEP files from McMaster for example. .STEP files can be a composite of parts (assembly) or a single part. Often the published .STEP files are external geometry only - similar to an .STL file. So If you are looking for a 3D model of a plumbing part, it may not be hollow.

I quite often download a part that is close to what I need. I print with a suitable material, scale as needed and then take the part and work on it more precisely using the mill.

🙂

p.s. so you could for example download the STL of a 5C collet and use that as the negative shape to punch the correct size holes in the block, using pattern replication.
 
Last edited:
did you get the ams? labels can be nice 🙂

I've done tons of tool holders and never worried about it, but if you were in a very humid environment you might want to clear coat or somehow seal the PLA as is reportedly it does absorb moisture. Wouldn't want to see prized possessions rust.... like i say, hasn't been an issue for me, but something to be aware of.

20260203_134736-1500x844.jpg
 
if you were in a very humid environment you might want to clear coat or somehow seal the PLA as is reportedly it does absorb moisture

Ive often wondered the exact same thing. Seems like conversation is dominantly about saturated filament in terms of printing issues, which is understandable. But rarely do I see conversation that the finished part is experiencing the exact same issue in terms of expansion/contraction. I dont think the filament changes properties once its been heated & cooled, its the same stuff in a different shape. Some say PETG has better properties vs PLA for many fronts, but I think its actually worse from water absorption standpoint no? Because I was making molds & such with some of my 3DP PLA parts, I do know that not all sprays & paints care for 3DP surfaces, so results can vary. A different topic.
 
did you get the ams? labels can be nice 🙂

I've done tons of tool holders and never worried about it, but if you were in a very humid environment you might want to clear coat or somehow seal the PLA as is reportedly it does absorb moisture. Wouldn't want to see prized possessions rust.... like i say, hasn't been an issue for me, but something to be aware of.

Yes, I did get the AMS. But I only have two spools in it right now and have not printed anything yet that requires multiple spools.

Humidity control is top of mind. In fact my second print job was a spool tray with a place for a hygrometer, and bowls for dessicant that fits in the bottom of sealed fillament containers (cereal containers).

20260703_123249.jpg

20260706_114215.jpg

Labels are obviously nice, the collet rack in your photo looks top notch. In fact, gorgeous might be a better descriptor. But, most of my collets are already marked on their face, I don't mind a bit of size testing, and I need the drawer space much more than I need pretty. Therefore...... no labels.
 
No AMS for me on my A1. I have a similar project but was thinking of incorporating a slight indent for my label maker which has standard tape width & I can define print length.
 

Attachments

  • EDT-06-07-2026 8.59.35 AM.jpg
    EDT-06-07-2026 8.59.35 AM.jpg
    16.8 KB · Views: 1
I am looking for one on the touch screen. I do get one that says it is done and asking if I want to print another but that happens immediately on completion when the bed is still REALLY hot. As I understand it, it should practically pop off when it cools. So I'm looking for something that says I can remove it. Or do I just go by temperature? If so, what temp should I be looking for?
I don't have the patience for that, I just remove the build plate and flex it to get the part to release. Sometimes it needs a little help.
 
I don't have the patience for that, I just remove the build plate and flex it to get the part to release. Sometimes it needs a little help.
I also remove the build plate and then set if on the metal tablesaw surface making sure it's completely wiped clean so nothing sticks to the bottom of the plate.
That cools the plate really quickly and shortly after that the part pops off easily.
Also you can print two at a time of those filament/desiccant/sensor holders. Use the Bambu user interface to clone it and then have it rearrange.
 
Regarding the external spool hanger, I've never used mine. Anything I've printed that is not AMS compatible is also prone to moisture absorption. I put a wye in the filament tube that feeds the buffer on the back of the printer and feed directly out of a roller equipped dry box.

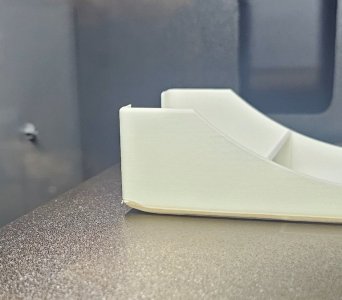
Speaking of bed adhesion, the first time I printed TPU I destroyed the part trying to get it off the plate. Always use the smooth plate for TPU. Even then it can be challenging.
 
Back
Top