-
Scam Alert. Members are reminded to NOT send money to buy anything. Don't buy things remote and have it shipped - go get it yourself, pay in person, and take your equipment with you. Scammers have burned people on this forum. Urgency, secrecy, excuses, selling for friend, newish members, FUD, are RED FLAGS. A video conference call is not adequate assurance. Face to face interactions are required. Please report suspicions to the forum admins. Stay Safe - anyone can get scammed.
-
Several Regions have held meetups already, but others are being planned or are evaluating the interest. The Calgary Area Meetup is set for Saturday July 12th at 10am. The signup thread is here! Arbutus has also explored interest in a Fraser Valley meetup but it seems members either missed his thread or had other plans. Let him know if you are interested in a meetup later in the year by posting here! Slowpoke is trying to pull together an Ottawa area meetup later this summer. No date has been selected yet, so let him know if you are interested here! We are not aware of any other meetups being planned this year. If you are interested in doing something in your area, let everyone know and make it happen! Meetups are a great way to make new machining friends and get hands on help in your area. Don’t be shy, sign up and come, or plan your own meetup!
You are using an out of date browser. It may not display this or other websites correctly.
You should upgrade or use an alternative browser.
You should upgrade or use an alternative browser.
2x72 sander
- Thread starter ShawnR
- Start date
Germany? Lol.
Kronau, Saskatchewan.
Facebook thinks my wife's apiary is in Germany sometimes as well. Drives her crazy.
The honey was just from one year's production from about 10 or 15 hives. Saskatchewan has some of the highest per hive production in the world because of our short but intense growing season where everything flowers at once. That and the oceans of canola.
Well, that is embarrassing. The first google hit for Kronau is Germany and that is as far as I went. I have never heard of it so ....well...
 Welcome to Canada.....lol
I toyed with venturing into honey bees. We live semi rural and hearing about the need for bees, I thought it would be an interesting venture but the idea dwindled the more I looked into it. I should pursue it. More for the bees than the honey, although we do use honey, a bit. That is the extent of my knowledge though....bees equal honey and pollination...pollination equals food....I like to eat. Seems worth it. We have a bit of a bee keepers community here.
Last edited:
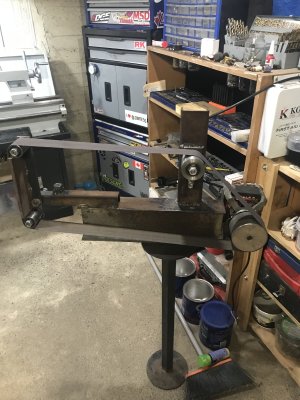
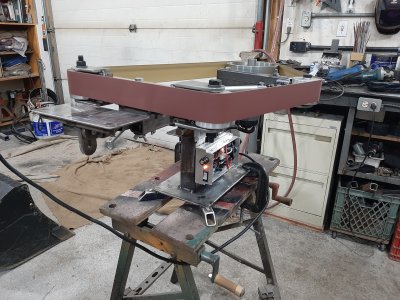
Made more good progress today or since last reporting. I made of feet for the base to get the bottom of the platen off the bench. I also shortened the front of the base a bit. I saw one set of plans with the base made with angled legs and liked the look so went with a variation on it. I also have the tracking wheel sort of set up. It pivots but I don't think I have enough room for a compression spring under the arm so need to figure something else up. An external tension spring working against the bolt would work but I don't like it so maybe an internal compression spring (internal to the arm)...still pondering.
Got the tensioning tube in place. I am pretty happy with that. The spacer for the tube against the main tube was a PITA! Broken tap #1, crappy tap #2, missed a hole - rewelded then the broken tap! Weld all holes up and go to imperial screws which look like crap.....but it works. Need to find 8-32 capscrews. Funny how the smallest simplest parts can take the longest time sometimes!
Once I get the tracking wheel mechanics figured out, I can apply power and watch the belts fly!
and then figure out how I am going to mount a table. Been a fun project so far. Lots like LOTS of head scratching but looks like it might work.
Cheers,
Attachments
Just started using mine, and steel dust collection is now my enemy. All scrap No plan and thread to follow soon. Thanks for the write up
Yea, There is an earlier post from @David_R8 about dust collecting. It is good. I have not considered that much yet. Good on you for going no plan and using up stuff you have. Sometimes the best projects.
Cheers,
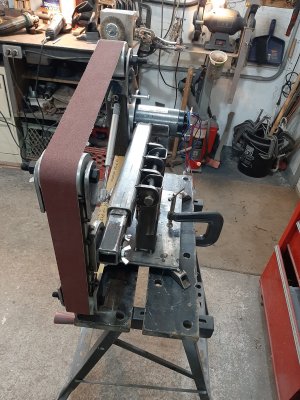
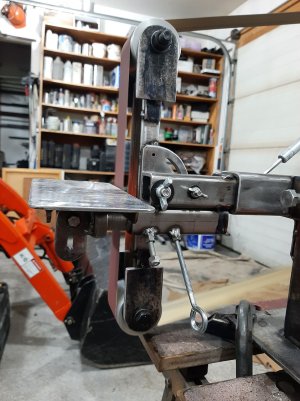
It lives! Powered up the belt sander today. After working on the tracking mechanism this morning and finally coming up something that I like, I had to make up some bushings for the wheel bearings. The standard washers for 12 mm bolts contacted the outer race so I made up bushings. Then set up the power supply. The full console you see in the video is not needed. I just needed the variable speed control for testing purposes and have not broken down the console. I won't even use the control from the console as it is pretty open so the dust will destroy it in short order, I think. I will make the electronics box as dust proof as possible but, well, you know,...it will get in there.
Next, I need a stop for turning the belt horizontal, then make up a box for the circuit board and do the final controls. Not sure if I will do a tach now or leave it for now. Getting into spring, my list of to do things is growing. Great the sander is running but still lots to do. I am pretty happy with the way it has evolved.
Powered up the belt sander today. After working on the tracking mechanism this morning and finally coming up something that I like, I had to make up some bushings for the wheel bearings. The standard washers for 12 mm bolts contacted the outer race so I made up bushings. Then set up the power supply. The full console you see in the video is not needed. I just needed the variable speed control for testing purposes and have not broken down the console. I won't even use the control from the console as it is pretty open so the dust will destroy it in short order, I think. I will make the electronics box as dust proof as possible but, well, you know,...it will get in there.Next, I need a stop for turning the belt horizontal, then make up a box for the circuit board and do the final controls. Not sure if I will do a tach now or leave it for now. Getting into spring, my list of to do things is growing. Great the sander is running but still lots to do. I am pretty happy with the way it has evolved.
Doggggboy
Ultra Member
Sweet.It lives!
Next, I need a stop for turning the belt horizontal, then make up a box for the circuit board and do the final controls. Not sure if I will do a tach now or leave it for now. Getting into spring, my list of to do things is growing. Great the sander is running but still lots to do. I am pretty happy with the way it has evolved.
Tell the truth. When you turned it up to 11 did you have your hand on the exit door to bail?
I fired mine up yesterday to work on the tracking as well. Scared the crap out of me but no casualties.
Sweet.
Tell the truth. When you turned it up to 11 did you have your hand on the exit door to bail?
I fired mine up yesterday to work on the tracking as well. Scared the crap out of me but no casualties.
Yea, ok..I might not have had one hand on the door, but I definitely did not take it off of the control and I don't even think I turned it up to max. I think with my calculations, the belt surface speed at max motor speed would be stupid fast so I only revved it up and down to see the transition. Not sure how far I went with that control. When I do the control circuit, I will set up limits according to a surface speed of about 6000 fpm. I think the knife makers like 5 to 6000 fpm
https://www.redlabelabrasives.com/blogs/news/optimal-speed-for-a-belt-grinder
Very nice. When do you start production.
Production of knives or production of sanders?..if you mean sanders, .at the rate I work, they would be very expensive or I would need to give up beer I think and food.....

I'm thinking of building something like a 6x48 soon. I may have missed it Shawn, but are you planning to buy abrasives locally? Where? Or is there a good Canadian source? I know nothing about where to source belts from. I do know that i want something that can hog metal fast. I have a spare 5hp 3ph motor and this might be the project for it.
I'm thinking of building something like a 6x48 soon. I may have missed it Shawn, but are you planning to buy abrasives locally? Where? Or is there a good Canadian source? I know nothing about where to source belts from. I do know that i want something that can hog metal fast. I have a spare 5hp 3ph motor and this might be the project for it.
I could not find any locally so ordered some on line, Amazon I think. I have more than I need. But having said that, apparently, Superior coatings on Fort William Road has them in stock, or the 2x72. For 6x48, GP carry them? They have a wall of belts, iirc
Doggggboy
Ultra Member
I ordered from Nexusgrinders.ca. They are in Alberta but mostly deal with 2x72 stuff.I could not find any locally so ordered some on line, Amazon I think. I have more than I need. But having said that, apparently, Superior coatings on Fort William Road has them in stock, or the 2x72. For 6x48, GP carry them? They have a wall of belts, iirc
Local supplier sellings belts. Don't know about brands or price comparison. But he did some heat treating for me & was a good experience.
https://www.knifemaker.ca/Heat-Treat-Service/
https://www.knifemaker.ca/Heat-Treat-Service/
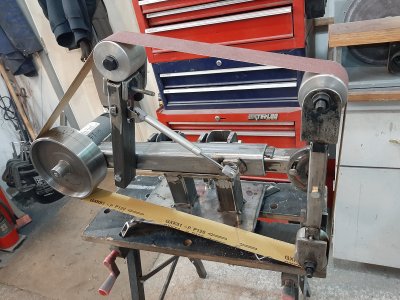
It has been a while since I updated but I have been working on the sander between other projects and life. It is almost done. I did the wiring today. I want to put a tach on it yet and thought I could steal the power for the tach from the control board but I will need to look more closely at that later. It won't be as easy as I thought it would be.
Since posting last, I capped the vertical supports, installed the horizontal stop plate and did the control box stuff, wiring and mounting, etc. I have yet to do final welding, make the wheel supports on the platen a little more pretty, and make up some nice handles and knobs for the various locking screws and tracking screw. I need the platen surface too. Might just be a piece of steel for now. Might try melamine and see what happens to it. Nothing locks the sander in either vertical or horizontal position so a lock screw/gadget of some sort.
The table mount caused me some delays but in the end, I like it. A piece of 1 3/8 round bar turned down to slip into the 1.25" square tube with the full diameter left as a mounting point for the table. I stressed over how to make the table tiltable but realized that since the whole belt tilts, I probably don't need the table to tilt too. It will tilt when lifted to the highest position, only practical if using the belt vertically.
You will see the ammeter. I was measuring the current draw so that I can choose the right fuse value. It looks like it can go as high as 12 amps under load. The DC Motor says 21 amps on it but since this is out of a residential treadmill, I doubted it, however since retrofitting the treadmill motor into another piece of equipment, anything goes.... I thought better to fuse accordingly.
As always, open to input.
Since posting last, I capped the vertical supports, installed the horizontal stop plate and did the control box stuff, wiring and mounting, etc. I have yet to do final welding, make the wheel supports on the platen a little more pretty, and make up some nice handles and knobs for the various locking screws and tracking screw. I need the platen surface too. Might just be a piece of steel for now. Might try melamine and see what happens to it. Nothing locks the sander in either vertical or horizontal position so a lock screw/gadget of some sort.
The table mount caused me some delays but in the end, I like it. A piece of 1 3/8 round bar turned down to slip into the 1.25" square tube with the full diameter left as a mounting point for the table. I stressed over how to make the table tiltable but realized that since the whole belt tilts, I probably don't need the table to tilt too. It will tilt when lifted to the highest position, only practical if using the belt vertically.
You will see the ammeter. I was measuring the current draw so that I can choose the right fuse value. It looks like it can go as high as 12 amps under load. The DC Motor says 21 amps on it but since this is out of a residential treadmill, I doubted it, however since retrofitting the treadmill motor into another piece of equipment, anything goes....
I thought better to fuse accordingly.As always, open to input.
Attachments
Last edited:
In addition to adding a DRO to my Grizzly milling machine, I am also going to build some Kant Twist clamps - posted elsewhere. In addition to those projects, I am planning on making a 2 x 72 inch grinder, based closely on Brian House's design, which is all over YouTube... Working with a family member who also wants one, so we will build a pair of these. Planning on using a 2HP, 3 phase motor with Chinese VFD. I like House's design and think I can handle the issues around getting two square tubes to slide together, one inside the other.
@Brian26 , I would say my build is based mostly on Brian House's, although ideas from other builds came into it. And input from members here. I did vary in order to use stock I had. As for sliding tubes, see post #58. It worked well for me. There are also comments and links earlier in the thread. The 3/4" burr makes removing the internal seam very quick and painless. I used the block of wood just as a hand support, being able to move it around. Not as slick as a custom made block to slide into the tubing but pretty versatile. I threw it into my tool box and then dragged it out last week again for another task.In addition to adding a DRO to my Grizzly milling machine, I am also going to build some Kant Twist clamps - posted elsewhere. In addition to those projects, I am planning on making a 2 x 72 inch grinder, based closely on Brian House's design, which is all over YouTube... Working with a family member who also wants one, so we will build a pair of these. Planning on using a 2HP, 3 phase motor with Chinese VFD. I like House's design and think I can handle the issues around getting two square tubes to slide together, one inside the other.
Last edited:
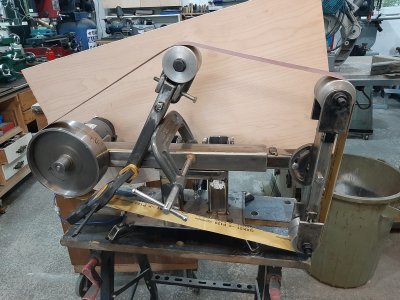
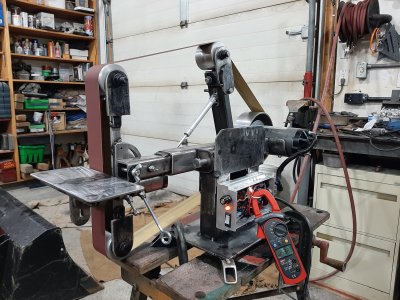
Today, working on finishing stuff....knurled knobs for adjustments mostly. Welded nuts on wheel screws. Seems to make sense.  . Put the melamine platen plate in. I will see how the melamine finish stands up. A glass platen is a possibility. I think from what I saw on ebay, they are common in a size that will fit.
The knurling was kind of a test of the new knurling tool that came with the new lathe. In the past, I had the "scissor" type of knurler and it worked great. Maybe I just got used to it. The one that I tried today is the normal 2 wheel tool press it into the stock type. Not sure if it has a name. . I will have to practice I think. Not sure how hard to press, do I need a center? feed speeds, etc....Not overly impressed with the knurls but they are ok. If they really bug me, I can make new knobs...but that is down the list right now...
I am really happy with the lever to remove/install the belt. I looked at several options and material sizes but ended up with the 3/8 rod you see (and my first new knurl tool trial run) It is easy enough to just pull the tracking wheel to release the tension but the lever feels more .....professional? (More gooder..") )
)
When I started sanding, it became evident that shrouding/shielding will be necessary. Sparks everywhere! @David_R8 those video links might come in handy!
But the sander sands! Speed works well. Popped the little 13 amp breaker in the power bar it was plugged into so will need to skip the power bar when using it. Not a problem for my planned location for it.
There seems to be a bump or something going on. Not sure if you can tell in the video. It might be a sander seam, or an issue in the speed controller. Not a problem at higher speeds. I thought it might be a platen issue but after moving the stock around, I don't think so.
Here is the test run.
. Put the melamine platen plate in. I will see how the melamine finish stands up. A glass platen is a possibility. I think from what I saw on ebay, they are common in a size that will fit.The knurling was kind of a test of the new knurling tool that came with the new lathe. In the past, I had the "scissor" type of knurler and it worked great. Maybe I just got used to it. The one that I tried today is the normal 2 wheel tool press it into the stock type. Not sure if it has a name. . I will have to practice I think. Not sure how hard to press, do I need a center? feed speeds, etc....Not overly impressed with the knurls but they are ok. If they really bug me, I can make new knobs...but that is down the list right now...
I am really happy with the lever to remove/install the belt. I looked at several options and material sizes but ended up with the 3/8 rod you see (and my first new knurl tool trial run) It is easy enough to just pull the tracking wheel to release the tension but the lever feels more .....professional? (More gooder..
)When I started sanding, it became evident that shrouding/shielding will be necessary. Sparks everywhere! @David_R8 those video links might come in handy!
But the sander sands!
Speed works well. Popped the little 13 amp breaker in the power bar it was plugged into so will need to skip the power bar when using it. Not a problem for my planned location for it.There seems to be a bump or something going on. Not sure if you can tell in the video. It might be a sander seam, or an issue in the speed controller. Not a problem at higher speeds. I thought it might be a platen issue but after moving the stock around, I don't think so.
Here is the test run.
Last edited:
Doggggboy
Ultra Member
MIne has a little thump in it as well. Realized it gets better if you don't have the belt on backwards but it's still there. I think it's the seam.Knocked mine off the stand and bent the motor shaft a good 3/8th on inch. Managed to get it pressed straight enough for only about a thousandth runout. Whew, I thought i was going to be motor shopping. And yes, nobody talks about the mess. Holy!Today, working on finishing stuff....knurled knobs for adjustments mostly. Welded nuts on wheel screws. Seems to make sense.
The knurling was kind of a test of the new knurling tool that came with the new lathe. In the past, I had the "scissor" type of knurler and it worked great. Maybe I just got used to it. The one that I tried today is the normal 2 wheel tool press it into the stock type. Not sure if it has a name. . I will have to practice I think. Not sure how hard to press, do I need a center? feed speeds, etc....Not overly impressed with the knurls but they are ok. If they really bug me, I can make new knobs...but that is down the list right now...
When I started sanding, it became evident that shrouding/shielding will be necessary. Sparks everywhere! @David_R8 those video links might come in handy!
But the sander sands!
There seems to be a bump or something going on. Not sure if you can tell in the video. It might be a sander seam, or an issue in the speed controller. Not a problem at higher speeds. I thought it might be a platen issue but after moving the stock around, I don't think so.
Here is the test run.