-
Scam Alert. Members are reminded to NOT send money to buy anything. Don't buy things remote and have it shipped - go get it yourself, pay in person, and take your equipment with you. Scammers have burned people on this forum. Urgency, secrecy, excuses, selling for friend, newish members, FUD, are RED FLAGS. A video conference call is not adequate assurance. Face to face interactions are required. Please report suspicions to the forum admins. Stay Safe - anyone can get scammed.
-
Several Regions have held meetups already, but others are being planned or are evaluating the interest. The Calgary Area Meetup is set for Saturday July 12th at 10am. The signup thread is here! Arbutus has also explored interest in a Fraser Valley meetup but it seems members either missed his thread or had other plans. Let him know if you are interested in a meetup later in the year by posting here! Slowpoke is trying to pull together an Ottawa area meetup later this summer. No date has been selected yet, so let him know if you are interested here! We are not aware of any other meetups being planned this year. If you are interested in doing something in your area, let everyone know and make it happen! Meetups are a great way to make new machining friends and get hands on help in your area. Don’t be shy, sign up and come, or plan your own meetup!
You are using an out of date browser. It may not display this or other websites correctly.
You should upgrade or use an alternative browser.
You should upgrade or use an alternative browser.
2x72 sander
- Thread starter ShawnR
- Start date


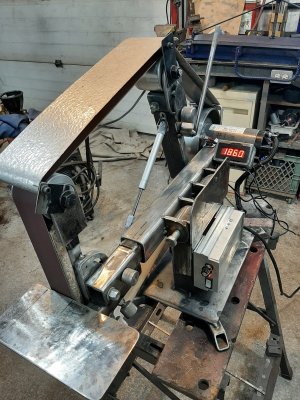
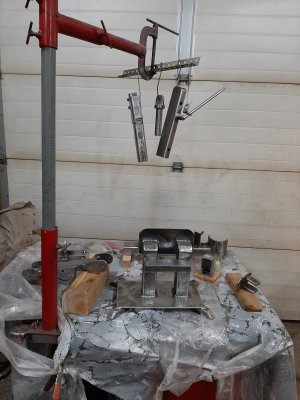
Still plugging away. Some tasks take way too long! Took days to build the box for the tach, (figured out a nice size in aluminum, found some rectangular tubing that would work, cut ends, practiced tig welding before I started on the box, ran out of argon Sunday, after I actually started on the box,.... decided that steel would work, repeat process above, Migged it together, layout and cut a nice hole for the display, found out no room for connections in the back, and so on.....  ) and then get the tach working. Lost a couple of magnets along the way....apparently centrifugal force beats magnetic force. I heard them fly but no idea what they are stuck to in the shop....
 And then I found out that the sensor only works on one pole of the magnet. I was wondering why it worked only sometimes. Spent sometime trying to fix an alignment issue when it was really a North South issue. Discovered that after reading the instructions that come with the tach... But the speed sensor works well now. The magnets are magnetically stuck to the inside of the drive wheel and epoxied into place too. ("they" cause one is the trigger and the other, opposite pole out, is there for balance. Probably don't need it but thought it wouldn't hurt)
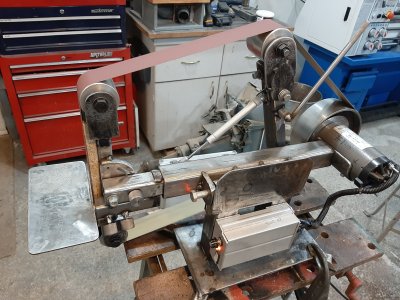
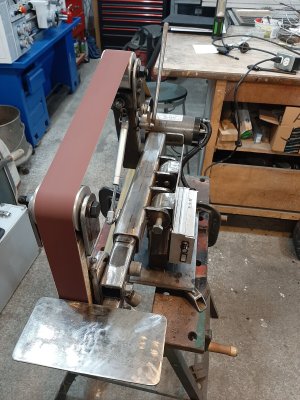
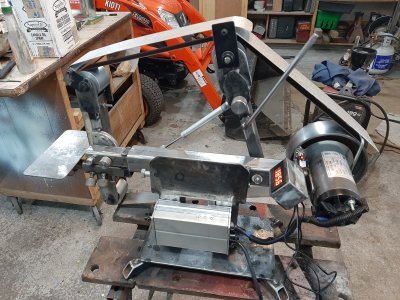
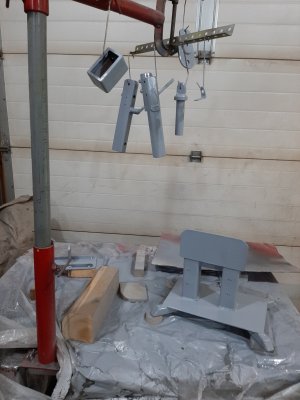
Today's shop was mostly spent on the shrouding. I watched Vanderley's video again (see post #86) for ideas but did not get as particular as he did. Youtube does not need any more really good hobbyists so I am shooting for mediocre.") I am pretty happy with the shroud actually. I was not sure where I was going with it this morning when I started but found the pebbled aluminum tucked away and sizing seemed good. I tapped 1/2" aluminum rods for rests to hold the 2 tops covers and the motor rest is just a piece of 1/4" rod, welded to the motor mount and bent so that the shield rests on it. The top 2 shrouds have to move for belt changes and they seem to accommodate that ok.
I am pretty happy with the shroud actually. I was not sure where I was going with it this morning when I started but found the pebbled aluminum tucked away and sizing seemed good. I tapped 1/2" aluminum rods for rests to hold the 2 tops covers and the motor rest is just a piece of 1/4" rod, welded to the motor mount and bent so that the shield rests on it. The top 2 shrouds have to move for belt changes and they seem to accommodate that ok.
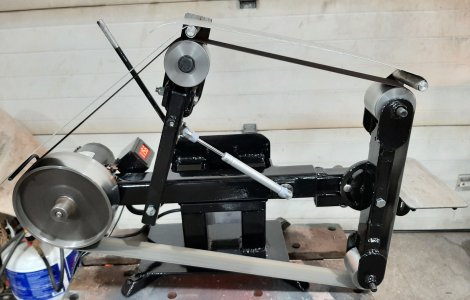
Can't say I am 100% happy with the motor control circuit but I was waiting to get the tach installed to have an idea of what is going on. I seem to be able to bog the sander down by pressing the material too hard, and then when it catches up, it over shoots and over revs. The trick might be simply not to bog it, let the belt do the work. Also, the motor can go way too fast I think so now I will be able to tell where I am at. The drive wheel is about 21 inches circumference so looking at the tach, multiply for 20 for a quick value of belt speed, or 21 if particular (or 20.625 if really really particular...but I ain't) I had aspirations of using an arduino to display actual belt speed but not now. Maybe later.
) and then get the tach working. Lost a couple of magnets along the way....apparently centrifugal force beats magnetic force. I heard them fly but no idea what they are stuck to in the shop.... And then I found out that the sensor only works on one pole of the magnet. I was wondering why it worked only sometimes. Spent sometime trying to fix an alignment issue when it was really a North South issue. Discovered that after reading the instructions that come with the tach... But the speed sensor works well now. The magnets are magnetically stuck to the inside of the drive wheel and epoxied into place too. ("they" cause one is the trigger and the other, opposite pole out, is there for balance. Probably don't need it but thought it wouldn't hurt)Today's shop was mostly spent on the shrouding. I watched Vanderley's video again (see post #86) for ideas but did not get as particular as he did. Youtube does not need any more really good hobbyists so I am shooting for mediocre.
I am pretty happy with the shroud actually. I was not sure where I was going with it this morning when I started but found the pebbled aluminum tucked away and sizing seemed good. I tapped 1/2" aluminum rods for rests to hold the 2 tops covers and the motor rest is just a piece of 1/4" rod, welded to the motor mount and bent so that the shield rests on it. The top 2 shrouds have to move for belt changes and they seem to accommodate that ok.Can't say I am 100% happy with the motor control circuit but I was waiting to get the tach installed to have an idea of what is going on. I seem to be able to bog the sander down by pressing the material too hard, and then when it catches up, it over shoots and over revs. The trick might be simply not to bog it, let the belt do the work. Also, the motor can go way too fast I think so now I will be able to tell where I am at. The drive wheel is about 21 inches circumference so looking at the tach, multiply for 20 for a quick value of belt speed, or 21 if particular (or 20.625 if really really particular...but I ain't) I had aspirations of using an arduino to display actual belt speed but not now. Maybe later.
Attachments

Not bad it would probably help with the slipping if you extended the arm out more allowing you to have the tracking wheel in a lower position that would give you more purchase on the drive wheel.
I don't think the belt is slipping. The motor is actually slowing down due to the control circuit, I believe. I have other MC60 controllers to try as well as another type so might experiment a bit. I would think the treadmill motor is strong enough since it drives a much larger belt with a person on it, although the roller it drives is about 3" from this 6"+ drive wheel where I am direct drive so losing that advantage.

Ah the final touches! So how do you find it now that you have used it for a while? Has any hindsight kicked in for any improvement?
I have just machined the rollers for mine I have a used belt that will serve to decide wheel placement then I can design the frame.
mmm....have to think about it (or rather, I should but apparently, I am going to start babbling...)
For what time I did use it, I really liked it! It will be a great addition to the shop.
I don't like that I can bog the motor but that is a motor controller issue or user error. Letting the sander do the work with speed and not pressure should be fine. A couple of the "evolutions" I really like. I feel like it has been a long project but when I looked back to my first post, it has been just over 3 months. That was from no solid plan to casting wheels to painting. A lot of other stuff happened in there too so not too bad I guess. If I had a plan to follow, and it was my only project, from the beginning, it would have been faster. My whole backhoe took me a year to build. Each day, out to the shop and work on the next page in the manual. On this project, lots of sketching, head scratching, posting and reading responses, etc.....the base is a good example. I started out with the flat plate, but made the platen too big for that to work. I then added the feet and really like the look of it, and it made it more stable.
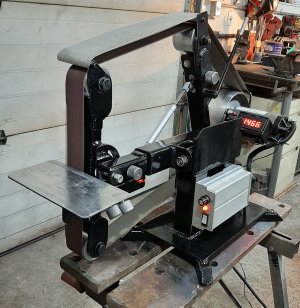
Tension and tracking mechanism work great! Tilt function in platen works great. Even the horizontal option works well and that was a real head scratcher! I wanted things to look good but of course function well. So I feel like I just kind of fumbled along. With the talents here on this forum, I often thought others would do things differently but for me, it was a successful and rewarding project. After using it, it quickly became obvious that a shield was needed. That worked out well. I might do a pan like Vanderley did but it will most likely sit on my welding bench so not sure it will be needed. As long as sparks are not flying back in my face, it should be ok. The shield, as shown, does that. And it is light and adjustable.
I still need to decide on a platen. The melamine looks like crap but with the hard smooth surface, it actually works well. But I will be changing it out for something...maybe I will splurge on the tempered glass ones available on ebay..... Maybe those with these sanders can chime in and tell me what they use.....?
Thanks for asking @Tom O . If you look back through my posts, you will see most of what I did. If you have any questions, ask away but I have seen your work so pretty sure you don't need my input!
Cheers,
Last edited:
Hey Shawn looking great on the paint job, you've built yourself a nice machine and you learned a lot, and with a lot of guys on here you can always see improvements in the things we build even though we may never change or fix it we know it can be done better and that knowledge is valuable to other members looking at a similar project. This is a quote I recently heard and its very true
"Every model is wrong, but some can be useful"
"Every model is wrong, but some can be useful"
In addition to adding a DRO to my Grizzly milling machine, I am also going to build some Kant Twist clamps - posted elsewhere. In addition to those projects, I am planning on making a 2 x 72 inch grinder, based closely on Brian House's design, which is all over YouTube... Working with a family member who also wants one, so we will build a pair of these. Planning on using a 2HP, 3 phase motor with Chinese VFD. I like House's design and think I can handle the issues around getting two square tubes to slide together, one inside the other.
Clamp project update - have the second prototype of the 10ga metal arms for a 4.5" clamp here at home. Cut by a local company using their laser cutter. Very nice. I left the holes undersized enough to allow for reaming, but now I wonder if I should have specified them exactly. One hole (to be reamed to 5/16") I specified as .300", and it measured .2995 - plus looked great as well.
2 x 72 inch grinder update. I had all the parts cut from 3/8 steel plate by the same local company that is doing the clamp parts. Very nice work using the computer files I bought from Brian House. Struggling a bit with the seam welds - not enough air to run my new 1/2 x 18-inch belt air grinder.
Just ordered a Chinese DRO for the large Grizzly, so that one no longer for sale. Kind offers from several of you to assist with the install and I may get back to you on that. The smaller tabletop Grizzly round column mill is now for sale and I have had a few expressions of interest. I will be replacing the Kijiji ad with a better description.
I think this mostly wraps up this project. I am still fiddling with the power supply for the tach, or rather, the housing and wiring of it. There is not a lot of room in the control box for additional wiring. The tach needs a separate 12 volt (ish) power supply. As mentioned earlier, I do not want to draw from the control board..so that lead to another supply (wall wart) which meant two plugs (ugly and not efficient) but then the stand was not designed for a second electrical box...yada yada yada...spent way too much time on this minor aspect of the project and still not happy with it so going to walk away. Should have just remounted the circuit board into a larger box from the beginning. Need to make a nicer knob/lever on the table lock. Right now, it is just a 1/4" wing nut. I guess I missed it when I was doing the other knurled knobs. Future use will show if I need to make any major modifications.
But otherwise, on to other projects.")
Thanks for following along and the input along the way.
Cheers,
But otherwise, on to other projects.
Thanks for following along and the input along the way.
Cheers,
Attachments
Chris Cramer
Super User
What motor did you use for this project? After making several knives with a cheap craftex belt sander, I've become determined to build a 2x72 belt grinder. I got some single phase 1hp motors for free, but I've read that 2hp is recommended for 2x72. Would 1hp work for a smaller sized square belt grinder that still uses 2" belts?
Chris Cramer
Super User
Looking at the Grizzly g1015. If this grinder works well for steel as a vertical 2 wheel design with a 1hp motor; then do you think a 1hp 3450 rpm motor would be good enough for a 2 wheel 2x72 design?
Chris Cramer
Super User
I decided to go for a 2hp motor on kijiji. The price was still $200 but I already have all the metal I need for the frame, and most of the other components that are needed.
What motor did you use for this project? After making several knives with a cheap craftex belt sander, I've become determined to build a 2x72 belt grinder. I got some single phase 1hp motors for free, but I've read that 2hp is recommended for 2x72. Would 1hp work for a smaller sized square belt grinder that still uses 2" belts?
Sorry @Chris Cramer , I have been away a lot this summer chasing fish and doing the cottage thing. I see you have good input already. My motor is 2.5 hp from a treadmill. I think the motor size is good but I believe my issues are with the controller. If I bog it, the controller takes a while to catch up. I find if I am patient (need work in that area), and let the belt do the work, the machine works great. A straight up 2 hp with no speed controller will work great. If you want variable speed, then the controller and motor type will determine your satisfaction, imho.
What kind of 2 hp did you get? AC?DC? RPM?
Are you planning on variable speed?
I have started to build a grinder like this. After watching a lot of videos on the Internet, I decided to go with the Houseworks design - the Revolution 4 I think Brian calls it. I bought an air belt grinder for taking out the welds inside the square tubing. My compressor is not up to a continuous grind, so I have to do this about 1cm at a time - then let the compressor catch up. I bought the electronic files from Brian and had a local metal fabricator cut out all the parts for me (except for the tubing) using 3/8" steel plate - as recommended. This company did a fine job and I am very happy. Not just a great job, but a lot cheaper than buying the parts and having them shipped from Florida.
I got the square tubing locally. Turns out that 1.5x1.5x.25" square tubing is nearly impossible to find locally. I did get a quote from MS, but their price for this was more expensive that for solid bar stock. So, I think I am going to go with solid square aluminum. I have a milling machine to take off the corners for a great fit - a 3/16" round-over bit does the job. Planning on a 2HP 3-phase motor with a VFD. I considered a motor from a treadmill, but got freaked out a bit by those who report a short life for those motors because they are not sealed, and dust from any sanding operation could play havoc with the bearings. I plan on buying the wheels from Nexus in Lethbridge.
Also, I am not happy with the tracking assembly that comes with the plans from Houseworks. So, I plan to use the milling machine to make one that fits properly and is wider. There is about 1/16" of play in the design from Houseworks and while it might work OK, it seemed very sloppy to me. Even when I wear my woodworking hat, I generally aim for about .01" closeness of fit, so this part of Brian's design seems very odd. Should be quite easy to get a fit of 1 or 2 thou using the milling setup.
I am not a welder and have no plans to learn. I am working with my grandson who is also building one of these and he is a capable welder and will do that part for the both of us.
Chris Cramer
Super User
I got a marathon electric 2hp 3450 rpm single phase motor. I'm confident that this motor will be powerful enough for metalwork, but since it is only single phase I will need to use a pulley system for variable speed.