• Spring 2024 meetup in Calgary - date Saturday, April 20/2024. discussion Please RSVP Here to confirm and get your invitation and the location details. RSVP NOW so organizers can plan to get sufficient food etc. It's Tomorrow Saturday! you can still RSVP until I stop checking my phone tomorrow More info and agenda
  • We are having email/registration problems again. Diagnosis is underway. New users sorry if you are having trouble getting registered. We are exploring different options to get registered. Contact the forum via another member or on facebook if you're stuck. Update -> we think it is fixed. Let us know if not.
  • Spring meet up in Ontario, April 6/2024. NEW LOCATION See Post #31 Discussion AND THE NEW LOCATION

What inserts do you like and why?

thestelster

Ultra Member
Premium Member
I did a bunch of research on insert tooling and one key learning was that the nose radius is the minimum depth of cut. This has a lot of implications for us small lathe owners. If the radius is too large then there's a good possibility that the machine won't be able to make that depth of cut.
All of this lead me to use HSS far more than insert tooling simply because I can keep it razor sharp and take depths of cut that my South Bend 10K can manage.
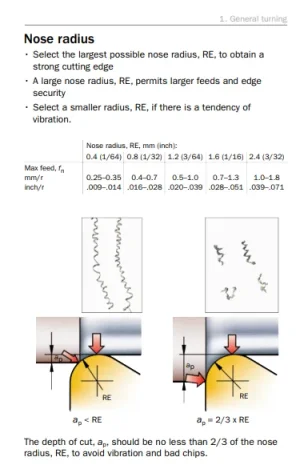
Hi David, I agree, but with too small of a nose radius, the finish isn't the best, unless you have a very slow feed, otherwise it almost looks like a super fine thread. According to the Sandvik Handbook:

1668625279434.png
 

DavidR8

Scrap maker
Administrator
Moderator
Premium Member
Hi David, I agree, but with too small of a nose radius, the finish isn't the best, unless you have a very slow feed, otherwise it almost looks like a super fine thread. According to the Sandvik Handbook:

View attachment 27976
Definitely, I round over the nose slightly to avoid that exact problem. For a finishing pass I will set the feed rate very slow, I have the ability to set a rate as fine as .0015"/rev which is obviously pretty glacial and I can't say that I've ever used it.
 

thestelster

Ultra Member
Premium Member
Also, have a look at those red arrows in the Sandvik Nose Radius picture. The size of those arrows is of significance! With a shallow depth of cut, relative to the nose radius, the radial forces created are larger than the axial. This will cause chatter, especially with slender parts. But when we take a deeper depth of cut, relative to the nose radius, the axial and radial forces are almost equal, therefore far less tendency for chatter.

1668626806410.png

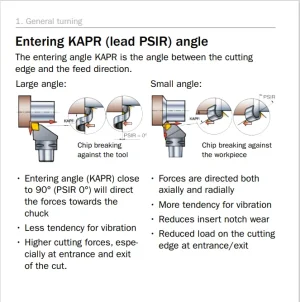
The same goes for lead angle. If we can have the majority of the forces directed towards the chuck, we should have less chatter, than if we had a tool entering at less than 90 degrees.
(The picture of the "Small Angle" doesn't really describe this well). In the picture of the 90degree lead angle, the vast majority of the forces are directed towards the headstock, (the heaviest and sturdiest part of our lathe), but with the "Small Angle", in the shown example 45degrees, the forces are directed towards the chuck and towards the part equally, therefore the resulting forces are off on an angle which would increase the propensity for chatter, especially on slender parts.


1668626848857.png
 

Susquatch

Ultra Member
Administrator
Moderator
Premium Member
I'd like to add a comment, certainly out of order.

Out of order? NEVER!

I've used the cheapest of the cheap, mid-range and premium inserts over that last 40 years. Yes even before ISO designations for inserts were commonly available sizes.

Here's my take for a hobby guy, and until tha last 14 years using a 1.5 HP lathe and 1 HP mill.

If you use the cheap ones carefully, they will get you by. They are better than HSS in tough stuff like shafting (4330 in my case), but they don't last long and won't survive interrupted cuts or tough situations.

Yes, the cheapos have gotten me by so far too. I don't do a lot of tough stuff machining though so maybe I've been lucky. My nemesis is interrupted cuts like holes or keyway. I put the carbide away for that kind of thing now.

During all this time I also was using Kinnemetal tooling (holder and inserts) for a single tool, a triangle tool in my 12X37 lathe. Because the price of the inserts I tried to minimize their use, and developed a goo balance between cheap inserts, HSS and the Kinnemetal ones.

Kind of where I am except nothing remotely like Kinnemetal here so my balance is between low cost inserts and HSS.

I agree that the trigon insert is superior to the triangle, because it is stronger, but I' don't have a holder for them.

I like what @John Conroy said about his diamond inserts. If I can make that work, I might give them a go.

Here's a bit of a kicker: The K tool holders aren't much more costly than any of the mid-range tool holders. I am looking to start tooling for CNMG for my bigger lathe and The holders are quite reasonable in price.

OK, that got my attention.

I've only had one time where the triangle tool was not up to the task: an 8" diameter 4140 PH steel pipe section I was trying to chamfer. The lath was just too flimsy for the tool pressure required on my 12X37, and I fractured the insert. Repeatedly.

I did that with carbide end mills once. After two I was ultra careful. After 3 I changed to HSS and had no more problems. Not the same as what you describe, but I get it....

If you have a small lathe, know that the cutting depths needed to really take advantage of carbide can be very hard or impossible if you lathe isn't rigid enough. You can help fix this by using inserts ground for finish on aluminum - for steel, but know they have a shortened life, but will work well.

Hmmmmm. Seems counter intuitive but if it works it works!
 

DavidR8

Scrap maker
Administrator
Moderator
Premium Member
Hmmmmm.... Any idea why that might be?
No idea to be honest but I expect it has to do with material engagement. If the DOC is less than the radius, I would think that the cutter would tend to 'ride' up and over the edge of the material.
 

thestelster

Ultra Member
Premium Member
Out of order? NEVER!


Yes, the cheapos have gotten me by so far too. I don't do a lot of tough stuff machining though so maybe I've been lucky. My nemesis is interrupted cuts like holes or keyway. I put the carbide away for that kind of thing now.


Kind of where I am except nothing remotely like Kinnemetal here so my balance is between low cost inserts and HSS.


I like what @John Conroy said about his diamond inserts. If I can make that work, I might give them a go.


OK, that got my attention.


I did that with carbide end mills once. After two I was ultra careful. After 3 I changed to HSS and had no more problems. Not the same as what you describe, but I get it....


Hmmmmm. Seems counter intuitive but if it works it works!
The inserts designed for aluminium are extremely sharp with large angles. Great for soft materials, but easily chipped with steel, unless you take very shallow cuts.
 

Susquatch

Ultra Member
Administrator
Moderator
Premium Member
I dunno....machining bolts can be pretty tough. I'm sure the quality of the bolt makes a difference but the ones I've done are usually a hard go.

You are right. I machine a lot of bolts. Most are old soft bolts but many are Grade 8.

Ok, I take it back. Now I'm even more lost.
 

Dabbler

ersatz engineer
I machine bolts all the time. Shorten them. Flatten out their heads. Make a cap head bolt just a *wee* smaller in diameter. The options are unbounded!
 

little ol' e

Jus' a hobby guy
@thestelster, try not to overthink this if you can. I overthink all the time and it kills me sometimes.
I know the brain sometimes needs to feel we are going by the book, but sometimes we need to throw the new books away and bring back the old ones....
Now where did I put my dam magnifying glass? The old books have such small letters...

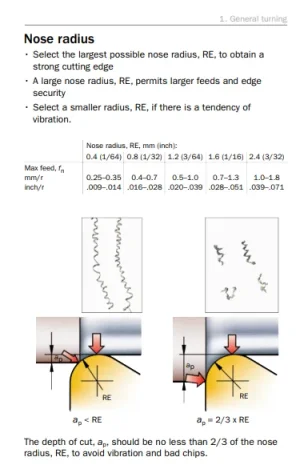
The illustrations posted above are for optimum cutting conditions. It is very difficult to have every style insert, radius and holder at your disposal doing this as a hobby.

If you go by the book and illustrations above in order to find optimum cutting conditions for each part your machining in a hobby shop. You will be upside down on costs, along with piles of headaches trying to achieve the optimum cutting conditions in all types of materials.

Then you start thinking do I need a 90deg holder, 95 deg, 93 deg and so on.. looking for that optimum cutting condition.
Try not to let the " catalogue " mess you up.

Just know, when using indexable inserts, "especially nice new sharp ones..." be careful going into rads with them lol, plunge in with a nice used insert first it won't squack and chatter as much.
That's why I mentioned in the past, after roughing change the insert, after semi, change the insert but keep them aside for these types of applications.

Hobby guys, including myself, really need to stick to the basics when manual machining. Yes, indexable tooling is the way to go for roughing anything out quickly if your lathe can handle it.

Finishing with .012-.015 stock leftover is great for a diamond finishing insert with a .015r which I think is optimum for stock to leave on my manual lathe without chatter.
That may be too much for some and not enough for others depending on the part being turned with inserts they have on hand. My rads have been plunged out by this point for blending since I have so many different types of inserts to choose from.

Bottom line here is, if you only have 1 or 2 style of holders and inserts to choose from, along with say a button cutter,
your going to get some chatter. Your going to get an insert into a full diameter radius eventually, simply because its easier then grinding several different rads continuously on HSS and blanks if your turning contours and shaping. Most guys find it much easier to just plunge in and done, then blend or polish it out.

I find rule of thumb's do not apply so much in manual turning.
CNC, yes follow rule of thumb 'n' toe...

Speaking of " Rule of Thumb "
When turning with inserts. DavidR8 described it perfectly as mentioned above. If you have a .015 rad, take a minimum .015 DOC and so on.
I would say stick to insert rads that your lathe can handle in depths of cut. I can't say I follow the rules all the time thou..

Anyway, typing sucks on this end, I hope this shines some light on the illustrations with inserts.
 
Last edited:

Susquatch

Ultra Member
Administrator
Moderator
Premium Member
Maybe I should send you some titanium aircraft bolts and then you can really test inserts and hss on them.

If you look at the abs cutter I made, you can see a typical use of an old bolt. In fact, it still has the root of the old threads on it. It's just old steel, nothing fancy. But it's free. I think that's fairly typical of what I do. I usually part the head off and turn off the old threads to get a piece of rod I can use for other things. But sometimes the old head becomes part of whatever I am making. For example, my lathe height standard is just an old bolt with the head turned round to make a foot to sit on the ways.

I also do a lot of what @Dabbler describes - modifying a bolt for a special purpose.

Now that it's been pointed out, I'd bet a lot of my insert failures are the result of turning the odd grade 8 bolt into something more useful.

I bet I could find ways to use your titanium too.
 

DavidR8

Scrap maker
Administrator
Moderator
Premium Member
Speaking of " Rule of Thumb "
When turning with inserts. DavidR8 described it perfectly as mentioned above. If you have a .015 rad, take a minimum .015 DOC and so on.

Anyway, typing sucks on this end, I hope this shines some light on the illustrations with inserts.
I learned a ton by watching Stefan Gottewinter here:
The main point being that if you are using insert tooling, the nose radius is going to determine the minimum DOC. Without some planning it means that 'sneaking' up on the final dimension may be near impossible because the final pass might be less that the minimum DOC of the insert.
I had to learn to figure out my max DOC on the material and if the resulting final pass was going to be more or less than the minimum DOC. If less I'd change each DOC so that the lass pass was at the minimum DOC or slightly more.
 

PeterT

Ultra Member
Premium Member
Hmm.. for 'mystery metal' bolts, that could present any number of issues - unknown alloy, toughened skin, maybe slightly deformed, corrosion scale... all that good stuff. That sounds like a perfect application for HSS to rough it down, or maybe brazed carbide which are spit cheap & can be dressed with the right abrasive. Once you are beyond the bad stuff & hopefully more into the consistent core, then break out the inserts. Nothing saying it has to be one tool to do a job. Use the axe to fall the tree, save the fine chisels for when it becomes a plank LOL
1668636171550.png
 

little ol' e

Jus' a hobby guy
Hmm.. for 'mystery metal' bolts, that could present any number of issues - unknown alloy, toughened skin, maybe slightly deformed, corrosion scale... all that good stuff. That sounds like a perfect application for HSS to rough it down, or maybe brazed carbide which are spit cheap & can be dressed with the right abrasive. Once you are beyond the bad stuff & hopefully more into the consistent core, then break out the inserts. Nothing saying it has to be one tool to do a job. Use the axe to fall the tree, save the fine chisels for when it becomes a plank LOL
View attachment 27980
For sure, sometimes I will throw my morning coffee at it, then my lunch...
 

Susquatch

Ultra Member
Administrator
Moderator
Premium Member
The main point being that if you are using insert tooling, the nose radius is going to determine the minimum DOC. This may mean that 'sneaking' up on the final dimension may be near impossible because the final pass might be less that the minimum DOC of the insert.

I didn't see this in the video. (Yes, I watched the whole video.) I did understand his point about splitting the cut. It's a good lesson. Something I never did before but fully understood. I might try it more in more detail another day.

I guess I am a "forum idiot who sneaks up on my dimensions". However, I have only blown a few in a few decades so I'm not accepting his criticism. In fact, unless I'm missing something I'd say that I use the same technique on sneakups as he does with bigger cuts. Basically that is to measure, set a cut, take a cut, measure again, take the same cut or very close, measure again, etc. The key being to take the same cut so spring back etc are accounted for and you are not chasing your tail.

I can't wait to try it with bigger cuts.

But I did not see anything in his video about this business of nose radius limiting the minimum cut.
 
Top