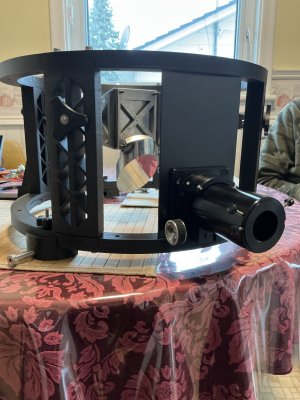
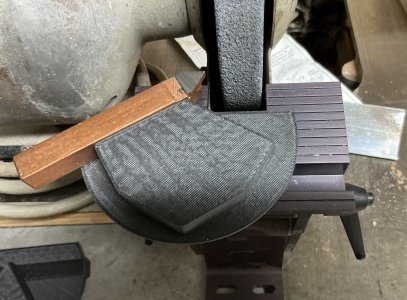
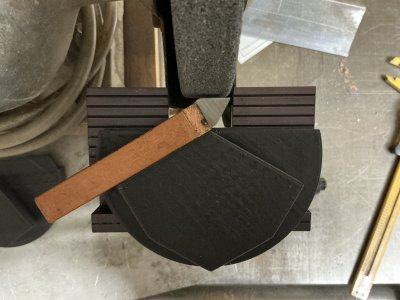
More details please! What is holding down the collet block? And how does that lead screw work inside? Maybe some section views?I made a similar slide plate for my TCG but its a bit of a rigmarole to set up the compound angles. I wanted to see what I could get away with with 3DP assembly & my bench grinder. The drill is held in a 5C collet block, advance into the wheel along fence up to the finger stop. Flip 180-deg & repeat. This ensure left = right. Increment infeed the fence with the mini lead screw. I was quite shocked, actually not too shabby geometry wise. Its the wrong wheel for the job & the grind striations look worse than in real life because I blackened the drill with felt marker & stroked the facet with a stone in an attempt to photo the dual angle. Yes I know, my facets don't quite meet up perfect because the whole setup is just tacked in place. The big issue I already knew from the TCG is few of these hardware store grade 'practice' drills are very coaxial or equal flute. Well, not exactly machine shop quality but it was a fun little project.
-
Scam Alert. Members are reminded to NOT send money to buy anything. Don't buy things remote and have it shipped - go get it yourself, pay in person, and take your equipment with you. Scammers have burned people on this forum. Urgency, secrecy, excuses, selling for friend, newish members, FUD, are RED FLAGS. A video conference call is not adequate assurance. Face to face interactions are required. Please report suspicions to the forum admins. Stay Safe - anyone can get scammed.
-
Several Regions have held meetups already, but others are being planned or are evaluating the interest. The Calgary Area Meetup is set for Saturday July 12th at 10am. The signup thread is here! Arbutus has also explored interest in a Fraser Valley meetup but it seems members either missed his thread or had other plans. Let him know if you are interested in a meetup later in the year by posting here! Slowpoke is trying to pull together an Ottawa area meetup later this summer. No date has been selected yet, so let him know if you are interested here! We are not aware of any other meetups being planned this year. If you are interested in doing something in your area, let everyone know and make it happen! Meetups are a great way to make new machining friends and get hands on help in your area. Don’t be shy, sign up and come, or plan your own meetup!
You are using an out of date browser. It may not display this or other websites correctly.
You should upgrade or use an alternative browser.
You should upgrade or use an alternative browser.
Tips/Techniques Show your shop related 3DP
- Thread starter PeterT
- Start date
Tips/Techniques
pdentrem
Ultra Member
QUOTE="PeterT, post: 199809, member: 22"]
This is an example of something I've been doing more as of late. When you want to fit something with some degree of snugness but the printer tolerance and/or part tolerance can vary a bit so it becomes a trial & error repetition. Sometimes its easier to make the cavity match the actual part dimension, but add some kind of flexure slot so there is some give in the surrounding material.
[/QUOTE]
I was actually pleasantly surprised when I was actually able to seat the carbon fiber plate in the printed slots. I was hoping that the 3 mm plate would not need to be worked to fit the designed .125” slots. I was naturally expecting to sand or file the plate to fit. Well it was a slight snug fit! Bonus! Not every print will be like this, and dried filament is going to be closer to size than wetter stuff. Every machine is also a little different when sizing is more critical.
Pierre

More details please! What is holding down the collet block? And how does that lead screw work inside? Maybe some section views?
The collet block is not held down. You gently push it inward to the fence for contact & slide it down until it grinds a bit off & reaches the foot stop. It is admittedly primitive but this allows you to flip the block & grind the other side to the exact same compound angle repeat
For each grind increment I loosen the lock knob (residing in the slot) & advance the 'leadscrew' knob. It is acting on an embedded hex nut glued into the end. Not in model but I have a spring in between the end of the green fence & the blue swivel table.
The fence runs in a dovetail which actually runs pretty smooth with just minor cosmetic sanding to get the fit.
All the knobs are identical, just use M4 threaded rod to various length
This is the cheesy angle adjuster stop (and is actually needed to support the weight of steel collet block). It has a dome top because the swivel plate above it contacts it tangentially. The idea was to grind a facet, say the primary (both sides of course doing the flip-flop), then screw this adjuster down & grind the secondary with drill/collet remaining in exact same position. This makes a straight band facet. But because of the table swiveling geometry, now the extended drill is a different distance to the wheel. So you adjust the fence stop down the dovetail so the drill end just kisses the wheel & infeed from there. Its this last secondary facet which is pushing the limits of a rather dubious 3DP contraption. Because the facet might only be a 0.010-0.015" wide band depending on the drill size.
I was just about to put this cheap drill press gizmo in my recycling pile, but thought I could give it another chance. I had this gizmo for more than 30 years and never used it. Hopefully this mod will save it from going to the metal scrap.

3D printed some brackets for the soldering iron. I now need to make the different tip sizes for the threaded insert and I got myself a threaded insert heat press.
3D printed some brackets for the soldering iron. I now need to make the different tip sizes for the threaded insert and I got myself a threaded insert heat press.
3D printed some brackets for the soldering iron. I now need to make the different tip sizes for the threaded insert and I got myself a threaded insert heat press.
These are available for small dollars from amazon. You get a little pack that has screw on tips for all the insert sizes. Might have to turn the piece they screw onto to fit your iron, but for 10 or 20 dollars it will save a lot of time
I have one of those sitting doing nothing. Good idea.I was just about to put this cheap drill press gizmo in my recycling pile, but thought I could give it another chance. I had this gizmo for more than 30 years and never used it. Hopefully this mod will save it from going to the metal scrap.
View attachment 66337
3D printed some brackets for the soldering iron. I now need to make the different tip sizes for the threaded insert and I got myself a threaded insert heat press.
pdentrem
Ultra Member
Not well organized yet! Here are some of the stl files that I have made up.
Assorted catchall by pdentrem | Download free STL model | Printables.com
Download 3D printable STL models
www.printables.com
pdentrem
Ultra Member
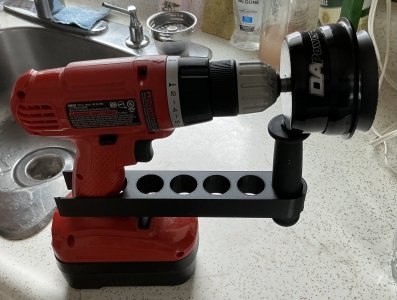
I bought a drill attachment to allow some polishing whatevers. To use you are to hold the drill and the handle with the other hand. Ok, let make it better. Printed a link bar to hold the attachment handle stationary to the drill. Works fine for me. Just have to trim the ears of the slot at the drill end.
Pierre

Pierre

How did you print these? No overall flat surface without support.Not well organized yet! Here are some of the stl files that I have made up.
Assorted catchall by pdentrem | Download free STL model | Printables.com
Download 3D printable STL modelswww.printables.com
The two angled 30 and 60 degree pieces. To much with them as each with two separate pieces a STEP file rather than STL is handier.Are you asking about the grinding fig? Support required or slice the model into top and bottom sections and glue them together. Using PETG the Purple Primer cleaner will permanently glue them together.
Pierre
Send me a dwg in a zip file and I'll see what I can do with it.Unfortunately my cad program does not do step files. I could send you the dwg or dxf file.
Pierre
Those were the same STL's that could be downloaded from the web. With a .dwg I can take the dimensions, recreate it and make a step file for you. What CAD program do you use to create the STLsHere you are.
CAn
Can you provide the dwg?Those are dwg made in Autocad 2000


