• Spring 2024 meetup in Calgary - tentative date Saturday, April 20/2024. Other regions are also discussing meet ups. If you want one in your area get going on organizing it! discussion
  • We are having email/registration problems again. Diagnosis is underway. New users sorry if you are having trouble getting registered. We are exploring different options to get registered. Contact the forum via another member or on facebook if you're stuck. Update -> we think it is fixed. Let us know if not.
  • Spring meet up in Ontario, April 6/2024. NEW LOCATION See Post #31 Discussion NEW LOCATION

Rose Index

TorontoBuilder

Ultra Member
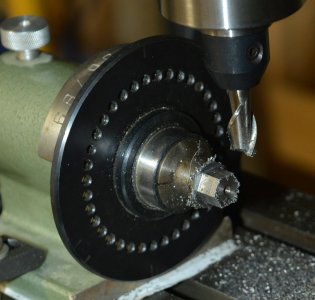
First project today ! Second Lathe chuck key for the four jaw. A simple square end but also a 45 degree feature (cross drill) for the handle. Rose index was handy.
I can't wait to get mine...

I can try to make a slightly larger key to fit one of the cams on my chipmaster spindle that someone bashed up trying to free a stuck cam that was or still is preventing the chuck removal.
 

PeterT

Ultra Member
Premium Member
I've got ta similar project on my drawing board. But I'm considering making a hex on the end so I can use a socket ratchet wrench. I still have a tommy bar cross hole just because, but personally I don't care for them as much.
 

Attachments

  • SNAG-2022-12-10 6.35.31 PM.jpg
    SNAG-2022-12-10 6.35.31 PM.jpg
    14.4 KB · Views: 16
@Timm Rosenthal Laser marker? Wow. Pictures and manufacturer if you get a minute? The lettering is first rate.
Beamer Laser


I have an older B-Series. Mine doesn't have the "Z-axis" that the new ones do.

Beamer is a bit spendy, however I really think the support and help is worth it.
 

TorontoBuilder

Ultra Member
Beamer Laser


I have an older B-Series. Mine doesn't have the "Z-axis" that the new ones do.

Beamer is a bit spendy, however I really think the support and help is worth it.
That fiber laser can be used to reveal multi-colour markings, very cool. I wanted to try something like that for the new plaques for my lathe. You have a very cool tool there tim

 
That fiber laser can be used to reveal multi-colour markings, very cool. I wanted to try something like that for the new plaques for my lathe. You have a very cool tool there tim

The laser could be a complete business all on it's own. I bought a used one because I couldn't justify the cost of a new one. After having it for a while I wish I would have had one years ago. I'm very busy and have too many irons in the fire already.....so it typically sits in the corner. I'm very glad I have it thou.....I just wish I had more time to play with it.
 

TorontoBuilder

Ultra Member
I keep forgetting that with the new grinding fixtures I recently bought I have another way to easily and quickly put flats on bar stock... albeit not as quickly as a mill can.

So I'll just skim pass all my milled flats to give them a smooth finish on a set up like Adam has here:

1670804023425.png
 

YotaBota

Mike
Premium Member
It Works! The trick is to use the same pattern each time. My first try wasn't bad but I was never going to find a wrench to fit a seven sided head LOL. I was laughing hard enough that I had to sit down for a minute.
Here is a shot of try number two using just the six side and not the six&eight sides at the same time, much better.
P1010966.JPG

Thanks Timm, this is going to work out very well.
 

TorontoBuilder

Ultra Member
It Works! The trick is to use the same pattern each time. My first try wasn't bad but I was never going to find a wrench to fit a seven sided head LOL. I was laughing hard enough that I had to sit down for a minute.
Here is a shot of try number two using just the six side and not the six&eight sides at the same time, much better.
View attachment 29072

Thanks Timm, this is going to work out very well.
nice
 
It Works! The trick is to use the same pattern each time. My first try wasn't bad but I was never going to find a wrench to fit a seven sided head LOL. I was laughing hard enough that I had to sit down for a minute.
Here is a shot of try number two using just the six side and not the six&eight sides at the same time, much better.
View attachment 29072

Thanks Timm, this is going to work out very well.
YotaBota,
It sounds as if you like your Index. Please continue to show little tid bits as you use it.....and if you don't mind taking the time please give me your feedback on your opinion of it also. I try pretty hard to make sure that I produce a quality tool. It is very important to me .... that the person taking a chance on by spending their money on it are happy with their purchase and that it truly is a useful tool for them.

I hope some of the other people that purchased these will also chime in. These are growing in popularity as people see the usefulness and convinience. Many people that purchase these get both sizes at the same time, however I do have a handful of people that seem to have purchased on to see what they're like and then purchase the other size later. Whether you are a hobbyist or a proffesional ... I sincerely feel that this is a tool that should be in every machinist's tool box.

Thank you,
Timm
 

YotaBota

Mike
Premium Member
@Timm Rosenthal - so far I do like it and have it hanging on the wall beside the mill. If any of the locals want to see and/or try it give me a shout.
I think the only improvement that would make it better, for me personally, would be if it was made from 2" stock vice the 1.5". I'm not old old, but as I get closer to old old I find smaller items are getting tougher to hang onto. And yes I can hear all the snickers from here about "smaller items". lol
All the best for the holidays and the new year.
Mike
 

jcdammeyer

John
Premium Member
@Timm Rosenthal - so far I do like it and have it hanging on the wall beside the mill. If any of the locals want to see and/or try it give me a shout.
I think the only improvement that would make it better, for me personally, would be if it was made from 2" stock vice the 1.5". I'm not old old, but as I get closer to old old I find smaller items are getting tougher to hang onto. And yes I can hear all the snickers from here about "smaller items". lol
All the best for the holidays and the new year.
Mike
I wouldn't mind trying it although to be truthful any hex heads I've made have been with the 5C collet spin indexer. At the moment I can't think of anything I'm making that needs a hex head.
 

Susquatch

Ultra Member
Administrator
Moderator
Premium Member
I wouldn't mind trying it although to be truthful any hex heads I've made have been with the 5C collet spin indexer. At the moment I can't think of anything I'm making that needs a hex head.

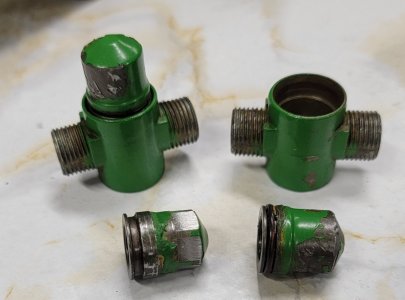
I am the same. I just finished putting a hex head onto some fuel injector caps for my tractor. No way a rose index would have handled that. The caps are only a half inch long and are barely held by a collet in my spin Indexer.

Might do a writeup on them for others with a similar problem.
 

DPittman

Ultra Member
Premium Member
I am the same. I just finished putting a hex head onto some fuel injector caps for my tractor. No way a rose index would have handled that. The caps are only a half inch long and are barely held by a collet in my spin Indexer.

Might do a writeup on them for others with a similar problem.
I'd like to see a couple of pics and description !
 

jcdammeyer

John
Premium Member
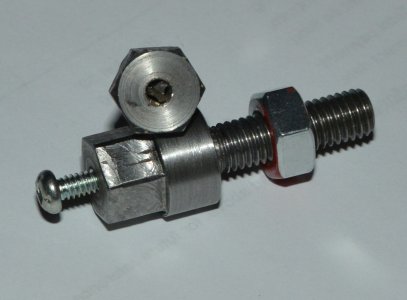
When I made a pair of custom bolts for the mill I first cut the hex heads.

SoftSteel.jpg

Then I turned in down the lathe for the metric threads. This was needed after I broke a tap in the original bolt.
HeadBolt-2.jpg
 

Susquatch

Ultra Member
Administrator
Moderator
Premium Member
I'd like to see a couple of pics and description !

Since the forum was down, I took some time to modify another injector.

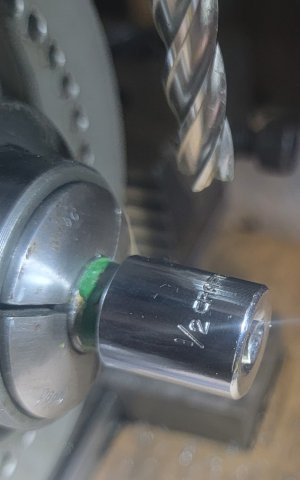
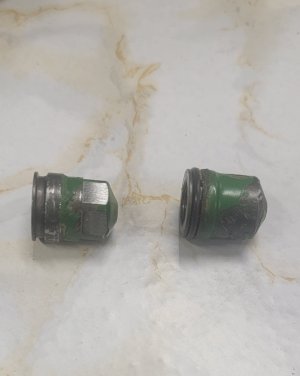
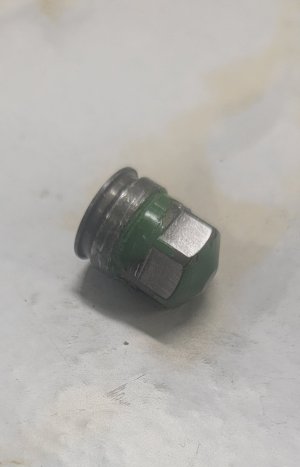
Here is the original and my modified cap to take a 1/2" socket. The cap screws onto the top of the injector return line manifold.


20230106_180953.jpg The dealer uses a special pliers. I couldn't get that to work well at all. My hands are simply too big. I ended up using vise grips. You can see the marks on the cap. Yuk.

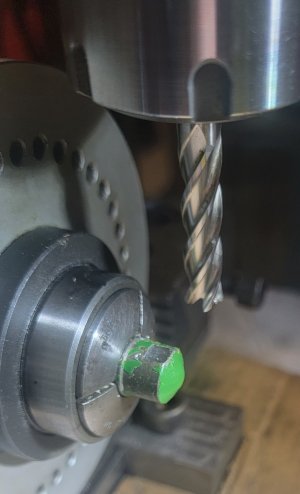
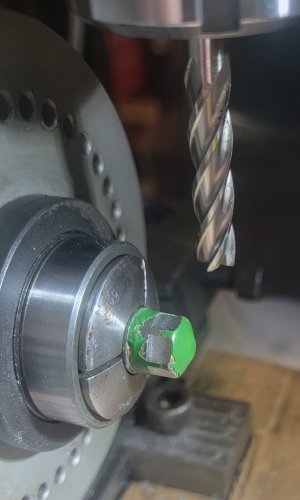
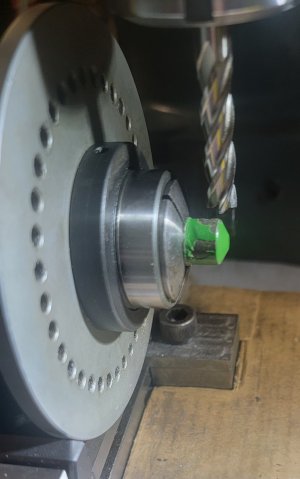
Basically, I clamped my spin indexer in my vise, then set my quill height using a half inch rod and 1thou paper, then dropped the quill 3 thou (1 for the paper and two so the nut will fit into a socket), then put the cap into a slightly bigger collet to fit, then cut a flat every 60 degrees.

Easy peasy. Here are some photos.

20230106_163453.jpg 20230106_163803.jpg 20230106_163900.jpg 20230106_164724.jpg 20230106_164533.jpg
 

Attachments

  • 20230106_163038.jpg
    20230106_163038.jpg
    239.8 KB · Views: 0

DPittman

Ultra Member
Premium Member
Since the forum was down, I took some time to modify another injector.

Here is the original and my modified cap to take a 1/2" socket. The cap screws onto the top of the injector return line manifold.


View attachment 29236The dealer uses a special pliers. I couldn't get that to work well at all. My hands are simply too big. I ended up using vise grips. You can see the marks on the cap. Yuk.

Basically, I clamped my spin indexer in my vise, then set my quill height using a half inch rod and 1thou paper, then dropped the quill 3 thou (1 for the paper and two so the nut will fit into a socket), then put the cap into a slightly bigger collet to fit, then cut a flat every 60 degrees.

Easy peasy. Here are some photos.

View attachment 29238View attachment 29239View attachment 29240View attachment 29241View attachment 29242
Looks good. One thing that is not clear to me....is that part you put a hex on just a cap? Is it solid? It doesn't appear to be threaded in? Just oring seal? And if so why would a feature that allows it to be turned be helpful....don't you need more pulling force than twisting?
 

Susquatch

Ultra Member
Administrator
Moderator
Premium Member
Looks good. One thing that is not clear to me....is that part you put a hex on just a cap? Is it solid? It doesn't appear to be threaded in? Just oring seal? And if so why would a feature that allows it to be turned be helpful....don't you need more pulling force than twisting?

It is actually a nut. It has an internal thread that fits the top of the threaded injector body. As it is tightened, it pulls the manifold down onto the injector.

I have no idea why it didn't have socket flats from the git-go. Perhaps to stop folks from over-tightening?
 

DPittman

Ultra Member
Premium Member
It is actually a nut. It has an internal thread that fits the top of the threaded injector body. As it is tightened, it pulls the manifold down onto the injector.

I have no idea why it didn't have socket flats from the git-go. Perhaps to stop folks from over-tightening?
Oh I see, how utterly stupid of the designers to make it that way. Torque specifications would have been an intelligent way to address concerns of over tightening. Good fix on your part!
 

Susquatch

Ultra Member
Administrator
Moderator
Premium Member
Oh I see, how utterly stupid of the designers to make it that way. Torque specifications would have been an intelligent way to address concerns of over tightening. Good fix on your part!

I'm pretty chuffed with the improvement. But a small part of me thinks I am overlooking something important.....

Anyway, you can only imagine how hard it is to tighten a round nut when it is buried behind a whole mess of other parts and sits on an angle that is very hard to grab.
 
Top