That was going to be my suggestion too.View attachment 27560
Make a shoe such that ther screw bears down on the stock with two points of contact.
OR
Make a set of roses with different hole sizes to better accommodate the stock to be modified.
-
Scam Alert. Members are reminded to NOT send money to buy anything. Don't buy things remote and have it shipped - go get it yourself, pay in person, and take your equipment with you. Scammers have burned people on this forum. Urgency, secrecy, excuses, selling for friend, newish members, FUD, are RED FLAGS. A video conference call is not adequate assurance. Face to face interactions are required. Please report suspicions to the forum admins. Stay Safe - anyone can get scammed.
-
Several Regions have held meetups already, but others are being planned or are evaluating the interest. The Calgary Area Meetup is set for Saturday July 12th at 10am. The signup thread is here! Arbutus has also explored interest in a Fraser Valley meetup but it seems members either missed his thread or had other plans. Let him know if you are interested in a meetup later in the year by posting here! Slowpoke is trying to pull together an Ottawa area meetup later this summer. No date has been selected yet, so let him know if you are interested here! We are not aware of any other meetups being planned this year. If you are interested in doing something in your area, let everyone know and make it happen! Meetups are a great way to make new machining friends and get hands on help in your area. Don’t be shy, sign up and come, or plan your own meetup!
You are using an out of date browser. It may not display this or other websites correctly.
You should upgrade or use an alternative browser.
You should upgrade or use an alternative browser.
6
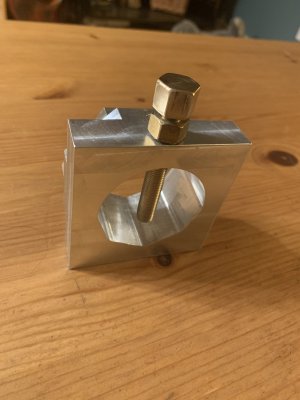
Question for the forum. What to do with the work holding bolt so it does not skate around? I think making the rose index out of metal would help. Also though the end of the work holding bolt in the commercial version is a flat brass insert on the end of the set screw. Would that skate less? Why? I could sharpen the bolt end and have it dig in to the work. Damages the work though.
I had the same thought as @YYCHM, except mine would be an internal pin instead of a socket. I like his idea better. Guaranteed not to slip.
McMaster certainly has a great selection of everything. But a 3/8-24 2.5" long bolt...
They are super organized, efficient, have everything and expensive. |😵
I hear you, expensive.
That's kinda their thing isn't it, they have "everything" if you've just got to have it like an oddball, full thread, grade 8, fine bolt but there's a price to pay. I've been lucky to hitch a ride so to speak when the office was ordering something. They must have spent a fortune on McMaster shipping.
You're probably going about it right to make your bolt unless the coarse thread bolts from Princess would do. I like the suggestions about a saddle fitting like you see on vee block sets.
BTW, that's an interesting fixture you're working on there.
D😎
Dan Dubeau
Ultra Member
Here's my quick and dirty morning break project.
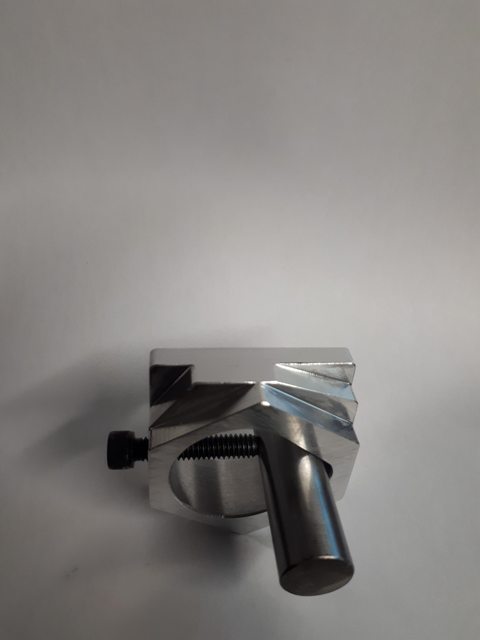
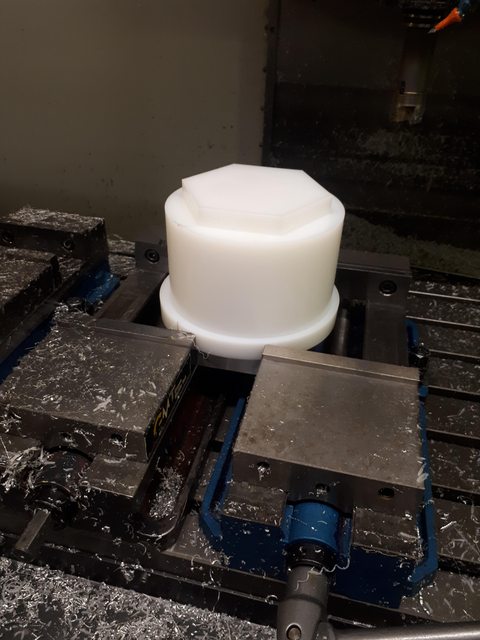
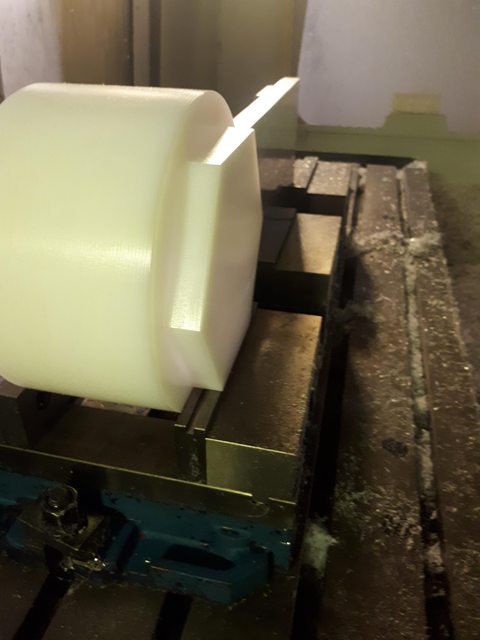
4, 5, 6 sided index. Will hold from 3/8" up to 1.25". I drew it up quick last night, and had planned on making 2 (one for work, one for home) but while cutting it, thought of a few improvements so I only made 1 for now, and will make some changes to the next ones. It's 2"sqx0.75" thick, with a 1/4"-20 screw. Each step is 0.25". Shown with a 5/8" pin.
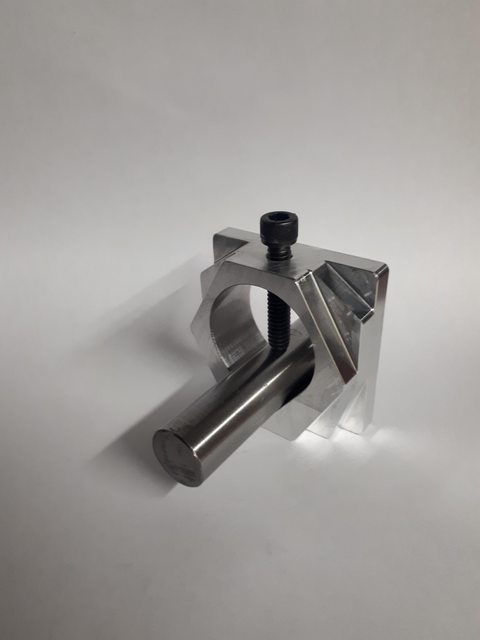
I'll throw it in the tumbler tonight, and send it out for anodizing in our next batch of stuff for work.
Sorry for piling on your thread Janger, but thanks for kicking my butt in gear. Might not see a lot of use, as I use my er32 collet blocks a lot for small stuff, but ya never know. Could come in handy some day.
I'm also attempting to take better picture of my stuff, but the lighting sucks in my office. Instead of just pushing the junk away on my desk and snapping a photo like I normally do, I...well....
baby steps.
4, 5, 6 sided index. Will hold from 3/8" up to 1.25". I drew it up quick last night, and had planned on making 2 (one for work, one for home) but while cutting it, thought of a few improvements so I only made 1 for now, and will make some changes to the next ones. It's 2"sqx0.75" thick, with a 1/4"-20 screw. Each step is 0.25". Shown with a 5/8" pin.
I'll throw it in the tumbler tonight, and send it out for anodizing in our next batch of stuff for work.
Sorry for piling on your thread Janger, but thanks for kicking my butt in gear. Might not see a lot of use, as I use my er32 collet blocks a lot for small stuff, but ya never know. Could come in handy some day.
I'm also attempting to take better picture of my stuff, but the lighting sucks in my office. Instead of just pushing the junk away on my desk and snapping a photo like I normally do, I...well....
baby steps.
DPittman
Ultra Member
Nice work fellas, I was thinking I should try making one of those a while back but then these came up and for the price (when they are on sale) and figured it was too easy not to try them.
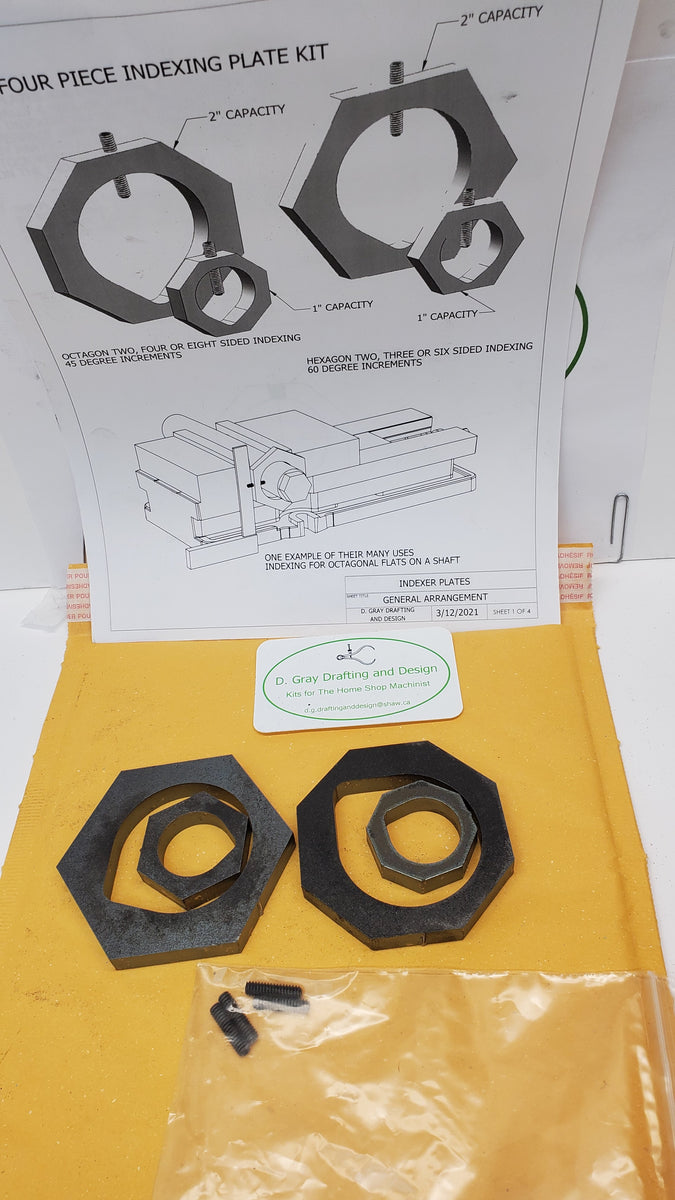
Indexing Plates The complete Kit
Hey Guys Exciting times in my shop. I now have available a complete kit for the Indexing plates. This is a a complete four piece kit . You get four CNC laser cut indexing plates 3/8" thick set screws printed build notes and typical examples of use. The plates are provided as they come off the...
d-gray-drafting-and-design.myshopify.com
Looking forward to the improvements.Here's my quick and dirty morning break project.
4, 5, 6 sided index. Will hold from 3/8" up to 1.25". I drew it up quick last night, and had planned on making 2 (one for work, one for home) but while cutting it, thought of a few improvements so I only made 1 for now, and will make some changes to the next ones. It's 2"sqx0.75" thick, with a 1/4"-20 screw. Each step is 0.25". Shown with a 5/8" pin.
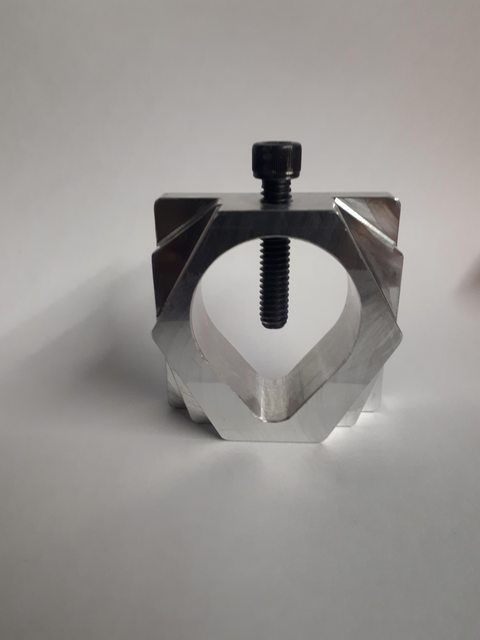
Amazing how our eyes deceive us too. I'd swear from the photos that the sides on the hex part are not the same length.
Dan Dubeau
Ultra Member
Good eye, they are not equal (it IS symmetrical from side to side though). Same with the Pentagon. They are simply run out to join and blend into the outside flat sides. They don't need to be equal due to the way the tool is used, it really doesn't matter, only the angles do. It would also just create a bunch of unnecessary extra work to deburr 😀. Plus I wanted one shared flat surface where the screw came through, and to make all shapes concentric with the center they wouldn't nest together in a nice aesthetically pleasing (to me anyway) homogenized and compact product like that.Looking forward to the improvements.
Amazing how our eyes deceive us too. I'd swear from the photos that the sides on the hex part are not the same length.
Had to get my hightech backdrop out again for that one 😉.

Looking at it again now, I could push the penta sides around a bit to further achieve that goal, and make the indexing flats a bit larger. I'll do it on the next ones. I seriously doubt I'll ever even use the penta side though, but it was kind of an afterthought, when I thought I could fit another set of angles in there. How many times would you need to rough index by 5? Maybe some top secret work for the US gooberment?
It makes for a better sounding name though. Like the 123 block, and the 345 triangle, this is the 456 index block. 😀.
Some improvements would be the center hole angled faces being 60* (they're currently 77.57*). I simply just joined the 2 circles tangentially and didn't pay any mind to the actual angle because I hadn't concieved of holding hex stock with it, and it didn't really matter. Not that I probably ever would, but why exclude it? Would be fun to drill 5 indexed holes radially around hex stock. Might break the universe or something 😀.
Fun morning project though. I need to make a point to do these more.
To be truthful I really can't get my head around how the hex sides which aren't at 60 degrees can then be used to mill a hex head on the end of a shaft. Especially since a larger diameter part moves it's centerline away from the anchor screw.
Maybe I'm not understanding how it's used in the mill. Those photos had so much other stuff in the way that it wasn't clear. To me anyway.
Maybe post an STL file and I'll 3D print a sample to get that hands on feeling.
Maybe I'm not understanding how it's used in the mill. Those photos had so much other stuff in the way that it wasn't clear. To me anyway.
Maybe post an STL file and I'll 3D print a sample to get that hands on feeling.
Dan Dubeau
Ultra Member
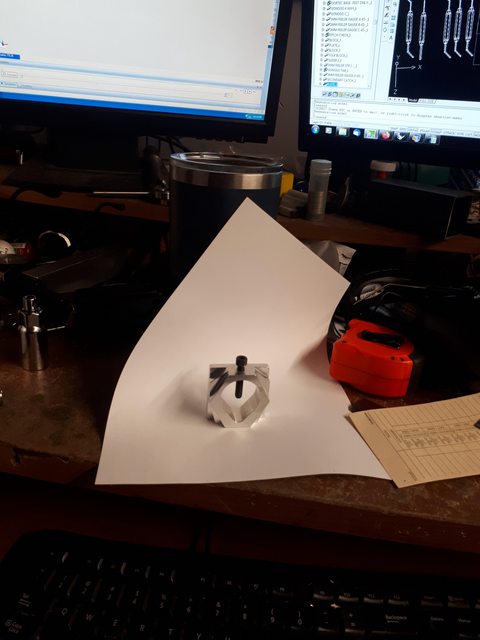
Sorry for the cluttered photos, I'll do better.
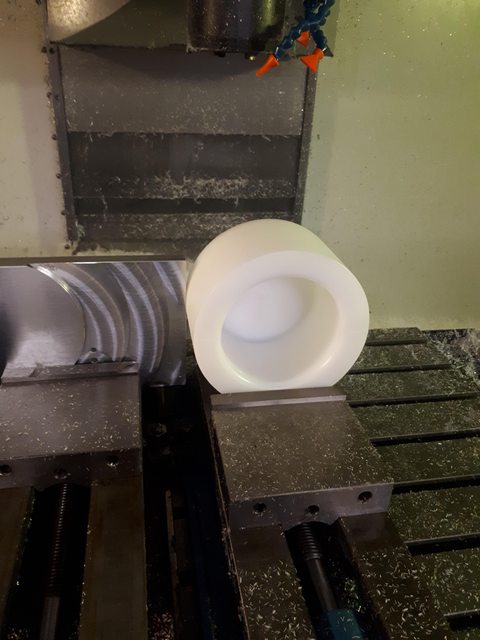
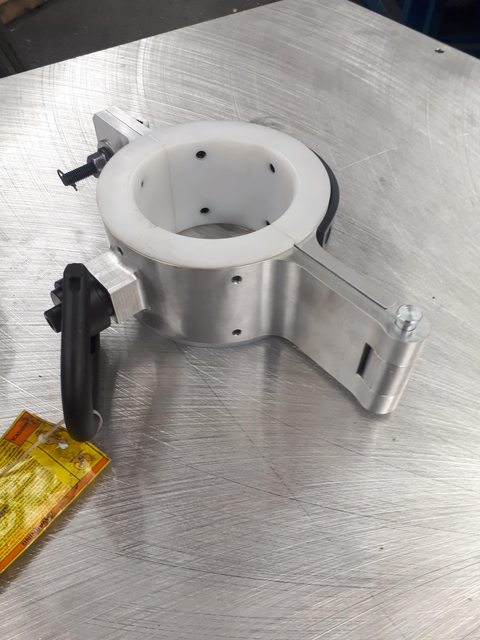
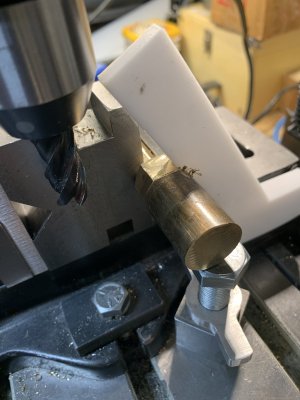
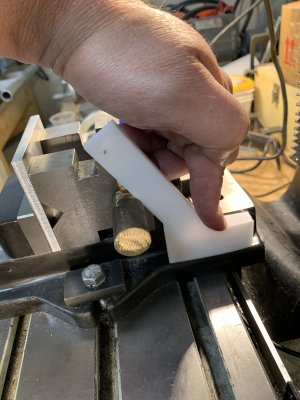
The part/shaft is held in the vise. Centerline/setup is taken from that. The index ring is simply used to index it's rotation by using a square against the machine table. It's concentricity to the shaft does not matter, just the relative angles. Hopefully these picture help show that a bit better. The ring isn't used to HOLD a part like a collet block. A vise is provides the holding power, this just simply indexes. I also wouldn't trust it for high accuracy, but I can see how this would be handy, quick and easy for a lot of things that have looser tolerance requirements.
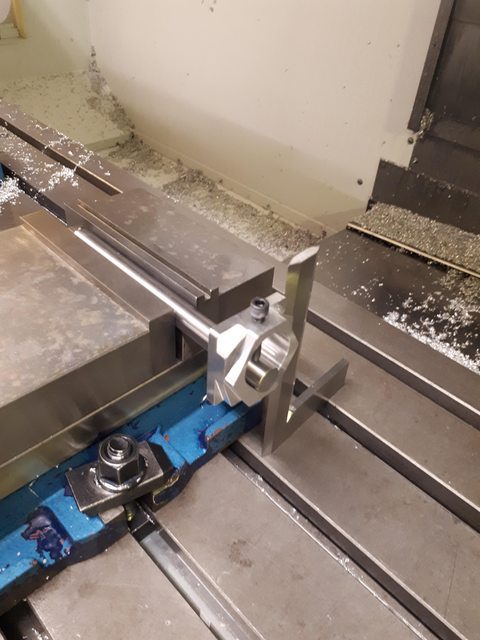
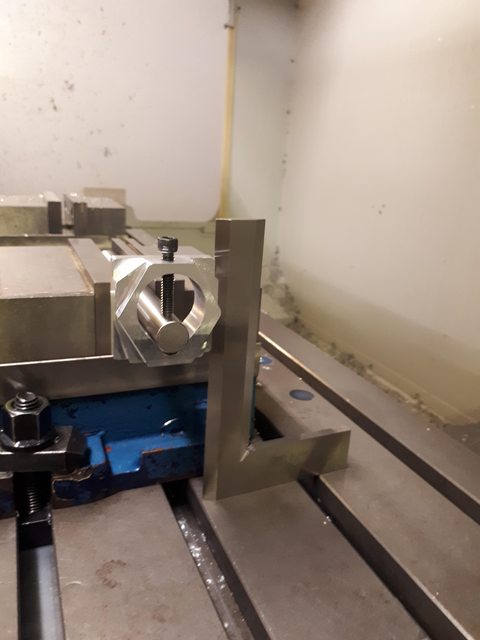
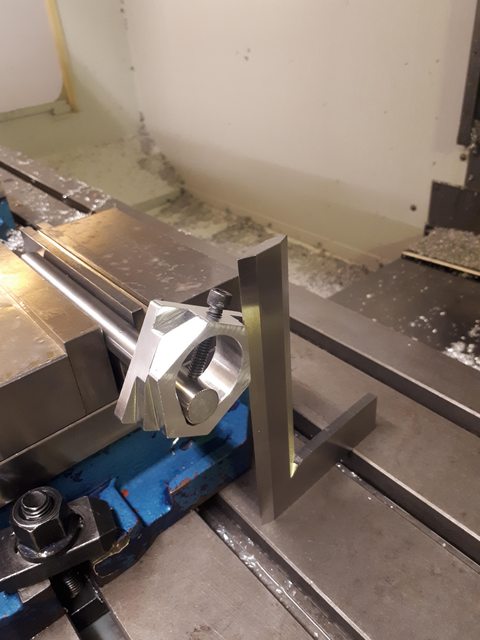
As you can see, the shafts location never changes in relation to the machine setup, ONLY it's axial rotation in relation to itself.
A bigger one for pipe/fab work for notching etc would be absolutely awesome.
The part/shaft is held in the vise. Centerline/setup is taken from that. The index ring is simply used to index it's rotation by using a square against the machine table. It's concentricity to the shaft does not matter, just the relative angles. Hopefully these picture help show that a bit better. The ring isn't used to HOLD a part like a collet block. A vise is provides the holding power, this just simply indexes. I also wouldn't trust it for high accuracy, but I can see how this would be handy, quick and easy for a lot of things that have looser tolerance requirements.
As you can see, the shafts location never changes in relation to the machine setup, ONLY it's axial rotation in relation to itself.
A bigger one for pipe/fab work for notching etc would be absolutely awesome.
Dan Dubeau
Ultra Member
Another benefit is the ability to take it off to do the machining, put it back on and square it up to the table before removing the part, then re-indexing the part and removing it to machine another feature. On some parts there really isn't a good way to hold them in traditional indexing fixtures.
I remember when I first saw it pop up in another youtube video a while back, and thought it was just another gimmick bettermoustrap product, but then I had a lightbulb moment of where and how it would actually shine and be useful to me. I just never got around to making one, nor getting off my wallet to buy one. It's not the end all be all, but sticking another arrow in the quiver never hurts sometimes.
I actually machine indexing features into waste stock sometimes, like on this big uhmw block from last week. I had no other good way to hold this to put in the 12 mounting holes I needed to radially.
While I was making the rose index I needed to have a rose index to make the rose index so that got me thinking if you followed that…
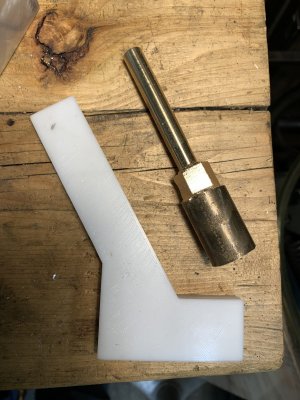
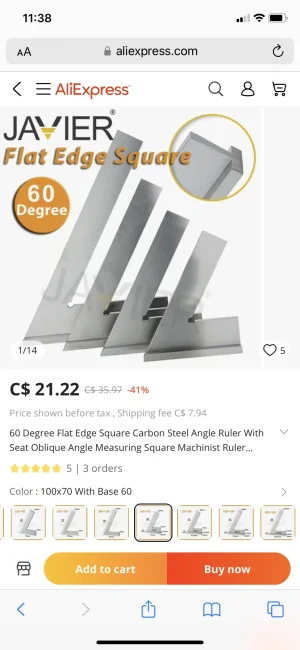
I realized for making square ends on a rod you just need a L square to advance a flat to 90 degrees. No rose index required. From there I reasoned if I had a 60 degree square then I could do hex. That got me looking for a commercial 60 degree square and they do exist on Ali express. I’m reinventing the wheel here… Okay a month and $30 for delivery. What can I do now? My combination set is too big for this set up so I designed and 3D printed a plastic one but at 150 degrees for convenience to clear the vise hold down bolts. It actually worked out well and I made a better bolt head than my first go at it.
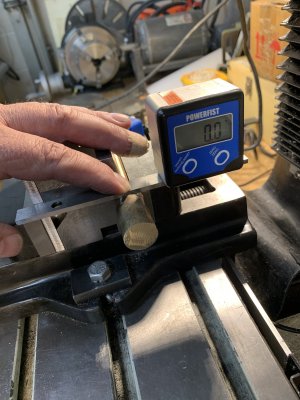
Lastly I learned from other peoples posts on that other hobby forum that with a small parallel and a digital protractor you can remove the part from work holding and put it back reliably and get it level. Learning learning…
If people would like me to post the model or .stl file for the 150 degree square I could put it up on printables.com
I realized for making square ends on a rod you just need a L square to advance a flat to 90 degrees. No rose index required. From there I reasoned if I had a 60 degree square then I could do hex. That got me looking for a commercial 60 degree square and they do exist on Ali express. I’m reinventing the wheel here… Okay a month and $30 for delivery. What can I do now? My combination set is too big for this set up so I designed and 3D printed a plastic one but at 150 degrees for convenience to clear the vise hold down bolts. It actually worked out well and I made a better bolt head than my first go at it.
Lastly I learned from other peoples posts on that other hobby forum that with a small parallel and a digital protractor you can remove the part from work holding and put it back reliably and get it level. Learning learning…
If people would like me to post the model or .stl file for the 150 degree square I could put it up on printables.com
Attachments
-
 7CDF00A4-32E4-4BA5-8550-CC3B7C235F14.jpeg490.6 KB · Views: 26
 -
 5CF969C1-A54C-4811-B758-7B75CDFF8C57.jpeg299.5 KB · Views: 34
 -
 AE7CD9F6-9752-43DC-AC70-0580504ED897.jpeg368.8 KB · Views: 29
 -
 A42CA9FA-DE0C-41DD-B092-6C239BB5A59C.jpeg408 KB · Views: 28
 -
 E798B316-0F80-45C9-A339-6F2EF6BFD4CE.webp74.6 KB · Views: 25
Dan Dubeau
Ultra Member
Nice problem solving John. You could also epoxy a nut on the end of your stock to index the 6 sides with a normal 90* square like the rose index, then remove it after.
This is the one thing I love the most about the machining trade is the problem solving of how do do something with the available tools you have. I have way more fancy tools at work to do stuff than I do at home, so sometimes things are a bit of a headscratcher in my home shop. Other times they come to work with me, and sit on my desk for months until I get some time to get around to them lol.
This is the one thing I love the most about the machining trade is the problem solving of how do do something with the available tools you have. I have way more fancy tools at work to do stuff than I do at home, so sometimes things are a bit of a headscratcher in my home shop. Other times they come to work with me, and sit on my desk for months until I get some time to get around to them lol.
While I was making the rose index I needed to have a rose index to make the rose index so that got me thinking if you followed that…
There is that darn chicken and egg again!
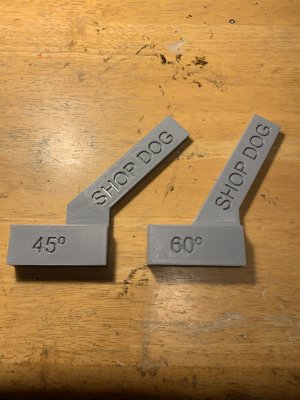
Over the last few days I made a bunch more progress with my project. I printed new angle brackets or squares at 45 and 60°. And I also finished my brass bolt with 3/8 - 24 fine thread. The bolt took me 3 attempts before I could get the hex sides parallel. Now it’s kinda a 15mm. I think I have a working rose index now.
Attachments
DPittman
Ultra Member
Hey that looks really good! I like the angled "squares".Over the last few days I made a bunch more progress with my project. I printed new angle brackets or squares at 45 and 60°. And I also finished my brass bolt with 3/8 - 24 fine thread. The bolt took me 3 attempts before I could get the hex sides parallel. Now it’s kinda a 15mm. I think I have a working rose index now.
John that turned out nice and an interesting project, you'll be able to use the index to make the next bolt🙂. If you wouldn't mind posting the angle bracket or squares file I would appreciate it I am back into some 3d printing after a summer break and think some of these would be handy in different applications and thanks for posting the er32 holders I am gonna try some out and see if they are for me.Over the last few days I made a bunch more progress with my project. I printed new angle brackets or squares at 45 and 60°. And I also finished my brass bolt with 3/8 - 24 fine thread. The bolt took me 3 attempts before I could get the hex sides parallel. Now it’s kinda a 15mm. I think I have a working rose index now.
Done. Have a look for them here: https://www.printables.com/model/313484-45-and-60-degree-fixed-angles-for-aligning-stock-wJohn that turned out nice and an interesting project, you'll be able to use the index to make the next bolt🙂. If you wouldn't mind posting the angle bracket or squares file I would appreciate it I am back into some 3d printing after a summer break and think some of these would be handy in different applications and thanks for posting the er32 holders I am gonna try some out and see if they are for me.
Glad you like them !
The link is incomplete.Done. Have a look for them here: https://www.printables.com/model/313484-45-and-60-degree-fixed-angles-for-aligning-stock-w
Glad you like them !