• Spring 2024 meetup in Calgary - tentative date Saturday, April 20/2024. Other regions are also discussing meet ups. If you want one in your area get going on organizing it! discussion
  • We are having email/registration problems again. Diagnosis is underway. New users sorry if you are having trouble getting registered. We are exploring different options to get registered. Contact the forum via another member or on facebook if you're stuck. Update -> we think it is fixed. Let us know if not.
  • Spring meet up in Ontario, April 6/2024. NEW LOCATION See Post #31 Discussion NEW LOCATION

Robot Arm

jcdammeyer

John
Premium Member
I've made some progress since my last posting. Mostly organizing the drawings and creating the G-Code for the 3D printed parts. Some of them will run over 9 hours.

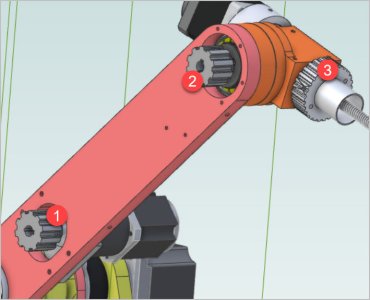
But, and it's a pretty big but at the moment, the cost of the motors, planetary reduction drives etc. running $894 Cdn w/o shipping. I'm not ready to put that much money into the hobby when I haven't even got ball screws on the mill yet.

I have a number of smaller DC motors with encoders on hand. Add that I've been mucking with harmonic reduction drives it's likely I'll do a modified design of this one but at least the software on the Teensy and the PC will give me a starting point for motion.
 

Mcgyver

Ultra Member
I've seen some guys making harmonic drives via 3 printing that might work. irrc the two geared rings were printed and inside AL housing. Even from China they are still too bloody expensive!
 

jcdammeyer

John
Premium Member
I've seen some guys making harmonic drives via 3 printing that might work. irrc the two geared rings were printed and inside AL housing. Even from China they are still too bloody expensive!
Yes. I also checked with Bergerda but they don't make any of the smaller size 17 motors or the one with the leadscrew for the shaft. In the assembly instructions he does state that 3D printing all the aluminum parts will make the unit less accurate since, for example, belts can't be tightened as well.

My experience with the 3D printing of harmonic drives is similar. The extra cost is adding encoders and planetary drives. The size of the robot arm prevents using bigger 3D printed units. I may just order one motor assembly at a time as I build up the system.

What I did last night was use the 2D drawings to create a few Alibre Part drawings and from that the STP files. I don't want to pay $99US for that set. The up side is I'm getting more practice with Alibre again. I'm looking at the drawings in detail. I finally understand where the linear drive is being using and how.

And I can use the AlibreCAM to machine the parts so some good practice there and an opportunity to use the mill for more than just improving the mill. Plus it will takes months to bring in the various bearings and motor parts. Even the Teensy 4.1 will be a while yet.

I've attached a zip with the stp files I've completed so far. The original drawings files are under the 2D Drawings entry.
 

Attachments

  • AR3_StepFiles.zip
    49.4 KB · Views: 2

jcdammeyer

John
Premium Member
Update on this project #42.
Dug out the old ASUS laptop with WIN-7. Plugged in the dongle for GeomagicDesignCAD. Ran the install from 2015 and after it was done imported a bunch of STL files. Geomagic was the renamed Alibre after SD Systems bought it. Since they were a 3D printing company they added the feature to read STL files. It didn't work perfectly then. Doesn't now compared to Fusion360 which is 8 years improved but many of the STLs can be imported and saved directly as AD_PRT files rather than first as STEP files and then re-imported into AlibreCAD to be saved as AD_PRT files.

Some of the bearings won't be here until April as they haven't even been shipped yet.

I started thinking about how now I've spent a lot of time on this doing drawings etc and realized that even once I get around to machining them I'd still really like less backlash on the mill. So other than completing the drawings and making sure I have the bearings and screws etc on hand I'll not do anything else on this until I finish a different project #42.

That's the Power Drawbar so I can more easily use the CNC stuff for making those parts but even more important is the ball screw conversion of the mill.

So this story will continue on my G3616 upgrade. https://canadianhobbymetalworkers.com/threads/g3616-conversion.1773/post-85031
 

jcdammeyer

John
Premium Member
OK. So I caved and did some more drawing conversions. My friend Joe has Fusion360 and he's been able to create step files from more of the STL drawings than my Geomagic can. But here's an example of the J5 Motor Mount translated by Geomagic and saved directly as an Alibre AD_PRT file.

I then loaded it with AlibreCAD Rev.25 and ran AlibreCAM 2020 to do some profiles. Normally I'd do this on the lathe given the piece is round but this is still all an exercise. The assumption is the center hole has already been drilled out and I'm just profiling the round recess. I added a 40mm diameter circle to the face and used that to guide the CNC tool since otherwise it didn't like the counter sinks. ie. the 10mm tool bit went around the holes.

1676770113740.png

I've also redrawn converted a much more complex part that did not translate well. I used the imported one as a template along with the pdf of the 2D drawings.

This is mine right down to the teeth for the timing belt.
1676770335264.png

And this is the original STL converted to STEP by Joe using Fusion360 imported to Alibre and saved as AD_PRT.
1676770436173.png
Good practice doing all this CAD work.
 

Attachments

  • J5 belt carrier.PDF
    266.3 KB · Views: 0

jcdammeyer

John
Premium Member
And another progress report. Pivots and rotates around all the joints so far. Need to create the Size 23 motor c/w gearbox for the arm motion and clamp it into the yellow bracket.
1676920381245.png
 

PeterT

Ultra Member
Premium Member
That's cool. Are cog wheels 1&2 for a tooth belt between them? So what drives 3? Or maybe I'm out to lunch how the motion gets controlled
 

Attachments

  • EDT-2023-02-21 10.26.02 PM.jpg
    EDT-2023-02-21 10.26.02 PM.jpg
    60.3 KB · Views: 0

jcdammeyer

John
Premium Member
That's cool. Are cog wheels 1&2 for a tooth belt between them? So what drives 3? Or maybe I'm out to lunch how the motion gets controlled
Yes, it's an L series belt or optionally he also designed it with two sprockets and a chain.
1677044061206.png
I have to draw up the angle bracket yet. The #3 pulley turns the #4 motor and arm assembly. Just working on that now. The lead screw nut on the #4 motor is in that movable part on the slides. The entire green box here is turned by that #3 pulley.
1677044427628.png
The assembly manual for the AR3 and AR4 arm has close-up photos and at times it's really hard to figure out how it all fits together. Now that I'm recreating the bits and pieces I'm getting the hang of what he designed. It's very impressive.

Here's one of the robot arms tending a CNC machine.

Edit:
Here's a video to his belt upgrade.
 
Last edited:

jcdammeyer

John
Premium Member
No excuse not to start turning some parts for that slip fit inside the bearings since they've arrived. More are on order like belts, pulleys, shafts. Need to decide if I want to order screw hardware. Like buy just two M4x14 flathead screws or a box of them.
1677182676970.png
 

jcdammeyer

John
Premium Member
I hope you have good luck with those bearings over time.
They maybe cheap bearings but remember, speed is very very slow. The fact that the needle bearings on one joint run on 1" OD aluminum tube suggests the designer didn't think it was an issue. I do so I might turn down a steel pipe to a smooth 1" OD finish. The inside has to be hollow because the lead screw for the next joint passes through it.
 

jcdammeyer

John
Premium Member
Machining question. The raised part in the inside center seats the tapered roller bearings on each side. The outer bearing races are a press fit. (or heat metal while freezing bearing so it drops in.

Obviously the bores should be concentric with each other. My thought process is this.
1. Hold the piece in the 4 jaw and indicate for zero run out and turn outside to target diameter as close as possible to the jaws.
2. Face off
3. Bore to prescribed 20.5mm depth.
4. Turn end for end and seat against chuck and indicate so it has zero run out close to the jaws and at the point where turning to diameter was stopped.
5. Turn OD to target diameter.
6. Face off to make part 60mm long.
7. Bore to 20.5mm depth and correct diameter.

The face of one side must be perfectly perpendicular to the center bored surface or the shaft won't sit straight up.

Am I making this too complicated?
 

Attachments

  • J1 turret housing.PDF
    161.6 KB · Views: 5

PeterT

Ultra Member
Premium Member
From what I tell, you could do 1,2,3,4 in one lathe setting. Flip part, into 4J, grip 80% of surface 1 but leave enough to DTI on OD. Make the last bearing recess & face.
 

Attachments

  • EDT-2023-02-23 7.16.14 PM.jpg
    EDT-2023-02-23 7.16.14 PM.jpg
    56.1 KB · Views: 0

jcdammeyer

John
Premium Member
Still waiting for bearings etc and it's too bloody cold to open the doors and run the foundry to cast some of the parts. So instead I'm 3D printing the covers etc. Brown letters instead of Red. Just to be different.
 

Attachments

  • 3D_PrintProgress-1.jpg
    3D_PrintProgress-1.jpg
    307.2 KB · Views: 4

LenVW

Process Machinery Designer
Premium Member
Nice little project John.
It will be a good ‘Pick & Place’ unit for your shop.
You are correct, with the slow speeds you can use ‘less expensive’ bearings and components.
Home Automation is possible !!

When I designed a high production application in 1998, I used Delrin bushings for Linear Slides because I knew it was going into a spray cooled area and the rails would always be wet. Thirty years later, the automated machine is still pumping out 900mm HDPE pipe.

I am waiting to see your completed Robot Arm.
 
Top