RF30 Basement Install

PeterT

Ultra Member
Premium Member
Setting it up with a square gets you to within 0.002 over 6" on the fixed jaw.

Hard to say but even if the vise was perfectly square initially, its possible to introduce that amount of run out just tightening the bolts. By applying torque you are twisting on the washer which is displacing the vise. Even if you alternate tightening the heads progressively back & forth between 2 bolts, chances are good the displacement will be in the same collective rotation direction (vs opposing or cancelling one another) as one bolt kind of acts as a pivot for the other. What might help is 2 washers so they slip. My vise has a slot & uses Z shaped type hold downs which is more downward force vs torque. Even so its still possible to introduce a bit of junk.

Just a personal opinion but I just use the square to get it quite close, usually within the same range as you are getting. Clamp one bolt rather firm, say 60% of full tight & leave the other looser. Run the DTI across the jaw, bump the vise & dial it in, snugging up the looser bolt. If you dial it in as table is moving you can usually get it within one pass with a bit of practice. 2 or 3 for sure so it really doesn't take much time. I know a lot of people use milled keys in the T-slot & prefer that. But I find the key position sometimes don't land the vise where I want it, so I just clamp it where I want it & dial it in. Its maybe personal preference. Keys might have a bit more stability retaining the vise under heavier load/vibration, but I think only if it fits the T slots well on both front & rear edges. My current mill is pretty good but my RF-45 was pretty rough.
 

PeterT

Ultra Member
Premium Member
Very nice, Frank. Worthy of a mini build post (hint-hint). Looks like a lot of though & effort went into that.
 

YYCHM

(Craig)
Premium Member
Well... the RT works per my expectations..... solid and smooth.

SW1.JPG

SW2.JPG

SW3.JPG

However the operator sucks big time LOL. That didn't turn out very symmetrical did it!!! I'm attempting to make a spindle wrench.
 

RobinHood

Ultra Member
Premium Member
Good attempt, Craig. I find that laying the pattern out first - either straight onto metal or on a piece of paper that is then taped (or glued) onto the metal - helps reduce errors.
 

YYCHM

(Craig)
Premium Member
Good attempt, Craig. I find that laying the pattern out first - either straight onto metal or on a piece of paper that is then taped (or glued) onto the metal - helps reduce errors.

I figured out why I messed up the first attempt LOL. The table is labeled 0-10-20-30...90-80-70-60...0 all the way around.

SW4.JPG

I'm now working on my fourth attempt to figure out what dimensions will capture the splines on my spindle.

It's 1" OD, and the splines appear to be 0.25" wide and 0.05" deep.

Suggestions anyone?
 
Last edited:

Janger

(John)
Administrator
Vendor
suggestion 1. CAD it, 3D print your solution, and see how it fits.

suggestion 2. draw it to scale on paper. cut it out. see how it fits.

then make it in metal.

is that the 8" table from Alex A.? Pictures? :>
 

Janger

(John)
Administrator
Vendor
Score one for Craig! that's a good one. I paid $500 for my 8" vertex new and retail.
 

YYCHM

(Craig)
Premium Member
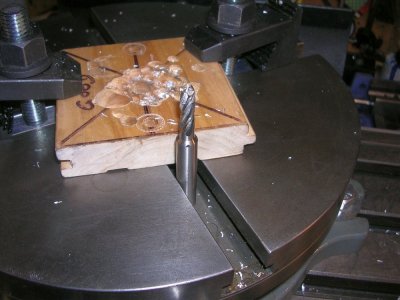
Well..... it took 7 prototypes to nail down a pattern that fit my spindle splines.

SW5.JPG

The winning combination was 9/32" holes drilled 0.463 from center and cored out with a 1/4" endmill 0.338" from center. If that makes sense to anyone please explain it to me as calculating the geometry just eluded me.

SW6.JPG

Making the wrench head went well apart from one little ooops and that was milling the OD to the wrong line. Oh well, we will just make the handle narrower is all.

SW8.JPG

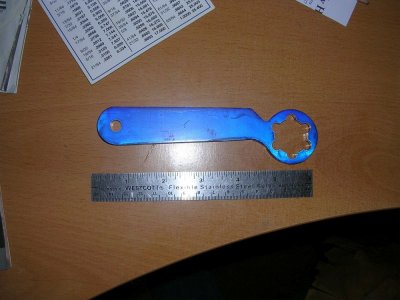
This is the finished wrench. That funky offset handle was NOT planned. When I went to mill the handle the end mill appeared to get a mind of it's owned and peeled off 30 deg in the wrong direction! I don't know if the work piece moved under the clamps or the RT rotated on me. To salvage what I had done so far I finished the handle on the bandsaw.

SW7.JPG

I suspect it was the work piece that moved as I had it kick out of alignment when I went to round the end of the handle. I probably need to use MDF or hardwood as backing rather than this particle board.

I think I'll try this all again in mild steel.

Craig
 
Last edited:

YYCHM

(Craig)
Premium Member
So what is this phenomenon about??

AL-EM.JPG

Half way through my spindle wrench project I had two swap out end mills as the one I was using had become clogged with aluminium. Aluminium swarf was packed and welded into all 4 flutes??? I had to essentially chisel it out of the flutes.
 
Last edited:

DPittman

Ultra Member
Premium Member
So what is this phenomenon about??

View attachment 10998

Half way through my spindle wrench project I had two swap out end mills as the one I was using had become clogged with aluminium. Aluminium swarf was packed and welded into all 4 flutes??? I had to essentially chisel it out of the flutes.
Well im no expert but.....some aluminum can be bad for galling up on tools. A two flute end mill will help clear the chips and reduce that as will some fluid such as wd40.
 

Dusty

(Bill)
Premium Member
Hi YYCHM, yup you got it aluminum is sticky stuff when it comes to drilling, machining, and tooling. Recommend this simple trick we used during my air force years. Best lubricant we found was clear paraffin you know the kind your grandmother and mother used when canning, comes in a box of 5 or 6 approximately 2 1/2" x 5" x 1/2" bars. So you rub the cold flutes with a little wax then as the mill end heats-up simply shut your mill off then touch the bar of wax near the cutter end. Not a perfect solution although reasonably cheep to buy and you don't end up with a huge oily mess. After the wax cools down it returns to a solid with aluminum swarf mixed in. Just flick it off.
 
Last edited:

PeterT

Ultra Member
Premium Member
MDF is probably a better choice of scrap board. Its denser, therefore wont squash out of alignment or loosen as much like plywood under clamping pressure. The thickness is quite uniform actually. Its smoother which effectively means more contact friction area on the surface. It doesn't do well with liquids like water which can swell it but seems to last me long enough with cutting oil to get through the job, at least that has been my experience. When you drill or mill through, its more like dust vs plywood can chip out.
 

turner

Active Member
YYC Paraffin sounds like a great idea. I work with aluminum...enough, the cutters for aluminum are made different. That being said, heat caused your problem, I often use a standard cutter as well, your cutter just needs a little help. RELTON A-9, I didn't really know how good this works until I was cutting Aluminum with a had saw. Put a spot on the blade and noticed less pressure/effort and a faster cleaner cut. I use it all the time, a little messy though. Available most places cutting fluid is sold. As well if you have a HSS/Carbide cutter that is plugged up, just put it in the mill and run it into a piece of mild steel/ cast iron. It will spit that aluminum out like nothing.
I as well have a RF-30 with no coolant. Todd. IMG_7856.JPG
 

Dabbler

ersatz engineer
+1 on all the lubricant advice.

On cutting, there are a few techniques that will help a lot, even if you don't have a dedicated aluminum cutter...
Take cuts with very small chip load: it generates a lot less heat, and prevents welding onto the cutter. Keep your cutter cool - between passes I take a short half minute break. Use lube (covered above), In order to make thins seem less tedious, I take twice the depth of cut with half the chip load, It results in long thin slivers of chips that seem to clear the cutter well.
 

YYCHM

(Craig)
Premium Member
Craig's production shop LOL.

SW9.JPG

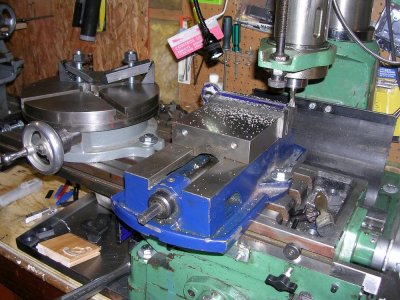
I needed the vise but wasn't finished with the RT so I scooched the RT over and mounted my vise. That 29" long table comes in handy.

SW10.JPG

Spindle Wrench Version 2.0. This one in 1/4" mild steel and the offset handle WAS planned this time LOL.

I'm liking this rotary table!
 
Last edited:
Top