One of these things is not like the others, and yet...I hate body work too. It's right up there with painting, drywall, plaster, and cleaning septic tanks.
-
Scam Alert. Members are reminded to NOT send money to buy anything. Don't buy things remote and have it shipped - go get it yourself, pay in person, and take your equipment with you. Scammers have burned people on this forum. Urgency, secrecy, excuses, selling for friend, newish members, FUD, are RED FLAGS. A video conference call is not adequate assurance. Face to face interactions are required. Please report suspicions to the forum admins. Stay Safe - anyone can get scammed.
-
Several Regions have held meetups already, but others are being planned or are evaluating the interest. The Calgary Area Meetup is set for Saturday July 12th at 10am. The signup thread is here! Arbutus has also explored interest in a Fraser Valley meetup but it seems members either missed his thread or had other plans. Let him know if you are interested in a meetup later in the year by posting here! Slowpoke is trying to pull together an Ottawa area meetup later this summer. No date has been selected yet, so let him know if you are interested here! We are not aware of any other meetups being planned this year. If you are interested in doing something in your area, let everyone know and make it happen! Meetups are a great way to make new machining friends and get hands on help in your area. Don’t be shy, sign up and come, or plan your own meetup!
You are using an out of date browser. It may not display this or other websites correctly.
You should upgrade or use an alternative browser.
You should upgrade or use an alternative browser.
Repair a very old vertical drilling machine
- Thread starter a smile
- Start date
a smile
Lifelong hobby - cold iron
Repair and polish - Repair and polish, repeat N times


The center is opened to form a 32mm hole for clamping the slender shaft


The gear change handle module is polished and cleaned together

Try paint jobs (using pressure tank paint), cure quickly, and try other colors with ----


Multiple spraying makes the surface smoother and more beautiful

After installation look at the color collocation is still good

Green paint dries very slowly and takes a lot of time. It's a bit edgy!!
The center is opened to form a 32mm hole for clamping the slender shaft
The gear change handle module is polished and cleaned together
Try paint jobs (using pressure tank paint), cure quickly, and try other colors with ----
Multiple spraying makes the surface smoother and more beautiful
After installation look at the color collocation is still good
Green paint dries very slowly and takes a lot of time. It's a bit edgy!!
a smile
Lifelong hobby - cold iron
Take the time to make a yard canopy and attach a gantry mid-shelf as part of the canopy
Find a piece of H steel, the length is slightly short, can only be welded to extend it, first cut the type C interface, and polish the welding impurities

Butt seam welding

Get a patch to reinforce it


Excuse me professional welder: the patch does not add welding wire, belong to the weld edge welding together, whether there is enough strength??
This is 200*100 type H steel, the lifting is planned to be 0.5T, does it need to be reinforced??
Find a piece of H steel, the length is slightly short, can only be welded to extend it, first cut the type C interface, and polish the welding impurities
Butt seam welding
Get a patch to reinforce it
Excuse me professional welder: the patch does not add welding wire, belong to the weld edge welding together, whether there is enough strength??
This is 200*100 type H steel, the lifting is planned to be 0.5T, does it need to be reinforced??
a smile
Lifelong hobby - cold iron
Yes, almost every part had to be repaired. It was a bad purchase. It took me too much time. Serious error of judgment ---- Although it is very cheap, my only satisfaction is that it gives me a chance to learn a new mechanical structure ----- whooQuite the project. Seems like every part on this drill press needs work. You'll have a wonderful tool when done.
historicalarms
Ultra Member
Wholly man that I-beam will lift earth moving equipment many times over the 0.5 T you spec. you will require.
Get a patch to reinforce it
I won't comment at all on your gantry crane plans, but I will comment on your I-Beam repair. It important to remember that the strength of an I-Beam is mostly determined by the size of the flanges and by their separation, not by the size of the web separating them. The reinforcing plate that you added to the web probably adds very little to the overall strength of the beam. If you calculate the moment of area for the beam, which determines its strength, you will see what I mean.
If you are worried about the strength of the repair, I would add plates to the top and bottom flanges instead. (You do not have to remove the plates on the web.) If you plan to use a trolley, add the plates to the other side of the flange so they don't interfere with the trolley wheels. It doesn't matter very much which side of each flange it is added to.
Hi A Smile. I recommend you should find a local welder to inspect the welds. To me - and I mean no offence - they appear to bridge too much air space, are full of porosity, and don't look like the weld heating zone has penetrated deep into the metal. I expect those welds will fail. I am not a qualified welder - and I think you should find one for a hands on inspection.
What is the thickness of the metal? How many amps and what voltage was used to do the welding?
I think you should cut that weld out and do a very straight cut on both sides. Abandon the tricky cut. This would allow the material to be butted together touching all along. A v-groove may be required. Clamp it tight together. Tack weld in places and then weld the seam. Then apply patches to reinforce the flanges. I don't know though this is just a possible approach.
I know we have some pro welders on here - can any of you provide better advice?
@johnnielsen ? TIG? Stick? MIG? Rod type? Amps and Voltage?
Last edited:
a smile
Lifelong hobby - cold iron
I know what you mean, adding a patch to the abdomen for stress is best ---- thank youI won't comment at all on your gantry crane plans, but I will comment on your I-Beam repair. It important to remember that the strength of an I-Beam is mostly determined by the size of the flanges and by their separation, not by the size of the web separating them. The reinforcing plate that you added to the web probably adds very little to the overall strength of the beam. If you calculate the moment of area for the beam, which determines its strength, you will see what I mean.
If you are worried about the strength of the repair, I would add plates to the top and bottom flanges instead. (You do not have to remove the plates on the web.) If you plan to use a trolley, add the plates to the other side of the flange so they don't interfere with the trolley wheels. It doesn't matter very much which side of each flange it is added to.
a smile
Lifelong hobby - cold iron
Thank you for your advice. I will find a professional welder to evaluate the welding quality.Hi A Smile. I recommend you should find a local welder to inspect the welds. To me - and I mean no offence - they appear to bridge too much air space, are full of porosity, and don't look like the weld heating zone has penetrated deep into the metal. I expect those welds will fail. I am not a qualified welder - and I think you should find one for a hands on inspection.
What is the thickness of the metal? How many amps and what voltage was used to do the welding?
I think you should cut that weld out and do a very straight cut on both sides. Abandon the tricky cut. This would allow the material to be butted together touching all along. A v-groove may be required. Clamp it tight together. Tack weld in places and then weld the seam. Then apply patches to reinforce the flanges. I don't know though this is just a possible approach.
I know we have some pro welders on here - can any of you provide better advice?
@johnnielsen ? TIG? Stick? MIG? Rod type? Amps and Voltage?
There must be pores, because the requirements are not very high, so I don't have a lot of patience to polish, but I think the welding heat is enough to weld the welding material, it should be because the welding current is very concentrated, the heat diffusion range is relatively small, which makes people illusion, the current 150A- I am not professional opinion - is enough
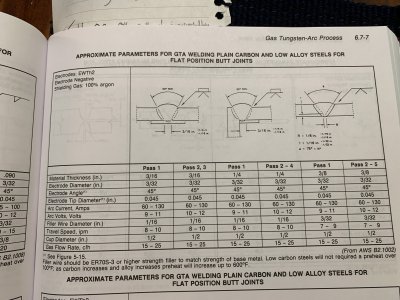
A. Smile I found the reference pages for tig welding beveled butt joints. This is for the reference text the procedure handbook of arc welding. You can see they recommend 4 weld passes for 1/4” (6mm) thick material joints with a steel backing.
Attachments

a smile
Lifelong hobby - cold iron
A. Smile I found the reference pages for tig welding beveled butt joints. This is for the reference text the procedure handbook of arc welding. You can see they recommend 4 weld passes for 1/4” (6mm) thick material joints with a steel backing.
Thank you for your welding parameter manual. Since I am not a professional welder, I can only watch videos to quickly learn simple welding techniques. For safety, I usually downgrade the use.
I have no professional training in welding, so I will not do some pressure, explosion-proof welding, to their own welding tools is probably enough
Thanks again for your technical support
a smile
Lifelong hobby - cold iron
Another doubt is that I found that the pictures sent by other friends in the forum are showing slightly reduced pictures, while the pictures I sent are directly displayed. Will this take up more resources and space of the forum? Hope to get a clear reply, so as to timely adjust my sending method, as far as possible not to occupy too much forum resources, thank you!
If there is any inappropriate behavior, please let me know, I will improve, thank you
If there is any inappropriate behavior, please let me know, I will improve, thank you
Another doubt is that I found that the pictures sent by other friends in the forum are showing slightly reduced pictures, while the pictures I sent are directly displayed. Will this take up more resources and space of the forum? Hope to get a clear reply, so as to timely adjust my sending method, as far as possible not to occupy too much forum resources, thank you!
If there is any inappropriate behavior, please let me know, I will improve, thank you
No problem. Post as you have been doing.