VicHobbyGuy
Ultra Member
Thanks, Craig.I don't own an optical punch; just remembered it from the Youtube video and found a random link via DuckDuckGo.
I wouldn't turn one down but with a DRO it probably has limited application, IMHO.
Craig
Thanks, Craig.I don't own an optical punch; just remembered it from the Youtube video and found a random link via DuckDuckGo.
I wouldn't turn one down but with a DRO it probably has limited application, IMHO.
Craig
I’ve never heard of those with the two holes at different degrees before just the 90* ones.
Keith Rucker on the Vintage Machinery Youtube channel goes over an optical center punch in the following video:
Craig
I thought it was the punch points that had different angles. And, isn't the second hole just a 'storage' for the punch when it's not being used? Anyway at $100+ CAD, it's all theory to me, for now.I’ve never heard of those with the two holes at different degrees before just the 90* ones.
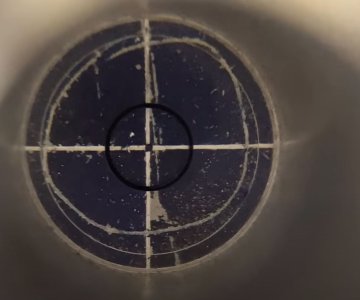
This 'Adam Savage' (not one of my faves) video shows video that's supposedly looking right into the optical 'sight':I understand the concept. What I don't understand is how you can see anything down in there. There is no light. It isn't obvious how the work gets illuminated so you can actually center it.

This 'Adam Savage' (not one of my faves) video shows video that's supposedly looking right into the optical 'sight':View attachment 24693
Looked up one of the cheaper versions on amazon.com (USA site) https://www.amazon.com/dp/B08XWRJSBQ#customerReviews and found that the reviewers mentioned exactly the problem that @Susquatch predicts:
Had seen this tool 30 years ago. As a professional Toolmaker I use layout tools all the time.
This tool is shy of allowing enough light into the cylinder to see the cross hair accurately!
I'm going to have to mill/drill slotts in the sides to be able to use it
More Amazon crap
4.0 out of 5 stars Accurate, but difficult to line up
Reviewed in the United States on August 7, 2021
Verified Purchase
It is hard for me to line up the marks, even when I "blue" the metal surface to be punched and scribe bright lines on it. I'm still experimenting with my lighting, trying to better illuminate the domed top without causing reflections. But then, my eyes aren't what they used to be. The product is usable, but could be better. Good value for the price, though.
2.0 out of 5 stars Reviewed in the United States on May 3, 2022
Verified Purchase
The article is unfortunately not good. It does not benefit from good manual punching. He has a major parallax problem, missing a light, so he forces me to use a flashlight. It would take a few more magnification and the axes drawn on the lens should be 5 or 10 times thinner. But the idea itself is very good.
I have one.Hey Tom how about this optical center punch made by Veritas and sold through Lee Valley a Canadian Company.
Veritas Optical Center Punch - Lee Valley Tools
Discover the Veritas Optical Center Punch. Buy this product now on our Lee Valley online store.www.leevalley.com
Apparently no longer available, cost was reasonable. That sucks!
Then you have this one on amazon.ca with 2 different optics and center punches. Read the reviews, somewhat pricey!
I have one.
Do you recommend this as something I'd find useful? I'm 70+ y.o. and doing layout for small model engines. Would it help?I have one.
99.9% of the time, that's the way I do it. The only time I'll use a punch mark is when doing free-hand drilling or on the drill press. Even when holding an odd shaped part clamped on the mill table, I'll center a pointer on the scribe marks, or use a center drill and touch off lightly and adjust as necessary.I never ever thought in a million years that I would ever be saying this but.......
I am still amazed at what I can do with a DRO. Just locate X0 & Y0 with an edge finder, set target point, center drill, and then drill. No punch needed. Perfect location every time. The DRO will also handle a lot of the math and convert between metric and imperial on the fly (0.7" down, 3mm left) etc etc
Yup, no need for bifocals, magnifying glasses, bright side lights, finger weights (to dampen the shakes), wife to prop me up,....... Just turn on the DRO and smile!
99.9% of the time, that's the way I do it. The only time I'll use a punch mark is when doing free-hand drilling or on the drill press. Even when holding an odd shaped part clamped on the mill table, I'll center a pointer on the scribe marks, or use a center drill and touch off lightly and adjust as necessary.
Took this this morning, it does not do it justice as the camera can not focus on the image in the lens, but it does show the light getting theough and the line white line blur underneath and the black blur is the reference line, second photo is the punch after proper alignment.
View attachment 24813
View attachment 24814
Sounds good to me. You forgot to add to your list: "Spend $2-10K for a mill with DRO, and find a place to put it, and get it moved to that place...."Yup, no need for bifocals, magnifying glasses, bright side lights, finger weights (to dampen the shakes), wife to prop me up,....... Just turn on the DRO and smile!
