• Scam Alert. Members are reminded to NOT send money to buy anything. Don't buy things remote and have it shipped - go get it yourself, pay in person, and take your equipment with you. Scammers have burned people on this forum. Urgency, secrecy, excuses, selling for friend, newish members, FUD, are RED FLAGS. A video conference call is not adequate assurance. Face to face interactions are required. Please report suspicions to the forum admins. Stay Safe - anyone can get scammed.

Jswain's active projects

CWret

Ultra Member
Premium Member
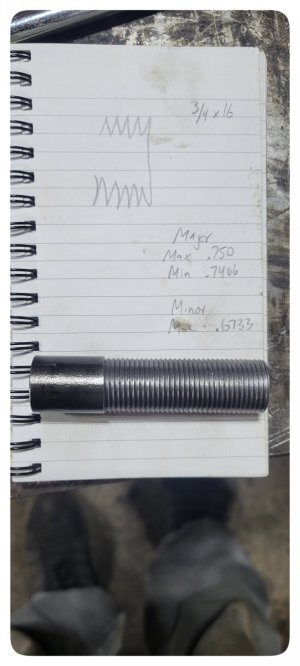
Just found your Active project thread.
It was / is quite interesting.
I also have a RF45 clone. I got mine from Modern Tool 18 months ago.
Where did you get yours from?
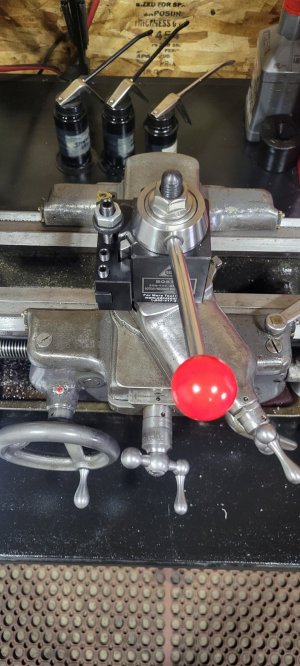
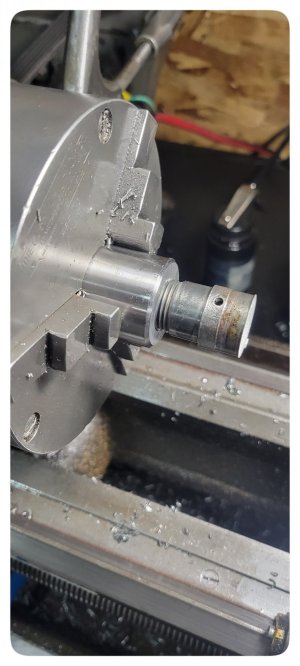
I too have a power x - feed. I got it as an extra with the mill from Modern and it was a very simple install. Easy easy but cost $550.
I love it. Well done on your x-feed installation. Looks like you also have a DRO. Love that also. Both awesome accessories.
I liked the video that @Proxule posted. Painfully long, but very interesting. An easy improvement for rigidity for this type of mill. I’m going to do my own testing/experimenting with that added bracket.
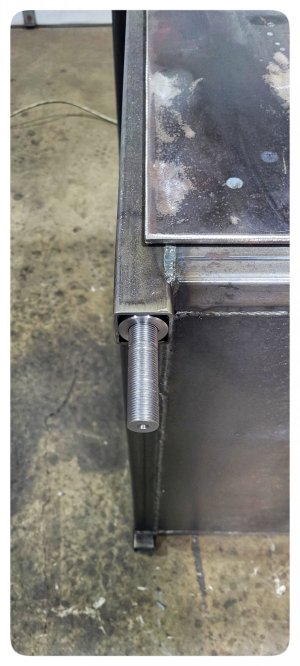
Your stand build is quite impressive. My stand too was home built and maybe overkill on making it heavy, strong, and very rigid. My stand weighs over 300 pounds.
What other modifications or accessories do you have in mind for your mill?
 

CWret

Ultra Member
Premium Member
Forgot to ask - Is that a powered Z feed i saw in a picture? If yes, we’d all like to know about it.
 

Jswain

Joe
Forgot to ask - Is that a powered Z feed i saw in a picture? If yes, we’d all like to know about it.
Thanks! I don't have a power z feed but would like to make it a future project, maybe next winter.

I found the mill on Kijiji last spring & bought it from a guy outside Airdrie.

After the stand is finished then I want to start building some more tooling for it, flycutter, some 3/4" boring bars and a chamfer tool to start. Then use it!

My stand is definitely getting heavy I would think it's between 3-400lbs and I'm definitely going to fill it with as much heavy sh*t I can. I'll be happy just to have the mill bolted down & some extra storage.
 

Jswain

Joe
Wish I could say the single point threading was more successful, but it wasn't! Lol

The first two attempts I did not realize my compound was actually @ 60 degrees instead of 29.5 so I'm thinking that was my problem. Resulting thread has a heavy lean on the one side not sure if you can see in the pic

After I set the compound to
29.5 degrees I cut a 3/4 - 16tpi thread that I believe is successful but I had nothing but a thread gauge/caliper to confirm.

Digging out some more stock to make up for the two I messed up I realized I have some 1" shaft with.......3/4 - 16tpi threads so now I have something to test it against anyways :cool:

Plan is ultimately thread 2" of the shaft & bore and thread the bungs. Weld them into the square tube & weld the shaft to some larger pucks
 

Attachments

  • 1000005828-01.jpeg
    1000005828-01.jpeg
    357.3 KB · Views: 17
  • 1000005829-01.jpeg
    1000005829-01.jpeg
    200.3 KB · Views: 17
  • 1000005831-01.jpeg
    1000005831-01.jpeg
    232.1 KB · Views: 15

Jswain

Joe
Think I found out what I was doing wrong, or one of them anyways.

Pretty sure every now and then I would back the cross slide dial off more then a full turn, say a turn and a half. Then when I went to take the next cut would get confused why it wasn't cutting as I only brought it back in a half, then advanced the compound dial in to cut without thinking?

I started practising on the opposite 1" long ends of the messed up chunks and pretty sure I have a better looking thread now. I may not have cut it deep enough but I think the inserts I have are partial form so maybe that's all I need.

Will remake another 4 tomorrow (hopefully) then start on the internal threads :eek:
 

Attachments

  • 1000005839-01.jpeg
    1000005839-01.jpeg
    246.5 KB · Views: 16
  • 1691879927470.png
    1691879927470.png
    71 KB · Views: 16

combustable herbage

Ultra Member
Premium Member
I have been using the chart in this thread to get me close to the final depth for external threads, they have divided it up into a certain amount of passes at different depths starting larger and ending small. There are lots of good threads (pun intended) with lots of ideas to improve your threading, practice and a better understanding of threading has helped me to achieve some good threads.


Susquatch

Ultra Member
Administrator
Moderator
Premium Member
Think I found out what I was doing wrong, or one of them anyways.

Boy, if that's your first try at single point threading, you sure are plowing along fast!

Since you made the same mistake most of us make when we start, I'd bet you are also making the 2nd mistake most of us make...... Putting the 1/2 degree on the wrong side.

I can't really see zooming in your photos, but it's an easy mistake that has a 50/50 chance of happening when you first try threading. If you remember that the extra half is a partial clean up pass and a wee bit steeper on each pass, it's a lot easier to get it right just looking at your compound.

Depending entirely on how important it is to you, you might also try using sharp HSS instead of Carbide. After 40 years of threading, I'm only just now trying Carbide. The jury is still out!
 

Jswain

Joe
Thank you both! Currently reading through the 29.5 vs 90 thread by @Susquatch & have downloaded the thread calculator app.

Lots of good info. If I can't figure it out I will try simplifying it and just attacking it at 90, but I'm pretty optimistic.

Going to do some more practise on the scraps, then switch it up and try an internal thread. That way I can use the manufactured thread on the end of the shaft as a gauge, produce some internal threads, then use them as a gauge for my external threading. Hopefully :D

The HSS is an option too but I'm 97% confident it is an error in me, rather than the tooling. I will get some more pictures of the setup as well! I am 100% rookie at grinding hss but I believe I have a threading tool made up already
 

thestelster

Ultra Member
Premium Member
Thank you both! Currently reading through the 29.5 vs 90 thread by @Susquatch & have downloaded the thread calculator app.

Lots of good info. If I can't figure it out I will try simplifying it and just attacking it at 90, but I'm pretty optimistic.

Going to do some more practise on the scraps, then switch it up and try an internal thread. That way I can use the manufactured thread on the end of the shaft as a gauge, produce some internal threads, then use them as a gauge for my external threading. Hopefully :D

The HSS is an option too but I'm 97% confident it is an error in me, rather than the tooling. I will get some more pictures of the setup as well! I am 100% rookie at grinding hss but I believe I have a threading tool made up already
You can also go to the hardware store and get a couple of large nuts to test your bolts for fit. Once the nuts screw on nicely, then you can use your new bolt to fit your lathe made nut.
 

Susquatch

Ultra Member
Administrator
Moderator
Premium Member
That way I can use the manufactured thread on the end of the shaft as a gauge, produce some internal threads, then use them as a gauge for my external threading.

I have either made or bought both nut and bolt gauges for the common threads I cut. I have even made a few high tolerance go-no-go ones for the most important threads I do. Nothing beats a go-no-go gauge for quickly knowing where you are. Watch out for those roots and peaks though - they can fool you!
 

Bandit

Super User
A few bolts in different sizes, thread longer then 1 inch/25mm, will also work for checking threads. Some of the metric threads can fool you, trying to figure out what it is, compareing over a short length.(and vice verse, is it metric or imperial), ( British Witworth, bicycle tread, I won't go on)
Anyway some are close in dia. and close in number of threads, when checked over a short length,(3/8 inch, 8mm and less), but generly start showing a difference over longer lengths.
 

Susquatch

Ultra Member
Administrator
Moderator
Premium Member
General setup

To my eye, needs another 1/2 degree clockwise. That assumes your scale is accurate. Well worth confirming your scale is correct. Some guys I have met never use the scale. They use a sine calculation instead.
 

YotaBota

Mike
Premium Member
Threads look pretty good.
Routine is key, if you can get one that works for you every time that's the one to use. At the end of a pass I backoff the cross slide no more than one turn (.100) and that way there's never any confusion.
 

Jswain

Joe
To my eye, needs another 1/2 degree clockwise. That assumes your scale is accurate. Well worth confirming your scale is correct. Some guys I have met never use the scale. They use a sine calculation instead.
To be honest I've never checked it and would have to figure out how
Threads look pretty good.
Routine is key, if you can get one that works for you every time that's the one to use. At the end of a pass I backoff the cross slide no more than one turn (.100) and that way there's never any confusion.
I deliberately set my handle horizontal, with the handle portion on the right, with the gauge zeroed, and I'll just continue to do that everytime to build a habit


Aaaaand we have some success. I only got work done on the one bung but I wanted to make a master to check the rest of the external threads with. It fits both the manufactured threads and the first test piece I did this morning so now I have some hope for the rest :)

I drilled out the back of the bushing to .750 ~ 1/4" deep so the threading bar didn't have to go in so far. Not sure if it would have cleared if I did not do that but it didn't look like it. Figure 48 threads should hold up the mill/stand lol

Now of course I have to swap change gears back to take the rest of my material down to size(ran outta 3/4 shaft), but I'll get everything prepped, center drilled, and bored then go on a threading marathon at the end

The scrap with the good thread on the end will make an excellent handle for setting & welding the bung on tho...
 

Attachments

  • 1000005859-01.png
    1000005859-01.png
    413.5 KB · Views: 8
  • 1000005862-01.jpeg
    1000005862-01.jpeg
    227.9 KB · Views: 8
  • 1000005864-01.jpeg
    1000005864-01.jpeg
    312.5 KB · Views: 8
  • 1000005866-01.jpeg
    1000005866-01.jpeg
    208.9 KB · Views: 8

Susquatch

Ultra Member
Administrator
Moderator
Premium Member
To be honest I've never checked it and would have to figure out how

Lots of ways to do it.

Just measure distance to your compound at two different locations - the further apart the better. Then use arc cos to determine the true angle from x & y. Works great as long as the side of your compound is parallel to its ways - most are.

Easier but not as accurate is angle blocks.

I like to assume the scale itself is reasonably scaled, then confirm zero by checking for indicator movement over a distance. If that checks out, I know my scale is "probably" properly indexed. You can check the scaling by testing at zero and again at 90.

For accurate work where the angle really matters (like tapers) never trust the scale and always do a cosine measurement over as much distance as your setup can handle.

The 29.5 isn't critical though. Just needs to be enough less than 30 to do a slight cleanup on the sliding face of the cut. Lots of guys do 29 instead of 29.5 but Lord knows what they really have.

If you can see a stepping cut in a magnifier looking at the back surface of your thread, you are on the wrong side of 30 or not enough to do a proper cleanup.


I deliberately set my handle horizontal, with the handle portion on the right, with the gauge zeroed, and I'll just continue to do that everytime to build a habit.

I'm not sure what you mean. If that refers to the cross-slide, it's as good a habit as any. I like mine on the right side at about 45 to 90 degrees when the dial is on zero. That way the weight of the handle stops the compound from moving during a cut.

Such a setting also makes backing off and resetting easy because you generally need less than half a turn to clear the threads.

I confess I have on rare occasions been more than a rotation out. But that was always on really big threads and the effect is visually obvious as the tool moves toward the work.
 

Jswain

Joe
Lots of ways to do it.

Just measure distance to your compound at two different locations - the further apart the better. Then use arc cos to determine the true angle from x & y. Works great as long as the side of your compound is parallel to its ways - most are.

Easier but not as accurate is angle blocks.

I like to assume the scale itself is reasonably scaled, then confirm zero by checking for indicator movement over a distance. If that checks out, I know my scale is "probably" properly indexed. You can check the scaling by testing at zero and again at 90.

For accurate work where the angle really matters (like tapers) never trust the scale and always do a cosine measurement over as much distance as your setup can handle.

The 29.5 isn't critical though. Just needs to be enough less than 30 to do a slight cleanup on the sliding face of the cut. Lots of guys do 29 instead of 29.5 but Lord knows what they really have.

If you can see a stepping cut in a magnifier looking at the back surface of your thread, you are on the wrong side of 30 or not enough to do a proper cleanup.


I'm not sure what you mean. If that refers to the cross-slide, it's as good a habit as any. I like mine on the right side at about 45 to 90 degrees when the dial is on zero. That way the weight of the handle stops the compound from moving during a cut.

Such a setting also makes backing off and resetting easy because you generally need less than half a turn to clear the threads.

I confess I have on rare occasions been more than a rotation out. But that was always on really big threads and the effect is visually obvious as the tool moves toward the work.
That makes sense what you mean about being a half a degree out on the other side now. I will have to check the angle see how accurate it is.

I should have said with the cross slide dial zeroed, the handle was horizontal with the portion you grab on the right. Before I was bringing the cross slide in to touch off, then zero the dial.

Now I am getting it close, put the handle where I want it, zero the dial then use the compound to bring it in enough to touch off. Benefit both from building repeatability where I back off the handle & reset it to, and also I don't have to mess around with setting the dial on subsequent threads(small flat head screw that needs to be changed to Allen or a thumbscrew some day)
 

thestelster

Ultra Member
Premium Member
The angle at which you advance your compound really shouldn't matter as long as it's 30° or less, (anywere between 25°-30° will work fine), but you should also advance the threading tool radially with your cross-slide for the last 2-3 thou'. Your threading insert is a 60° form tool. By advancing the cross-slide those last couple thou' cleans up both flanks of the thread.
 

Jswain

Joe
The angle at which you advance your compound really shouldn't matter as long as it's 30° or less, (anywere between 25°-30° will work fine), but you should also advance the threading tool radially with your cross-slide for the last 2-3 thou'. Your threading insert is a 60° form tool. By advancing the cross-slide those last couple thou' cleans up both flanks of the thread.
I will try that out on these ones. Thanks!
 
Top