• Scam Alert. Members are reminded to NOT send money to buy anything. Don't buy things remote and have it shipped - go get it yourself, pay in person, and take your equipment with you. Scammers have burned people on this forum. Urgency, secrecy, excuses, selling for friend, newish members, FUD, are RED FLAGS. A video conference call is not adequate assurance. Face to face interactions are required. Please report suspicions to the forum admins. Stay Safe - anyone can get scammed.

JCDammeyer's 42 projects

Recall I also smashed my ESTOP too hard and broke the edge. https://canadianhobbymetalworkers.com/threads/jcdammeyers-42-projects.9677/post-225874

I had glued it together with superglue but no trust it wouldn't break again if I hit it.

Well I needed a bit of epoxy to hold the base of the 3D printed frame together so I chopped up some carbon fibre. Here's the result. Probably could have used strands of fibreglass instead.

View attachment 74635
At the rate you've been going lately, you might have to change your user handle to "crash gordon" 😛
 
This is what had an 8mm drill bit embedded into it.
View attachment 74627

I paid $110 for it. No longer available with a listed price of $146. I ordered a different one from Amazon for $55 which is about the same as AliExpress once shipping is included.

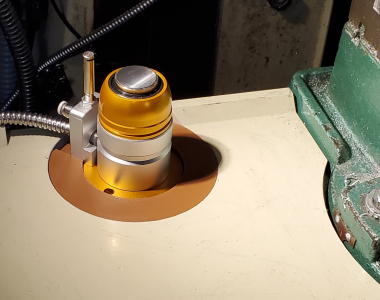
So what do they look like inside?

View attachment 74628

The little brass part slides towards the chip on the other side. Some sort of capacitive coupling.

View attachment 74629
Ok I give up, what is it ?
 
Ok I give up, what is it ?
When you are running a CNC system you have two choices. Every tool in the tool changer or list has a length measured outside of the machine and entered into the tool table. So tool #1, the centre drill might be 2.81" while tool #10 a jacobs chuck with an 8mm drill might have 6.23" as the length.

If you don't measure ahead of time you can use a tool height setter. If the tool length in the tool table is zero the software takes the quill over to a position above the tool setter, moves down slowly and in effect measures the tool. Handy for one jacobs chuck with 3 different drill bits during the operation.

So in my case the 8mm drill was say 6.23" in length after measurement it was sent to 3" above the work zero (surface of the aluminium plate). Then over to the work. All totally possible except for one teensy detail.

While the tip of the 8mm drill bit would be 3" above the flat plate on the table the tool setter was 4.37" above the table. The rest of the details aren't important other than the G-Code sent the tool down at 120ipm to get to that 3" above the work while still above the tool setter that was 4.37" high.

Oops... Normally this wasn't a problem because every other tool I loaded wouldn't have hit the tool setter. What I really need to do is force the system to first move with the tool as high as possible above the work to the first drilling position. Obvious right. Then and only then to down to a point where it knows it won't run into anything.

Does that make sense?
 
Hi John,

Thank you for the explanation. So basically the device is a tool setter ? I Understand that knowing where the tool tip is/should be is important.

The only tool setter I have ever seen was like a collet where the tool was placed into it and clamped when the tool tip sat on a specific height, then the collet was put into a carousel and picked out by the machine.
 
Probably could have used strands of fibreglass instead.

I often do something similar. I often use aluminium or steel chips from the mill to make a better metal epoxy than the liquid steel or aluminium epoxy you can buy from Devcon. Off hand, I can't think of anything I ever glued that way that failed. Not very pretty though.
 
I often do something similar. I often use aluminium or steel chips from the mill to make a better metal epoxy than the liquid steel or aluminium epoxy you can buy from Devcon. Off hand, I can't think of anything I ever glued that way that failed. Not very pretty though.
It's behind and out of site. I could have added a black colourant to it to make it totally black. Wasn't worth the trouble. Just a bit of silica to add some body to it and the carbon fibre.

Finally got a wiring diagram for the new tool setter that should be here tomorrow. Going to have to rewire my little junction box to not invert the output. The previous tool setter was NO and this one is NC.

Not in a rush. Holidays are real soon now.
 
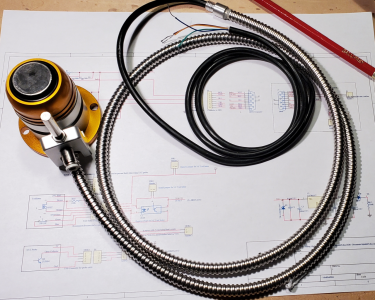
Well now. The new tool setter just arrived.
1765679087103.png

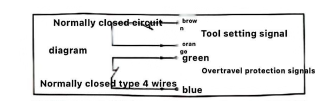
It's a Normally Closed version (NC) rather than Normally Open (NO) like the previous one I smashed and bent. To make the NO one work I had to add a small circuit that changed the polarity of the signal before it went into the probe input pin.

Both these tool setters also have a NC mechanical over travel switch. NC so that if the wire or connector breaks it stops the machine. This is assuming of course that's even wired into the system. And there's the rub...

The spindle encoder, tool setter and probe circuit board in a small box up by the spindle motor and pulleys has a connector on it that is supposed to take the two wires from the over travel switch down to the limit switch box that collects all the limits. The plan was to have the tool sensor in series with the limit switch so that if it were actuated the effect would be the same as the ESTOP all would stop NOW!

Well the limit switch interface box also has a two pin connector in it and a jumper sitting on it faking out the closed tool sensor over travel switch.
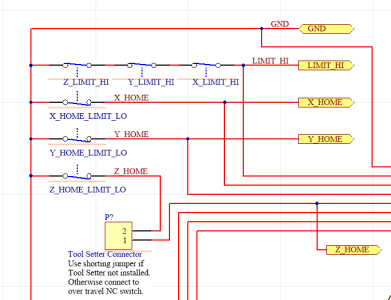
1765679028055.png

Oops. For some reason I never took the next step and added the two conductor wire and two connectors so that the signal from one was brought to the other. I do have a new cable there now...

And speaking of cables. The armoured part of the new tool setter is half the length of the other one and thinner because it has only 4 wires. Also the cable inside that extends out only 1/4 as far as the original. So it won't reach anymore. I'll just use the old 6 conductor cable to extend this one since then I can match the colour coding.

The lack of that two wire cable so far as cost about $150. I really thought I'd made one and installed it. I guess not.

 
I’d put a block of cheese or something like it that could be destroyed while you’re yelling Noooooo. While your paddling the emergency stop.
Just in case.
 
Here we go. Rewired some connectors and added jumpers to the interface board to deal with both types of tool height sensors. Tested it and yes the system shuts off power if the over travel switch on the tool height sensor is tripped.

Measured it using a 1-2-3 block; theoreticaly 2.526" high. It has a magnet on the bottom to hold it onto the table so I just 3D printed a piece to go around it and hold it so the tool always touches it in the centre.

1765696646796.png
 
@jcdammeyer your experience is making me question the tool setter integration in the Tormach. I suspect it doesn't use the overtravel limit switch but probably should.
Another wiring project - Yay! May as well swap over the tool setter and 3D touch probe to the Tormach ones while I'm at it. The ergonomics of accessing the electronics cabinet within the mills enclosure is beyond sub optimal. I'll be lucky to finish the job with my back intact.
 
@jcdammeyer your experience is making me question the tool setter integration in the Tormach. I suspect it doesn't use the overtravel limit switch but probably should.
Another wiring project - Yay! May as well swap over the tool setter and 3D touch probe to the Tormach ones while I'm at it. The ergonomics of accessing the electronics cabinet within the mills enclosure is beyond sub optimal. I'll be lucky to finish the job with my back intact.
How are the Tormach ones different?
 
I don't have my tool length sensor over travel wired to the estop but I probably should
Over travel switch in series with the limit switch of the direction the Z axis is moving. For me that works with the mechanical NC limit switch and the mechanical switch in the tool setter.

1765737997330.png

Haven't looked into how I'd connect the proximity type switches yet. I have them. They aren't installed.
 
I'll add a small write up in my shop activities thread, I'm not actually sure what is different. I did learn that the Tormach tool setter does not have an overtravel switch. The Touch probe is active...more to come once I learn all about it.
 
I'll add a small write up in my shop activities thread, I'm not actually sure what is different. I did learn that the Tormach tool setter does not have an overtravel switch. The Touch probe is active...more to come once I learn all about it.
Other than installing some sort of adjustable Z axis limit switch that can be moved there is, on my system, only the need for a Z Home switch which is when the knee is all the way down.

For the CNC router it's when the Gantry Z is all the way up. I do have an adjustable one on the CNC router that I can set so the tool bit can never ever go into the table but with each tool change it would have to be adjusted so I don't bother.

On the mill then I put the Tool Height Sensor over travel into the Z limit switch. Since all three switches are in series and the LinuxCNC knows that the over travel stops all the motors including the spindle.

# MESA 7i92H P2 connections
net min-home-x <= hm2_7i92.0.gpio.014.in
net min-home-y <= hm2_7i92.0.gpio.015.in
net max-home-z <= hm2_7i92.0.gpio.016.in
net max-x-y-min-z <= hm2_7i92.0.gpio.003.in

If I don't have the Tool Height Sensor installed I have a dummy plug that goes into the box instead of the cable simulating a normally closed over travel and sense switch.
 

Attachments

Back
Top