• Scam Alert. Members are reminded to NOT send money to buy anything. Don't buy things remote and have it shipped - go get it yourself, pay in person, and take your equipment with you. Scammers have burned people on this forum. Urgency, secrecy, excuses, selling for friend, newish members, FUD, are RED FLAGS. A video conference call is not adequate assurance. Face to face interactions are required. Please report suspicions to the forum admins. Stay Safe - anyone can get scammed.

Installing a DRO on a Hartford Bridgeport Clone.

Ya, that's heart attack pricing.

I might try that next. I figure I could even sharpen one of those if need be. For now I have oa #29 carbide in a regular twist to get the right hole size.
You are right about the price, but sometimes a bit of heart fibrillation is required to get the job done. Will be waiting to hear the out come of this.
 
I'm not getting notifications so I have missed the last 3 days of this. Bravo, @Susquatch for motoring on despite the roadblocks. Bert had similar problems when he mounted the DRO on his - about the same year, same models, etc.

It is probably due to the casting method and raw materials used in the casting process. It is possible they just used Meehanite throughout most of the machine, as Bert had problems with the Y scales as well. Not so much on the knee, that was easy compared.

How did Bert get his mounted?

Is a carbide drill bit viable in Meehanite or did I waste my money?
 
How did Bert get his mounted?

Is a carbide drill bit viable in Meehanite or did I waste my money?
He burnt out several cobalt drills and then settled for carbide. He also dulled 2 HSS taps to make the threads in the holes. He just kept at it until holes were threaded. He muttered a lot about it, as he didn't have any money to do anything with at the time, and needed the mill to make money.

One caution about double sided tape: I remove tape goo with oil, so make sure that if you do use tape, that it is oil resistant.

I can believe that! My muttering ever since I burned up cobalt drills has not been fit for most normal people's ears.

No worries about tape. If I do use it, it will be temporary. If I can't get screw holes drilled and tapped for a permanent install, I'll prolly use epoxy.
 
You might drill-and-pin, with a press-fit pin or loctited pin. If the outer part of the pin is tapped, then a retainer screw and washer can be applied.
 
You might drill-and-pin, with a press-fit pin or loctited pin. If the outer part of the pin is tapped, then a retainer screw and washer can be applied.
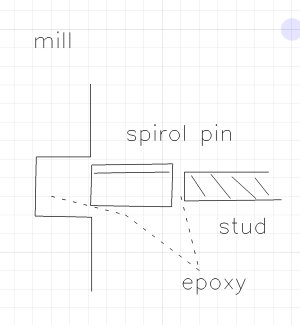
Assuming you can drill a slightly larger hole (stronger drill bit), then this seems like a brilliant idea. Spirol pin, threaded stud, some epoxy. Won’t move, but if you have to remove the pin or stud some heat would soften the epoxy.
 

Attachments

  • 3FE00685-E5FC-4125-8BA0-B90DD0F8B295.jpeg
    3FE00685-E5FC-4125-8BA0-B90DD0F8B295.jpeg
    88.7 KB · Views: 3
There needs to be a little adjustment at the scale itself to achieve parallel motion VS the read head.

If I combine all your ideas, I think an inside threaded sleeve epoxied into a hole in the casting will work best. Of course, this assumes I can drill a hole at all. If not, then a piece of bar epoxied to the casting will solve both the drilling and the tapping problems.

Who would have guessed I'd have this problem!
 
If i couldn't drill it...everything can be drilled...but if I couldn't, i'd glue an aluminium bar to the machine. Or hold it with hard drive magnets, far enough from the ends of the scale...or 3m tape.

Another thought i had earlier, is a mag drill, as silly as it sounds, to make pecking easier. You don't usually peck cast iron, as the chips break on their own, but pecking can reduce rubbing and heat buildup.

Wow, and I thought carbide drill bits were expensive!

But I like it. Lotsa places I could use a mag drill on the farm. Prolly couldn't get it into the space behind the table though.

No worries, I can prolly peck drill with the small milwaukee and a decent drill guide.
 
The mag drill is a great idea and probably would have worked on the X and Z but I doubt I could have used it on the Y on my machine. Mag bits are expensive. Bought a set from 3/4 to 1 1/2 and I keep them with my wife's jewellery.:D
 
The kids all left at 1pm. I looked at bride and said I am going to the barn. I'll see you tomorrow sometime. She smiled in her knowing way and said ok!

Well, Carbide cuts the cast, but like a snail. So I took a diamond burr as per @whydontu 's suggestion and cut away about a 1/16 of an inch of skin. Then re-applied the carbide drill. THAT WORKED! It was still slow going, but not so slow that I wanted to quit.

At 5:15 I was tapped and ready to attach parts. Here are a few photos.

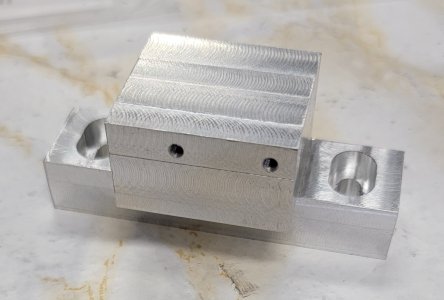
I made a custom X-Axis read head bracket:

20220320_164928.jpg


20220320_165318.jpg


20220320_165346.jpg


The assembled and installed X-Axis scale looks like this:

20220320_170129.jpg


I still need to put a strain relief on the cable and install a shield. Later this week......

Happy Happy!

Y Axis is up next. Should go MUCH SMOOTHER!

A HUGE THANK YOU FOR ALL THE SUGGESTIONS AND THE DISCUSSION! You guys ROCK!
 
Back
Top