Coming together.
View attachment 39759
-
Scam Alert. Members are reminded to NOT send money to buy anything. Don't buy things remote and have it shipped - go get it yourself, pay in person, and take your equipment with you. Scammers have burned people on this forum. Urgency, secrecy, excuses, selling for friend, newish members, FUD, are RED FLAGS. A video conference call is not adequate assurance. Face to face interactions are required. Please report suspicions to the forum admins. Stay Safe - anyone can get scammed.
-
Several Regions have held meetups already, but others are being planned or are evaluating the interest. The Calgary Area Meetup is set for Saturday July 12th at 10am. The signup thread is here! Arbutus has also explored interest in a Fraser Valley meetup but it seems members either missed his thread or had other plans. Let him know if you are interested in a meetup later in the year by posting here! Slowpoke is trying to pull together an Ottawa area meetup later this summer. No date has been selected yet, so let him know if you are interested here! We are not aware of any other meetups being planned this year. If you are interested in doing something in your area, let everyone know and make it happen! Meetups are a great way to make new machining friends and get hands on help in your area. Don’t be shy, sign up and come, or plan your own meetup!
You are using an out of date browser. It may not display this or other websites correctly.
You should upgrade or use an alternative browser.
You should upgrade or use an alternative browser.
DavidR8's shop shenanigans
- Thread starter David
- Start date


Thanks John.That looks very, very nice!
Only a few more things to do and I can install it.
Thanks Larry!A fine piece of work.
Yeah I'd be throwing fits if it didn't!
Was never in doubtIt fits!
")
There was some doubt here!Was never in doubt
140mower
Don
That's what hammers and grinders.....errrr fine adjustment tools are for....There was some doubt here!

Well done, now get it finished and making chips already.

Almost there.That's what hammers and grinders.....errrr fine adjustment tools are for....
Well done, now get it finished and making chips already.
Need to get belts, put the motor back on and reassemble the spindle.
Then it’s chip time.
Well I need to give it a thorough cleaning too.
Last edited:
Nothing beats the delicacy a 4 pound microadjuster. lolThat's what hammers and grinders.....errrr fine adjustment tools are for....
Link belts are your friend.
Definitely doing link belts!Nothing beats the delicacy a 4 pound microadjuster. lol
Link belts are your friend.
When my belt finally wears out, I'm doing link belts too. Mostly because to change the belt you have to completely disassemble the headstock. (!!)Definitely doing link belts!

It's a bonkers design for sure!When my belt finally wears out, I'm doing link belts too. Mostly because to change the belt you have to completely disassemble the headstock. (!!)
Alrighty then.
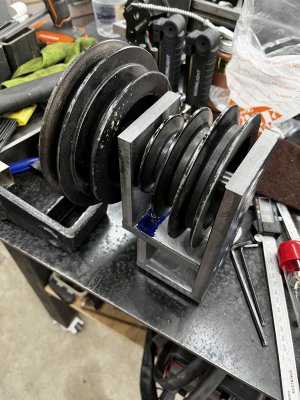
Here’s the counter shaft all assembled. Spins ever so freely. Very happy with the result.
I'll tear it apart so I can prime and paint it.
Picked up key stock and link belt today so inching ever closer to full reassembly.
Here’s the counter shaft all assembled. Spins ever so freely. Very happy with the result.
I'll tear it apart so I can prime and paint it.
Picked up key stock and link belt today so inching ever closer to full reassembly.
Attachments
Before final assembly, try to torque the cap head screws to about 70% of their max torque -- it gives the best stiffness and helps stop them from backing out. For a 3/8" bolt about 37 ft lbs is about right. (grade 8) for metric cap head screws, it is about 25% more.
Thanks John I was wondering how tight they should be. I'll break out the torque wrench.Before final assembly, try to torque the cap head screws to about 70% of their max torque -- it gives the best stiffness and helps stop them from backing out. For a 3/8" bolt about 37 ft lbs is about right. (grade 8) for metric cap head screws, it is about 25% more.
It's a Busy Bee DF-1237G, same as a Grizzly G1003.What model lathe is this? I can't quite picture why there are pulleys in the head stock. If you have a manual please post it.
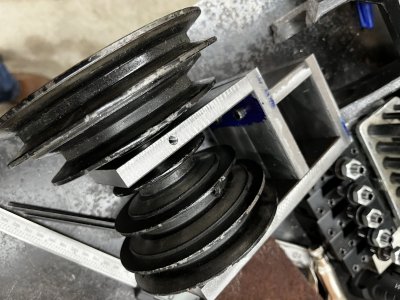
Here's a pic of the inside of the headstock.
The thing I built is at the rear. The pulley on the left goes to the motor, and the three-step goes to the spindle.
