-
Scam Alert. Members are reminded to NOT send money to buy anything. Don't buy things remote and have it shipped - go get it yourself, pay in person, and take your equipment with you. Scammers have burned people on this forum. Urgency, secrecy, excuses, selling for friend, newish members, FUD, are RED FLAGS. A video conference call is not adequate assurance. Face to face interactions are required. Please report suspicions to the forum admins. Stay Safe - anyone can get scammed.
-
Several Regions have held meetups already, but others are being planned or are evaluating the interest. The Calgary Area Meetup is set for Saturday July 12th at 10am. The signup thread is here! Arbutus has also explored interest in a Fraser Valley meetup but it seems members either missed his thread or had other plans. Let him know if you are interested in a meetup later in the year by posting here! Slowpoke is trying to pull together an Ottawa area meetup later this summer. No date has been selected yet, so let him know if you are interested here! We are not aware of any other meetups being planned this year. If you are interested in doing something in your area, let everyone know and make it happen! Meetups are a great way to make new machining friends and get hands on help in your area. Don’t be shy, sign up and come, or plan your own meetup!
You are using an out of date browser. It may not display this or other websites correctly.
You should upgrade or use an alternative browser.
You should upgrade or use an alternative browser.
DavidR8's shop shenanigans
- Thread starter David
- Start date
So if that's the case then likely you have to do what my mill instructions told me to do. Run it for a while at each speed going faster and faster. Likely the bearings will get warm. Just make sure they don't get to hot. After that you may even be able to 'tweak' tighten the bearings a bit more. Depends if the chatter etc comes back.
In other words you actually want the bearings to 'wear' a bit. Or maybe the better term is 'break in'
I was just thinking the same thing. I’ve basically just put it back together and started trying to make chips.So if that's the case then likely you have to do what my mill instructions told me to do. Run it for a while at each speed going faster and faster. Likely the bearings will get warm. Just make sure they don't get to hot. After that you may even be able to 'tweak' tighten the bearings a bit more. Depends if the chatter etc comes back.
In other words you actually want the bearings to 'wear' a bit. Or maybe the better term is 'break in'
I’ll let it run with no load for 30 mins and monitor bearing temps with my IR gun.
Try turning different stock and see if it persists.
Maybe your bearings have worn in a wee bit......
^^^ This
Yours wouldn't be the first machine that needs to be used a bit before it "settles in".
My lathe had a break in procedure that I followed and then re-adjusted the bearings again. It's been good ever since.
Any sense of how long I should let it run?^^^ This
Yours wouldn't be the first machine that needs to be used a bit before it "settles in".
My lathe had a break in procedure that I followed and then re-adjusted the bearings again. It's been good ever since.
With or without chuck?
It's been a very long time. I think it was 15 minutes at each speed increasing speeds from slowest to fastest.Any sense of how long I should let it run?
With or without chuck?
I don't think it matters if the chuck is installed or not.
I also recall I had to monitor the bearing temp to make sure it didn't get too hot.
An approach (was I told, or did I figure out myself? I can't remember!) is to check it every 10 minutes until it stabilizes. Abort, of course if it is not heating, or goes above your set point. Depending on your bearing oil, a reasonable target is 30-35C. If you bet good results ata lower temperature, the stopping is fine - you just don't want to cook your oil or your seals.Any sense of how long I should let it run?
Well, if you do, you remember (for now) how it is done. in 10 years, who knows?I really hope I don’t have to tear it apart to replace the bearings.
Former Member
Guest
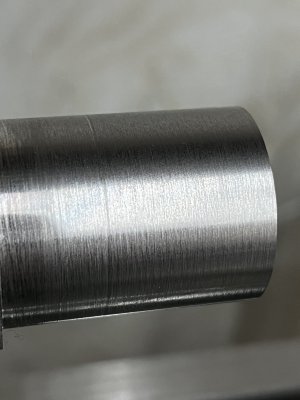
RPM go up one setting, go down one setting, can be a harmonic of the material or the machine.The equalizer bars turn beautifully!
View attachment 40624
1.25 OD
Last pass was .010 DOC
490 rpm.
Think I have still have some vibration in the spindle though.
View attachment 40625
CCMT, don’t recall the nose radius though.Just out of curiosity what type of cutter are you using and do they have a radius?
EDIT: Nose radius is 1/64" or .015"
Last edited:
Tomc938
Ultra Member
I just feel so fortunate to know someone who can afford to buy 24' of copper pipe! Like knowing Bill Gates.
It was only $170 for every thing. And honestly the ball valves were almost half the cost. Seemed better use of money than a $200 desiccant dryer that requires fussing with desiccant beads etc.I just feel so fortunate to know someone who can afford to buy 24' of copper pipe! Like knowing Bill Gates.
Last edited:
Former Member
Guest
I got my ball valves for $21.00 and bought 6ft of 3/4 for the first leg, and 24ft of 1/2 for the rest.
i have a few left over pieces will to sell cheap at $50.00
i have a few left over pieces will to sell cheap at $50.00
Former Member
Guest
-Try taking a 0.020" depth of cut.CCMT, don’t recall the nose radius though.
EDIT: Nose radius is 1/64" or .015"
-make sure your insert has no wear
-put your tool so that the lead angle of the insert is 0° or -3°.
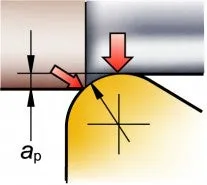
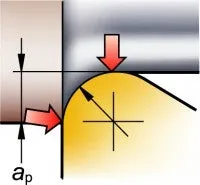
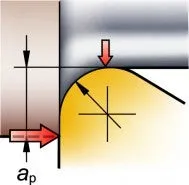
Depth of cut and cutting forces
The relationship between nose radius and depth of cut affects vibration tendencies. The radial forces that push the insert away from the cutting surface become more axial as the depth of cut increases.It is preferable to have more axial forces than radial. High radial forces can have a negative effect on the cutting action which can lead to vibration and bad surface finish.
As a general rule of thumb, choose a nose radius that is equal or smaller than the depth of cut.


DPittman
Ultra Member
Has anyone ever heard of safety problems with standard "M" copper used for airlines? There must be thousands of shops across the country with airlines done with M copper and soldered joints. The joints are by far the weakest link in the whole system and I believe they recommend brazed joints for that reason. Just wondering.@David_R8 I hope you used L copper not M for the extra safety factor.
I used type L coper for all of my lines and used regular solder. I found out later I should have silver solded the joints.
It's been over 30 years and have never had a problem. Maybe just luck. The system runs at a max of 125 psi.
When I installed my mill I used 1/2" PEX to feed the power draw bar, then reduced down to 1/4" nylon pneumatic hose with push connectors.
It's been over 30 years and have never had a problem. Maybe just luck. The system runs at a max of 125 psi.
When I installed my mill I used 1/2" PEX to feed the power draw bar, then reduced down to 1/4" nylon pneumatic hose with push connectors.
Former Member
Guest
The solder joints now can silver bearing on most lead free versions. If you are using up old leaded plumbing solder well...no such luck.
The primary reason for joint failure is poor joint preparation, insufficient heat so the solder does not flow into the joint correctly.
Silver bearing solder is a little more temp sensitive (electronic and plumbing) requires a little more heat, but not too much more. A significantly narrow temp band for good joints and flow, which is why there are issue.
Most of my current soldering is electronic hand soldering and I go through between 1-4lbs a year depending on the work required. All is lead free.
Yes it is L type@David_R8 I hope you used L copper not M for the extra safety factor.

