Well if we're going to post videos here's one from 14 years ago using prototype #2.I'm more proficient with limit settings now to avoid the growling
-
Scam Alert. Members are reminded to NOT send money to buy anything. Don't buy things remote and have it shipped - go get it yourself, pay in person, and take your equipment with you. Scammers have burned people on this forum. Urgency, secrecy, excuses, selling for friend, newish members, FUD, are RED FLAGS. A video conference call is not adequate assurance. Face to face interactions are required. Please report suspicions to the forum admins. Stay Safe - anyone can get scammed.
-
Several Regions have held meetups already, but others are being planned or are evaluating the interest. The Calgary Area Meetup is set for Saturday July 12th at 10am. The signup thread is here! Arbutus has also explored interest in a Fraser Valley meetup but it seems members either missed his thread or had other plans. Let him know if you are interested in a meetup later in the year by posting here! Slowpoke is trying to pull together an Ottawa area meetup later this summer. No date has been selected yet, so let him know if you are interested here! We are not aware of any other meetups being planned this year. If you are interested in doing something in your area, let everyone know and make it happen! Meetups are a great way to make new machining friends and get hands on help in your area. Don’t be shy, sign up and come, or plan your own meetup!
You are using an out of date browser. It may not display this or other websites correctly.
You should upgrade or use an alternative browser.
You should upgrade or use an alternative browser.
D. Gray D&D - HEAVY DUTY KNURLING TOOL KIT
- Thread starter YYCHM
- Start date
One to go.
I admire you pluck. I'd have put it away for a few days despite my farming impatience.
Two spring collars done now.....

But we have a problem.....

The 5/16 drilled bores won't slip over the unthreaded section of the tension rod. The plans called for them to be reamed but I don't have that reamer nor propose to get one. The walls of the narrow sections are too thin to re-drill one size up I figure. May have to thin the unthreaded section of tension rod some how?

Man brass makes a sticky powdery mess.
But we have a problem.....
The 5/16 drilled bores won't slip over the unthreaded section of the tension rod. The plans called for them to be reamed but I don't have that reamer nor propose to get one. The walls of the narrow sections are too thin to re-drill one size up I figure. May have to thin the unthreaded section of tension rod some how?
Man brass makes a sticky powdery mess.
D. Gray Drafting & Design
Member
I found the end of the threads leaves a bur. Chuck as Gerrit says and perhaps a pass with a fine file.
D. Gray Drafting & Design
Member
looking good Craig!
@YYCHM did you follow post #124 and re-make the part or...? I think he correctly identified that your compound was not set correctly based on you picture. That was my guess as well because the thread form looks off. If that's what you did then for sure you would have surface issues. But more importantly, its not really a proper thread form because of how the tool was advancing (which makes me wonder how it threaded on the nut). Anyways, ignore if I'm stating the obvious.
@YYCHM did you follow post #124 and re-make the part or...? I think he correctly identified that your compound was not set correctly based on you picture. That was my guess as well because the thread form looks off. If that's what you did then for sure you would have surface issues. But more importantly, its not really a proper thread form because of how the tool was advancing (which makes me wonder how it threaded on the nut). Anyways, ignore if I'm stating the obvious.
I'm with Peter on this @YYCHM. I'm guessing (and hoping) that you made a new part. But if you didn't, I'd highly recommend that you do.
I know, that will feel like a step backward, but just look at it as another opportunity to have fun and practice threading!
Assuming you cut the first rod deep enough to get the nut on, that means that you also had to remove the crests because of the approach angle for the threading tool. That means the OD of the thread is significantly reduced and will easily strip in the future as you use the knurler and torque down the clamping nut on those weak threads. Basically, I think it will probably just work for a while and then fail in the middle of a future job.
If you already made a new rod, then just tell me to stop being an old worry wart.
BTW - it's really turning out to be a cool tool!
I'll be re-working the hinge pin and tension rod once I source some O1 drill rod.
VicHobbyGuy
Ultra Member
It would be interesting to get some numbers on torque and axial pressure for the tension bolt in knurlers. That 5/16 tension rod in @YYCHM 's project is bigger than the one on my small knurler(s) - perhaps it would last a long while.and will easily strip in the future as you use the knurler and torque down the clamping nut on those weak threads. Basically, I think it will probably just work for a while and then fail in the middle of a future job.
https://www.engineeringtoolbox.com/bolt-torque-load-calculator-d_2065.html
Re-making the part does seem like the best option to me (also) if for no other reason than 'job satisfaction'. I've found in the past that even though others might not notice mistakes in my projects, some of them can be a 'reminder' every time I use the item. Doing a test piece with ordinary CRS or 'mystery metal' while waiting for the O1 might make the work less stressful and get all the dimensions and measurements/settings sorted out.
VicHobbyGuy
Ultra Member
It's really interesting reading @YYCHM 's posts about the build of this kit. Thanks, @YYCHM !
It clearly points out the advantages and disadvantages of buying a kit of parts.
The big advantages IMO is that one saves the expense of buying more metal than really needed and avoids the hassle (and shipping expenses) of finding uncommon parts.
The downside is that there's not extra metal to remake parts if a problem crops up. For me, that increases the stress level - I re-make a lot of parts! Lots of "That's another learning experience"
Whether my ever-increasing pile of metal stock - buying 'just some extra' for every project- is a plus or not is another matter for discussion. No doubt the eventual executor of my estate will not share my happiness!
Last edited:
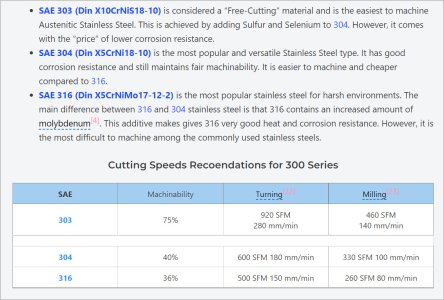
I'm trying to find some information I saved on O1, but cant seem to locate it. I seem to recall tensile strength (in annealed condition which is what you have) was not appreciably different than other more common grades of steel we use, but at lower cost & higher machineability rating. Unless you plan on heat treating it after threading, personally I don't see the sense of O1 in this case. You could make it from 4140 or 303 stainless. Even 12L14 which machines like a dream is about 78ksi UTS.
I'm trying to find some information I saved on O1, but cant seem to locate it. I seem to recall tensile strength (in annealed condition which is what you have) was not appreciably different than other more common grades of steel we use, but at lower cost & higher machineability rating. Unless you plan on heat treating it after threading, personally I don't see the sense of O1 in this case. You could make it from 4140 or 303 stainless. Even 12L14 which machines like a dream is about 78ksi UTS.
All of my metal stock is essentially donated mystery metal, so to go with something other than O1 would still need to be sourced.
VicHobbyGuy
Ultra Member
As soon as I saw the meniton of O1 in this kit, I assumed that heat-treating would be one of the specified construction steps. If not, I don't see the point in specifying it. 12L14 is so nice to work with...definitely worth having some on hand,even if it means shopping at the local MetalSupermarket. BTW, I have a lot of problems drilling stainless and had to re-make the barrel of my tap follower when the SS from my 'mystery box' couldn't be drilled...so I wouldn't recommend SS as a replacement! (SS= horrible stuff and not fun, for me).Unless you plan on heat treating it after threading, personally I don't see the sense of O1 in this case.
so I wouldn't recommend SS as a replacement! (SS= horrible stuff and not fun, for me).
I had the same experience with SS, horrible stuff. It work hardens as you turn/drill it. Had a piece I planned to tap for a end cap screw (axle for a teeter totter). Ended up drilling through and using a cotter pin. Could not get it to tap.
Last edited:
Homedepot 1/2" x 6" hex head grade 8 bolt should do the trick. About $7. Grade 5= $5.15
gerritv
Gerrit
I think 4140 and 303 love to work harden, i'm confident Craig doesn't want the additional fun of that.
For the threads, I'm not sure how ppl can determine that your overall diameter is wrong from a photo, a skill I don't have yet.
Outside of needing to touch up your cutting tool to be 60dg, it is worth noting that a thread has tolerances. So a 5/16-24 can be major diameter of 0.3125-0.3053 and still be a class 3A fit. A class 1A fit would be a range of 0.3114-0.3006 IOW quite a bit of leeway. I have found that the root width is the deciding factor on whether a nunt goes on or not. For most thread types that is .25 * pitch so for 24 tpi it is 0.078". I know we love to gring these cutters to a point but it is not really correct. The peaks also should not be sharp, again at .25 * tpi. This is actually one of the things to watch for with A/AG60 inserts, the range they claimis not supported by the tip width of the cutter. I always have to grind that for the higher pitch end of the cutter range.
Your tap should be labelled with its tolerance, the rest is in Machinery's Handbook since this is imperial stuff.
If my threading on the lathe is not smooth enough I use a Cratex stick, from coarse to fine to get the finish I need. For this adjuster I would say it should be smooth given the torque needed to get the knurl to form.
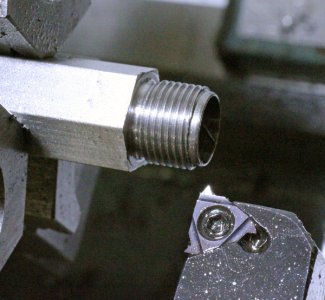
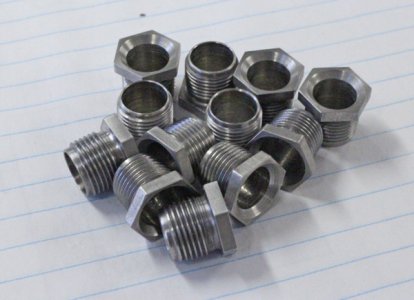
I haven't found 303 to be too bad, but I agree some of the other SS alloys are brutal. This was done at my lowest lathe speed with carbide insert - violating all the sacred rules! LOL
Threading results seem to vary by individual, so buy a few sticks of this & that & give it a whirl.
I also agree that bolts, threaded rod & the like can be a good source of decent quality metal stock for similar application small projects vs bar stock. I have found getting through the threads &/or coating can sometimes be interesting, but relatively smooth sailing once in the core.


