• Scam Alert. Members are reminded to NOT send money to buy anything. Don't buy things remote and have it shipped - go get it yourself, pay in person, and take your equipment with you. Scammers have burned people on this forum. Urgency, secrecy, excuses, selling for friend, newish members, FUD, are RED FLAGS. A video conference call is not adequate assurance. Face to face interactions are required. Please report suspicions to the forum admins. Stay Safe - anyone can get scammed.

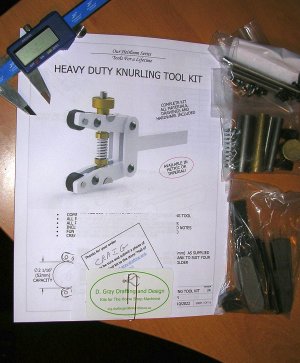
D. Gray D&D - HEAVY DUTY KNURLING TOOL KIT

PeterT

Ultra Member
Premium Member
Look forward to your build & testing. I cant figure out the knurled tension knob on these styles. I have limited experience but I've used:
- bump style knurlers ( work fine but too hard on parts & machine IMO)
- a very poorly made Asian contraption (not even worth mentioning)
- an Armstrong (USA made scissor style), decent but has some shortcomings IMO
- AccuTrak (better USA made scissor style). Both USA models presumed some kind of wrench to apply enough force on the scissor action & arguably had higher leverage mechanics relative to axle & wheel. Same deal for the Doug Ross knurler I attached YouTube link for in the other post.

I'm not picking on this design in particular because I have seen several variants in model engineering circles. But I'd be interested in how this style works with (only) finger torque tensioning. Do the instructions infer running the knurl back & forth with increasing tension or....?
 

YYCHM

(Craig)
Premium Member
Look forward to your build & testing. I cant figure out the knurled tension knob on these styles. I have limited experience but I've used:
- bump style knurlers ( work fine but too hard on parts & machine IMO)
- a very poorly made Asian contraption (not even worth mentioning)
- an Armstrong (USA made scissor style), decent but has some shortcomings IMO
- AccuTrak (better USA made scissor style). Both USA models presumed some kind of wrench to apply enough force on the scissor action & arguably had higher leverage mechanics relative to axle & wheel. Same deal for the Doug Ross knurler I attached YouTube link for in the other post.

I have one of these https://www.busybeetools.com/products/adjustable-knurling-tool-holder.html and a bump knurler that came with my QCTP set. The joints in the BB knurler are soo loose the whole thing leans way over when you travers. Both produce a knurl but not the best IMHO.
 

Dusty

(Bill)
Premium Member
Imperial. Now I have to source a 5/16-24 tap and a 5/16 reamer:oops:

Hey Craig you mean to say holes are not drilled or tapped? Why do you require the reamer? Kindly fill in the planks as there may be others interested in obtaining a kit. Just saying!
 

YYCHM

(Craig)
Premium Member
Hey Craig you mean to say holes are not drilled or tapped? Why do you require the reamer? Kindly fill in the planks as there may be others interested in obtaining a kit. Just saying!

All the raw stock and screws are supplied with the full kit. You have to do all the drilling, reaming, tapping and thread the 5/16-24 tension rod. There is a little bit of lathe turning and some milling. The plans and build notes look pretty good.
 
Last edited:

Six O Two

(Marco)
I'm not picking on this design in particular because I have seen several variants in model engineering circles. But I'd be interested in how this style works with (only) finger torque tensioning. Do the instructions infer running the knurl back & forth with increasing tension or....?

I generally bring my scissor-style knurler up to the work so that the two wheels are just shy of being on the diamater axis of the workpiece, finger tighten, and then use the cross-slide to roll the now tight wheels onto the center of the piece. Dunno if that's how you're supposed to do it, but it's worked for me.
 

PeterT

Ultra Member
Premium Member
I can see that cross slide technique accomplishing the right seating effect for knurl wheels & material. Maybe a downside is it puts additional pressure (wear) on your leadscrew/nut.
 

Tom O

Ultra Member
I wonder about this pressure on the lead screw while people are bragging about 100 - 150 + depth of cut using said screw and not concerned about pressure. I realize the scissor knurler is better than the direct push in type.
 

RobinHood

Ultra Member
Premium Member
I wonder about this pressure on the lead screw while people are bragging about 100 - 150 + depth of cut using said screw and not concerned about pressure.
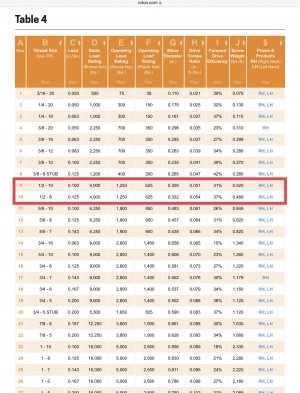
So was I until I found some numbers which set my mind at ease…

Let’s assume that most hobby size machines have compound lead screws of 1/2-10 Acme (the cross slide and the carriage lead screws would most likely be bigger). Most have steel screws with a bronze/brass nut. So the nut would be the limiting factor.

Here is what roton (not affiliated) has to say about their bronze nuts (and they list other materials as well).

3E7CDB87-1624-4DCD-91E2-03772F0DFDFC.jpeg

I would assume that during most cutting / knurling operations the compound (as well as the cross slide) would be stationary. So, static load is 4000 lbs and operating load is 1250 lbs for a 1/2-10 Acme.
The problem is most likely not the lead screw/nut; it is a lack of rigidity of the smaller machines.

Here is the link to the roton website:
 

VicHobbyGuy

Ultra Member
I would assume that during most cutting / knurling operations the compound (as well as the cross slide) would be stationary. So, static load is 4000 lbs and operating load is 1250 lbs for a 1/2-10 Acme.
@RobinHood - thanks for that info.
I don't understand the 'Operating load' parameter. Suppose a 1250 lb load was suspended from the nut and the steel screw was wound to raise the load. How long would the bronze nut last, and what would the wear rate be, with normal (thin coat of oil) lubrication?
I have both push and scissor knurlers. With the scissor knurler it's impossible to get enough pressure on the knurls to knurl steel by tightening the tension knob by hand. I don't want to put Vise-Grips on the knob so I usually advance the knurls 'almost' to the working possition (straddling the work), tighten the knob as much as I can to start knurling, and then advance the cross slide to push the knurling wheels into the 'corrrect' working position. I do worry that I am causing a lot of friction and wear on the cross slide nut by doing this.
 

YYCHM

(Craig)
Premium Member
Got started on the build shorty after lunch today.....

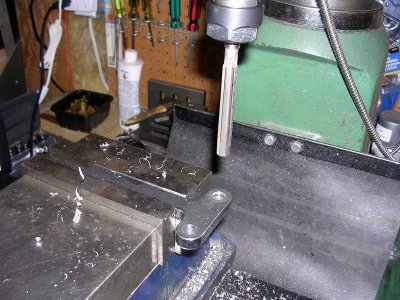
ReamingBodyPlate.JPG

Here I'm reaming a hole in the body plate.

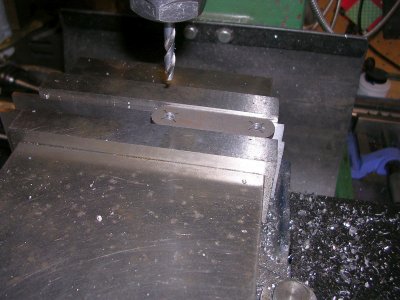
DrillingCoverPlates.JPG

Here I'm drilling a hole in a cover plate (one of two).

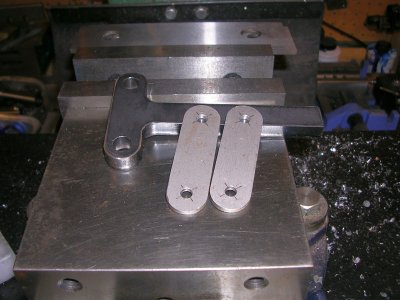
Body&CoverPlates.JPG

Body and cover plates done. This could drag on as I'm using an ER20 collet chuck for all the hole making operations. 4 collet changes if reamed, 3 collet changes if only drilled. The laser etched hole center marks are a nice touch as it confirms the DRO locating process.

Next up are the 4 arm plates which will require 16 reamed holes:rolleyes:

The plans suggest gluing two arm pates together and drilling and reaming them as a set. I'm not sure I trust that approach.......
 
Last edited:

Susquatch

Ultra Member
Administrator
Moderator
Premium Member
I generally bring my scissor-style knurler up to the work so that the two wheels are just shy of being on the diamater axis of the workpiece, finger tighten, and then use the cross-slide to roll the now tight wheels onto the center of the piece. Dunno if that's how you're supposed to do it, but it's worked for me.

I have only used pressure Knurlers to date having just only just recently acquired a scissor unit. But I generally like your approach. It makes some sense. Perhaps my only objection would be the initial push to get it over center. It might actually be better to tighten the scissors than push it over center even though it can't possibly be as bad as a regular push knurler.

So I see it as infinitely better than pushing and then perhaps some tradeoff on how to best set it up.
 

PeterT

Ultra Member
Premium Member
I guess I was trying to say 'unnecessary' load on the cross slide leadscrew nut, since with a scissor knurl you have a much cheaper screw built in the tool itself that accomplishes the exact same thing in a different plane. That screw is finer pitch, presumably more mechanical advantage to achieve knurl depth. It also runs in steel 'nuts', not a typical bronze ABL leadscrew nut. With bump style knurling tools you are kind of stuck with direct infeed. I've seen those easily bend 1/2" tool steel which would equate to a pretty aggressive cut. Bump style is also not kind to your tail stock assembly taking lateral force, but again, our machines vary in robustness. When I was shown bump style it was recommended that you don't creep in slowly. Supposedly kiss the rollers on the surface & then you gave it a faster dial twist in which helped set the deformation process. Not sure if this was related to a sort race against work hardening, or just how it works out. The instructors knurls were perfect sharp diamonds under magnification & everyone else's was shades of sh*t so who am I to argue. Actually most people had decent results on 12L14 but O1 was a different matter despite finer knurl pitch. Some just looked like cross hatching, those were the infeed dilly-dally-ers I recall.

As to how much accelerated wear occurs by heavy cutting in-feeding by itself, that's a great question. I have only seen tables that quantify power consumption to remove material X at rate Y. Parting in theory should be hard on leadscrews too, but maybe in reality we just feed at the rate its happy. Too much & usually something worse happens. I've been pretty average or probably light operating my lathe & its leadscrew/nut time this winter. Wear is a reality.

Good discussion. My own personal conclusion is I now want to try a cut knurler.
 
Top