• Scam Alert. Members are reminded to NOT send money to buy anything. Don't buy things remote and have it shipped - go get it yourself, pay in person, and take your equipment with you. Scammers have burned people on this forum. Urgency, secrecy, excuses, selling for friend, newish members, FUD, are RED FLAGS. A video conference call is not adequate assurance. Face to face interactions are required. Please report suspicions to the forum admins. Stay Safe - anyone can get scammed.

Anyone own a GH1440W lathe from Modern Tools or a PM1440HD from Precision Matthews?

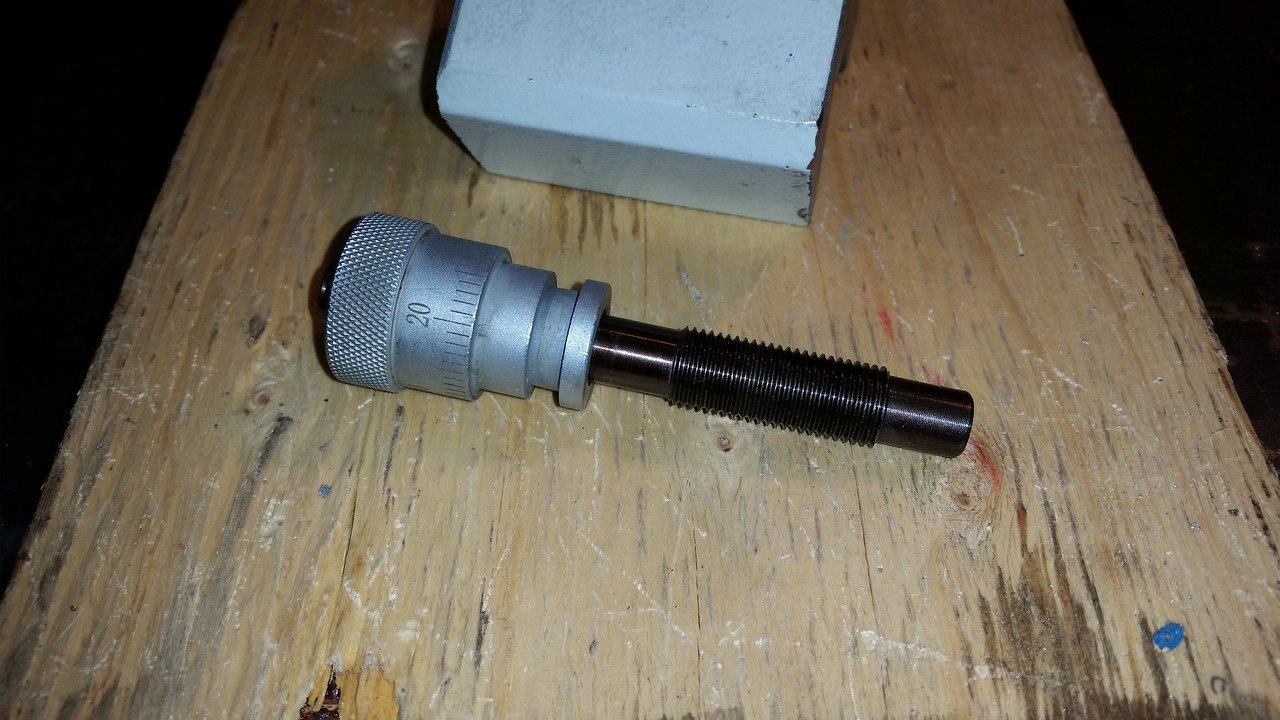
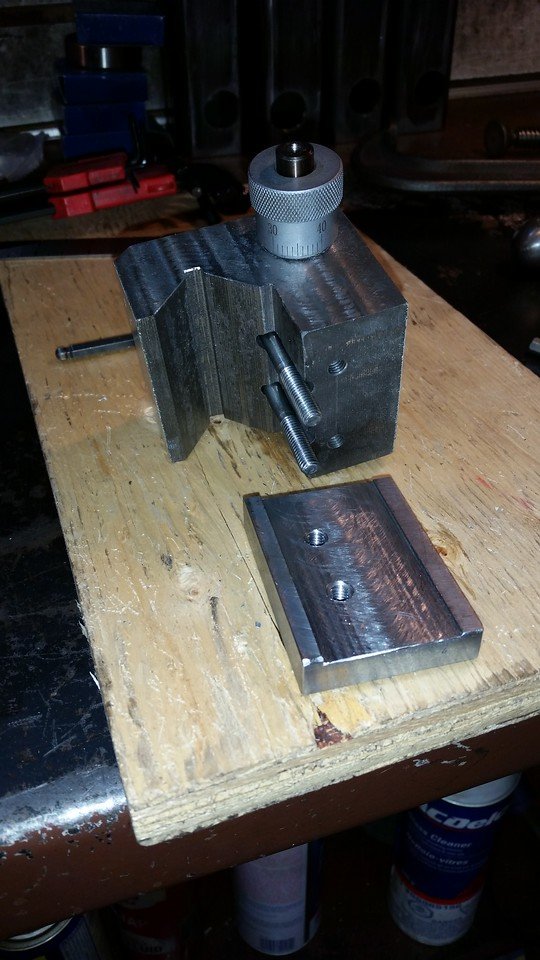
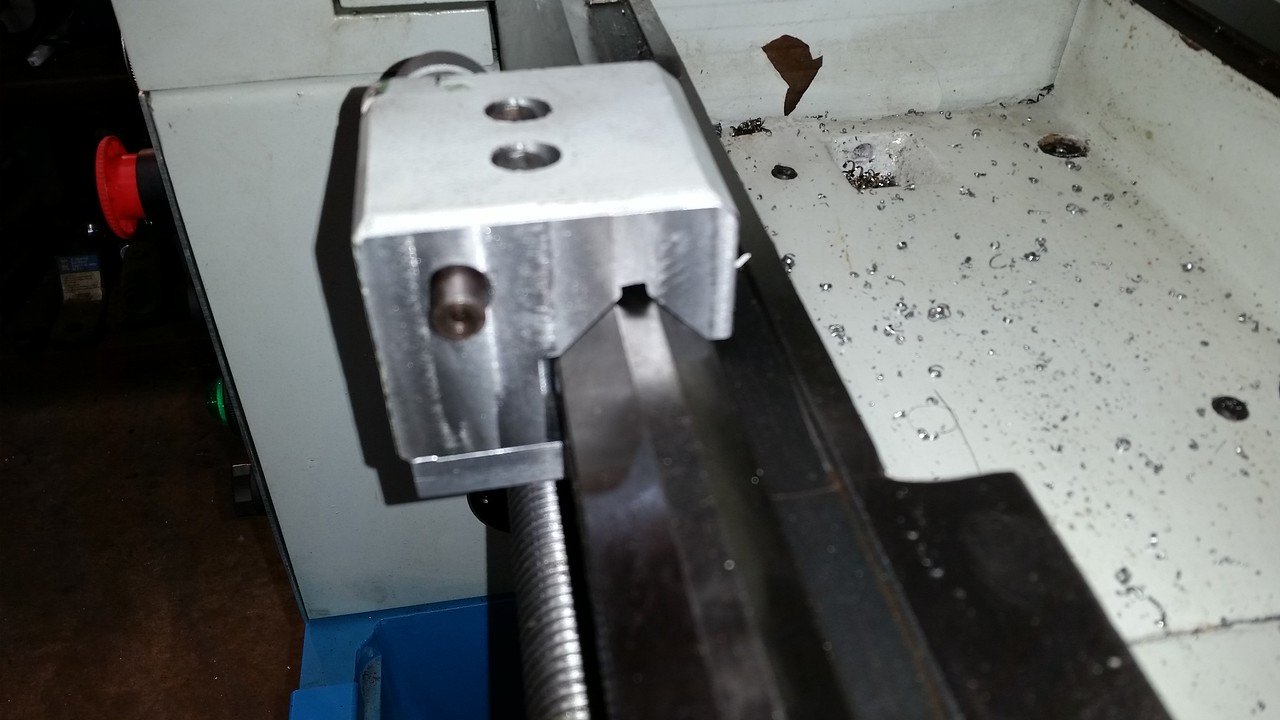
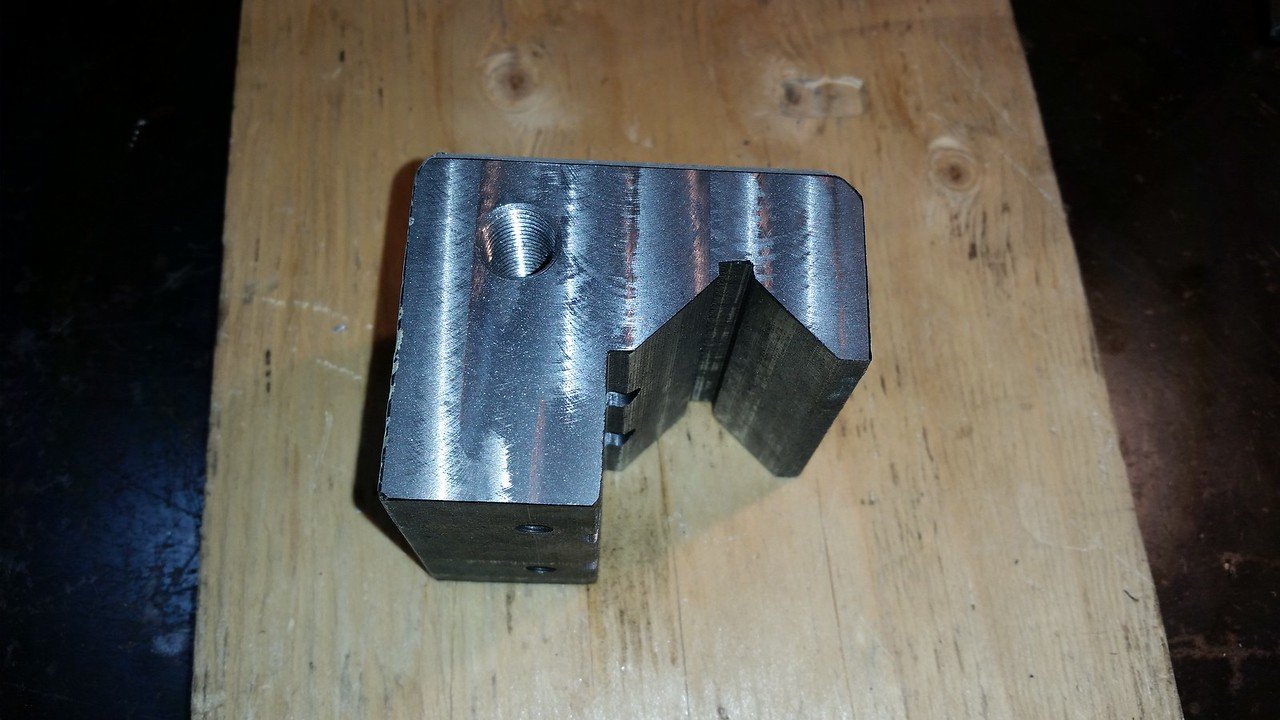
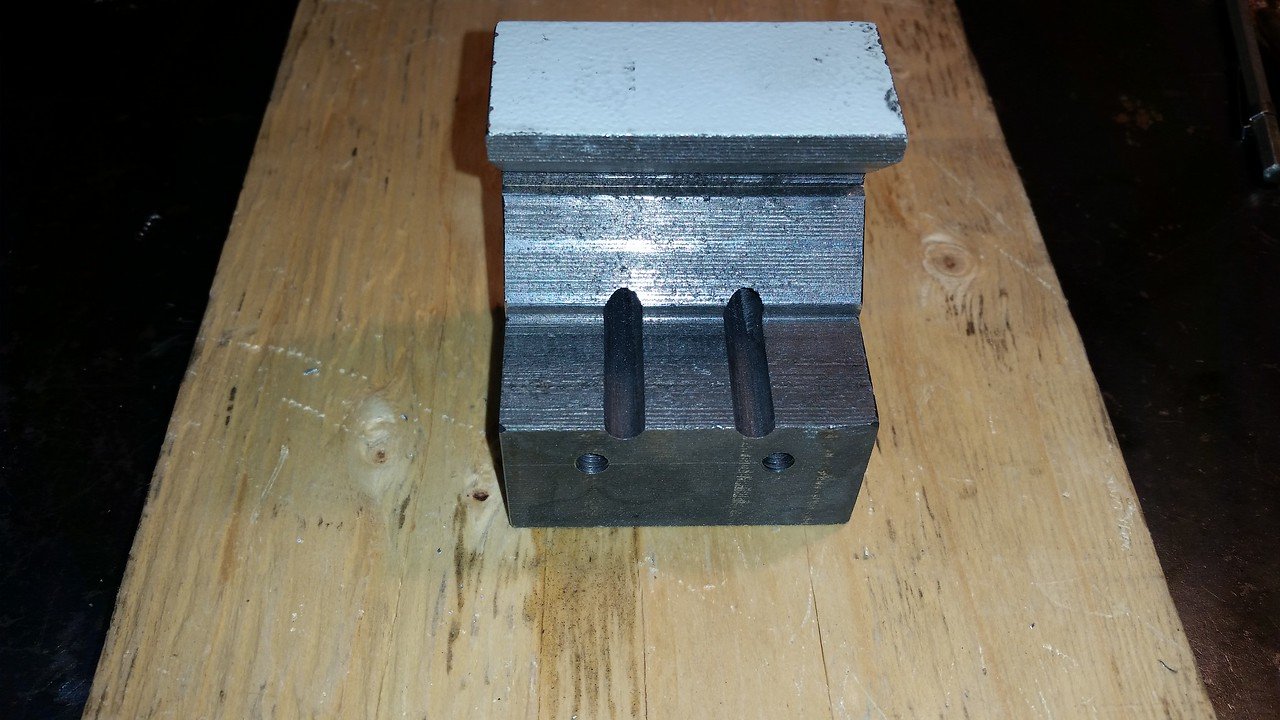
Another accessory item that often causes complaints on Asian lathes is the "micrometer carriage stop". They all seem to have the fasteners attach from the bottom where they are hard to access. I've seen a lot of posts on other forums where people made better versions from aluminum etc. I wanted to improve mine but not build a new one. One of the design problems I saw with mine was the fasteners are so far from the clamping area that it was not really secure even with the bolts tight. There is room to put the fasteners through from top to bottom and not run into the micrometer thimble and that moves the bolts right up against the side of the V way, which improves the leverage they have for tighter clamping. By changing the shape of the bottom plate by adding a fulcrum at the outside edge even more leverage can be applied to clamp the assembly tighter.
I "drilled" the two 1/4" holes with a long 1/4" end mill since the bottom 1/2 of the holes are only partly supported by the cast iron body. I elongated the holes so the bottom plate and bolts can be moved right against the V way before tightening. I made a new bottom plate from 1/2" steel with a raised outside edge to serve as a fulcrum when tightening. Just for esthetics I milled both sides flat as they originally were very roughly machined. The threads for the micrometer part were very rough and hard to turn but they are M12 X 1.25mm and I have a tap that size so they cleaned up nicely. I wondered how they could have the mic graduations shown as .050" per revolution with metric threads. When I checked the threads with thread pitch gages 1.25mm thread is the same as 20TPI imperial. It turned out to work quite well.
20190307_134342.jpg
20190307_133828.jpg
20190307_121845.jpg
20190307_133649.jpg
 
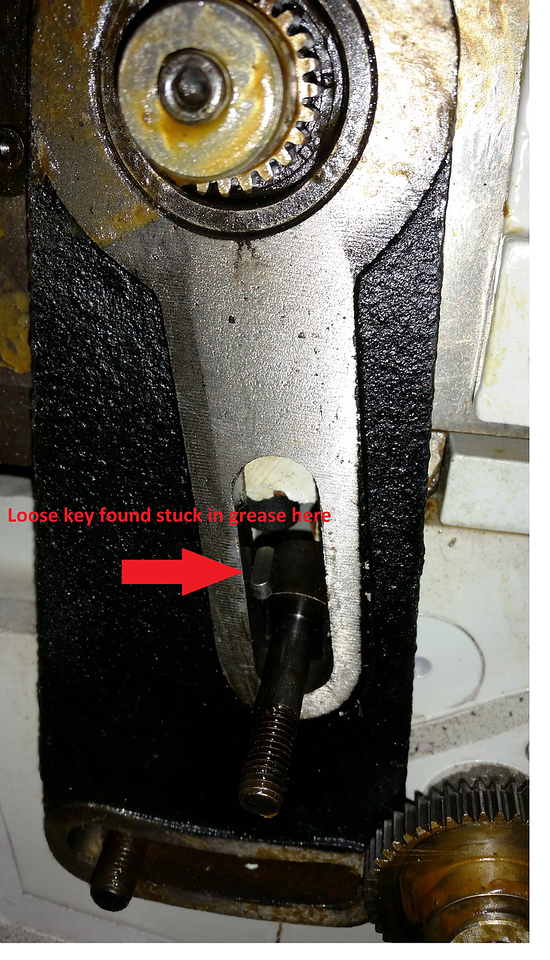
The drive gears on this machine are lubricated with grease, the manual specifies EP1 grease which means extreme pressure capacity and the 1 refers to the NLGI (National Grease and Lubricating Institute) rated thickness or viscosity of the grease. Most general use greases are NLGI 2 rated, thicker than what is needed here. I searched the Gregg Distributors catalog and found a few examples of EP grease and ordered a tube of Loctite brand EP grease and one made by Nemco in Canada specified as EP1. There is a noticeable difference in the thickness, the Loctite being much thicker so I used the Nemco Blue Max EP1. The grease that was in there from the factory was more like wax and I used WD40 and a rag to wipe most of it out then I removed the 3 transfer gears to wash them in Varsol. Behind the large idler gear, stuck in some grease was a key from a shaft, just sitting there waiting to cause a disaster if it had fallen between 2 gears. I took both the drive and driven gears off their shafts and checked that the keys were in place. This extra one must have been dropped and lost during assembly of the machine. Another disturbing thing I found was there was absolutely no backlash between any of the gears. The manual calls for .002"-.004" backlash at both driven and drive gears. I re-assembled the gear train with the backlash set to spec and added a healthy dollop of grease to the gears. It may be my imagination but the machine seems quieter now. I'm really glad I pulled it apart to do this or it could have been ugly if that key had fallen out at the wrong time. I sent an email to Modern to see what they recommend in regard to the extra key.

20190307_150344.jpg


20190307_140135.jpg
20190307_140146.jpg


20190307_150351.jpg
20190307_145023.jpg
20190307_145030.jpg
 
John, did your machine actually come with the micrometer stop? My King didn't, but it's been something I've wanted to make for a while. Didn't know that some machines had them as part of the equipment.
 
In the US, almost every lathe had a micrometer stop by default, used or not. In Canada, they seem far rarer!
 
It's good that you are going through the machine methodically & finding these things, John.
That was the case on certain aspects of my King lathe & mill - just because it 'runs' doesn't mean its set up correctly.
 
I'm really glad I pulled it apart to do this or it could have been ugly if that key had fallen out at the wrong time.
Makes one wonder what else “has fallen down”.... Like in the headstock, apron, etc.

As PeterT has suggested, good thing you are going through the machine in fine detail, it already is much better than new!
 
John, did your machine actually come with the micrometer stop? My King didn't, but it's been something I've wanted to make for a while. Didn't know that some machines had them as part of the equipment.
Yes it came with the lathe. Too bad they don't adopt those simple improvements at the factory.
 
It's good that you are going through the machine methodically & finding these things, John.
That was the case on certain aspects of my King lathe & mill - just because it 'runs' doesn't mean its set up correctly.

I haven't found anything really terrible yet. I got a call from Modern's service manager today and we discussed the extra key. Based on it's size, 5mm X 5mm X 14mm it is probably a key that was meant for the drive or driven gear since they are that size. We agreed that it probably got dropped and lost during assembly.
I do think it's worthwhile to pull the top cover off the headstock and have a look though. I'm going to try to get to that this weekend. Tomorrow is a write off, gotta bury a friend.
 
John I am sorry for your loss.

I'm glad you have started this thread, as it is imperative that whenever we get a new machine (or new to us) we check out everything out thoroughly - as you have done. My friend Bert bought a (brand) new LeBlond lathe a number of years ago, and spent 2 months full-time going over everything and fixing a lot of minor things before ever turning the power on.
 
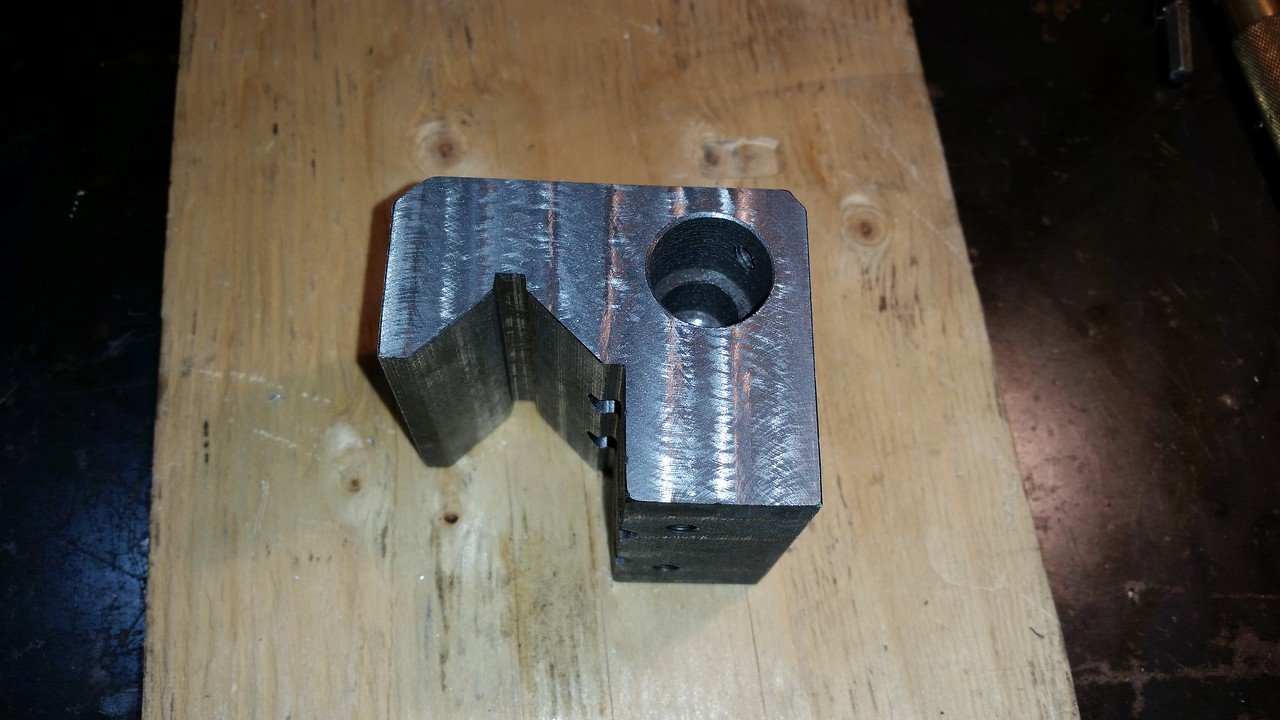
Another accessory item that often causes complaints on Asian lathes is the "micrometer carriage stop". They all seem to have the fasteners attach from the bottom where they are hard to access. I've seen a lot of posts on other forums where people made better versions from aluminum etc. I wanted to improve mine but not build a new one. One of the design problems I saw with mine was the fasteners are so far from the clamping area that it was not really secure even with the bolts tight. There is room to put the fasteners through from top to bottom and not run into the micrometer thimble and that moves the bolts right up against the side of the V way, which improves the leverage they have for tighter clamping. By changing the shape of the bottom plate by adding a fulcrum at the outside edge even more leverage can be applied to clamp the assembly tighter.
I "drilled" the two 1/4" holes with a long 1/4" end mill since the bottom 1/2 of the holes are only partly supported by the cast iron body. I elongated the holes so the bottom plate and bolts can be moved right against the V way before tightening. I made a new bottom plate from 1/2" steel with a raised outside edge to serve as a fulcrum when tightening. Just for esthetics I milled both sides flat as they originally were very roughly machined. The threads for the micrometer part were very rough and hard to turn but they are M12 X 1.25mm and I have a tap that size so they cleaned up nicely. I wondered how they could have the mic graduations shown as .050" per revolution with metric threads. When I checked the threads with thread pitch gages 1.25mm thread is the same as 20TPI imperial. It turned out to work quite well.
View attachment 4629View attachment 4630View attachment 4631View attachment 4632
nice mod John. I need to do the same. Did you use Allen key bolts and counter sink the hole on the stop on top? I can’t quite tell.
 
Makes one wonder what else “has fallen down”.... Like in the headstock, apron, etc.

As PeterT has suggested, good thing you are going through the machine in fine detail, it already is much better than new!
John I am sorry for your loss.

I'm glad you have started this thread, as it is imperative that whenever we get a new machine (or new to us) we check out everything out thoroughly - as you have done. My friend Bert bought a (brand) new LeBlond lathe a number of years ago, and spent 2 months full-time going over everything and fixing a lot of minor things before ever turning the power on.
Thanks John, when my wife and I were young it seemed like we went to a friends wedding every weekend. Now it seems like it's a funeral every weekend.

If Bert thought all the work was worth doing on a LeBlond it's worth doing on any machine.
 
Last edited:
I have used the new lathe for about 6 hours now and I wanted to have a look inside the headstock gearbox. I've heard all kinds of horror stories about sand and other contaninants being left inside new lathes at the factories. I was surprised that the top cover is made of fiberglass, my old lathe had a metal cover. There is a nice gasket under the cover that is glued down to the headstock but had no glue on top so it came off easily after removing the bolts. It was pretty clean but there was some wear metal laying on the bottom of the gearbox so I drained the oil and wiped up everyting I could from the bottom. I'll check it again after another 30-40 hours. The oil drain plug is in the usual silly location and it was a little messy to drain it but the drain plug is 1/4" NPT so I installed a 2" nipple to make future oil changes easier.

You can see some sparkles from the wear metal in this pic.
20190311_155317.jpg


You can see the brass nipple I installed in the drain hole here.
20190311_155255.jpg


Cleaned up and ready to refill, it holds over 2 gallons of oil. I'll change the other 2 gearboxes oil this weekend.
 

Attachments

  • 20190315_141653.jpg
    20190315_141653.jpg
    108.1 KB · Views: 0
Last edited:
I bought a Crappy tire syringe like you recommended & it worked well on my 14x40, just took multiple sucks to get the volume out. 5 litres I believe. But looks like you have even more volume. I did find some cheapo 12v pumps online that were 'oil' rated I'm sure would pump this viscosity oil in no time, but they were ebay/china items & I was impatient to get it done. I guess if you changed the oil real often might be worth it & never have to deal with the drain plug rigmarole. I figure I'll have other shop uses for the syringe around the shop, its impervious to hydrocarbon type liquids.
 
And the oils you are planning on using are........


Sent from my iPhone using Tapatalk
The manual calls for Mobile DTE Heavy Medium. My research shows that is an ISO 68 hydraulic oil so I am using Pro Point ISO 68 hydraulic oil for now. Its about half the price of the Mobil product.
Screenshot_20190312-160502.png
Screenshot_20190312-160404.png
Screenshot_20190312-160502.pngScreenshot_20190312-160404.png
 
Last edited:
I bought a Crappy tire syringe like you recommended & it worked well on my 14x40, just took multiple sucks to get the volume out. 5 litres I believe. But looks like you have even more volume. I did find some cheapo 12v pumps online that were 'oil' rated I'm sure would pump this viscosity oil in no time, but they were ebay/china items & I was impatient to get it done. I guess if you changed the oil real often might be worth it & never have to deal with the drain plug rigmarole. I figure I'll have other shop uses for the syringe around the shop, its impervious to hydrocarbon type liquids.

It will be really easy to change the oil next time with the extended drain plug. No mess with that installed. It is much easier to fill from a 5 gallon pail with the top cover removed also.
 
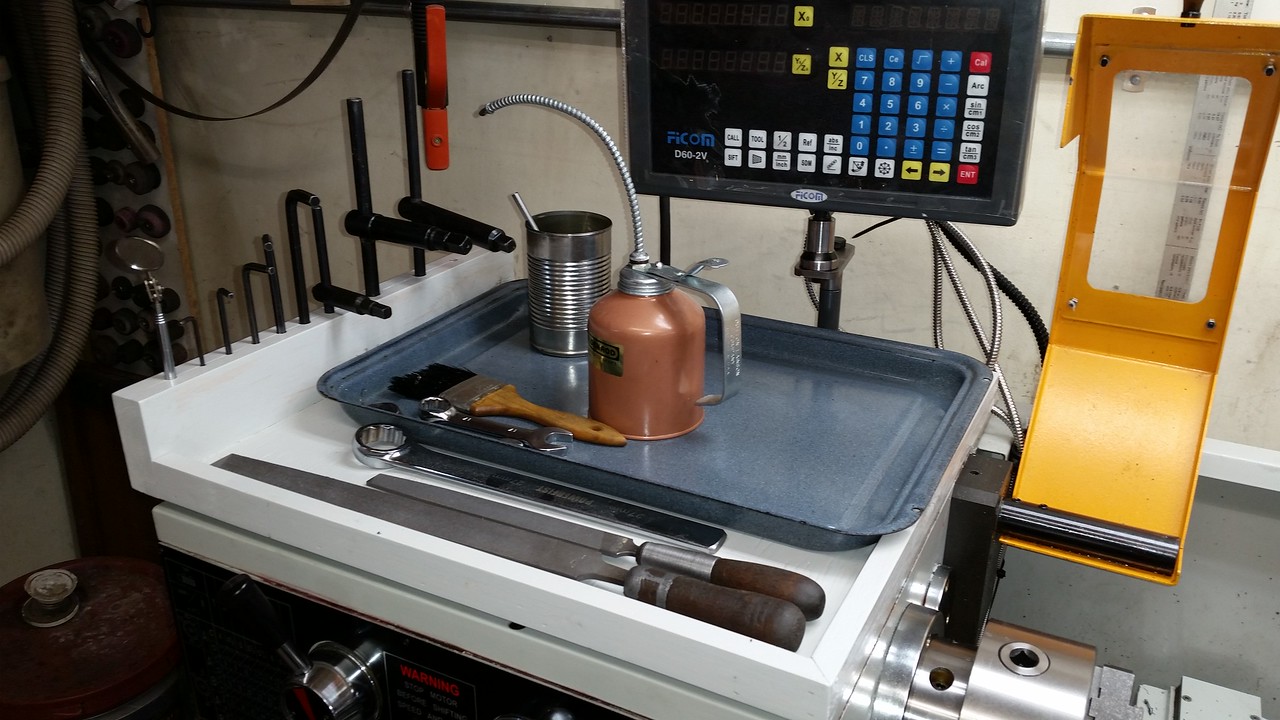
I used my very limited woodworking skills to make a tool storage tray for the top of the headstock. All these tools were just laying on the top cover of the headstock on my old lathe. I wanted to keep things better organized with this one. Made from 1/2" plywood on the bottom and the side pieces were cut from 2 X 4's on my table saw. I really dis-like wood working due to the mess it creates but having that table saw sure does make it easy to cut things straight and square. It's also nice to be able to rip dimensional lumber pieces down to any size you want. Using a vacuum on the dust outlet of the saw helps but the garage is still covered in find sawdust. Anyway, enough whining, the tray is held in place by one of the M6 screws that hold the headstock cover on. I found that Tremclad light grey paint (brush on) matches the color of the lathe pretty well and also Tremclad medium blue is a good match to the lathe base. I usually don't like Tremclad as it takes forever to dry, but it is pretty durable.


Somehow I missed this tread for a few days and wish I'd of caught you when you had the cover off and I would have suggested you give those little Allen screws a "snugging -up" that hold the shift forks in place on the shaft's connecting to the shift levers. From the looks of the photo of the inside of the gear box , yours is the same as mine (whether sold by House of tools or Modern I think they came from the same factory) and the shafts don't have a flat spot on them to hold the screw from turning on the shaft and every once in a while one of them will "slip" a smidge when trying to change speeds, just enough to cause a poor gear engagement ( the gears aren't engaged when the shift lever is in it's detent position). Every time I have the cover off for a service I give those screws a little pressure.
 
Somehow I missed this tread for a few days and wish I'd of caught you when you had the cover off and I would have suggested you give those little Allen screws a "snugging -up" that hold the shift forks in place on the shaft's connecting to the shift levers. From the looks of the photo of the inside of the gear box , yours is the same as mine (whether sold by House of tools or Modern I think they came from the same factory) and the shafts don't have a flat spot on them to hold the screw from turning on the shaft and every once in a while one of them will "slip" a smidge when trying to change speeds, just enough to cause a poor gear engagement ( the gears aren't engaged when the shift lever is in it's detent position). Every time I have the cover off for a service I give those screws a little pressure.
Thanks for the heads up. I'll check them next time I have the cover off
 
Back
Top