• Scam Alert. Members are reminded to NOT send money to buy anything. Don't buy things remote and have it shipped - go get it yourself, pay in person, and take your equipment with you. Scammers have burned people on this forum. Urgency, secrecy, excuses, selling for friend, newish members, FUD, are RED FLAGS. A video conference call is not adequate assurance. Face to face interactions are required. Please report suspicions to the forum admins. Stay Safe - anyone can get scammed.

9" SM Utilathe Restoration

YYCHM

(Craig)
Premium Member
@YYCHobbyMachinist : make sure you clean off all the old liquid gasket and then use acetone or some other non residue cleaner to be sure both plates are oil free. Apply a thin amount of the sealant as you do not want it gumming up your gears - once you re-assemble let it fully cure before you add oil. I cannot recall any gasket or sealant on the donor lathe. If the apron piece is still in the junk bin I will see if there is any tell tail signs.

There is no mention of shaft seals in the parts list, and either @YotaBota or @Hruul (one or the either or both) confirmed not finding any as well.
 

Brent H

Ultra Member
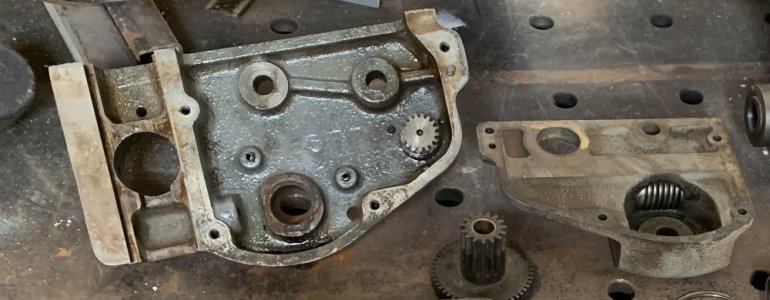
Are you leaking at the shafts? At the front or back of the apron? I do not think there was any sealant on the donor. Here is a picture right after taking it apart - no seals and maybe a haze of some liquid gasket but possibly just the machined surfaces fit together.

slpit apart lathe 9 inch.jpg
 

YYCHM

(Craig)
Premium Member
Are you leaking at the shafts? At the front or back of the apron? I do not think there was any sealant on the donor. Here is a picture right after taking it apart - no seals and maybe a haze of some liquid gasket but possibly just the machined surfaces fit together.

I think I am, but @YotaBota claims his leak disappeared when he re-sealed the casting halves.

slpit apart lathe 9 inch.jpg

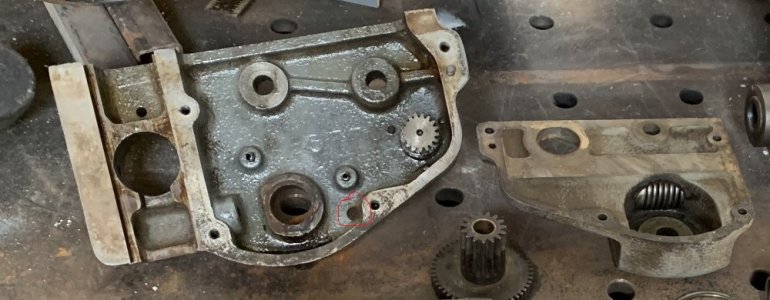
The hole I circled in red is the oil fill port which appears to be below the lowest shaft. The oiler is however dog legged up and the top of the oiler is above the bottom edge of the lowest shaft. The apron calls for 1/2 cup of nondetergent SAE 30W so it will be interesting to see to what level in the oiler that comes to.
 

Hruul

Lee - metalworking novice
I have not had my apron off. It has a slow drip, but not worried about it at this point. I figure its a good way to get new oil in. ;)
 

YotaBota

Mike
Premium Member
IIRC the 1/2 cup of oil was just below the lowest shaft. If I would stop giving the apron a shot of oil every week it would stop dripping, lol. It is seeping from the shaft but only a drop every couple of days so it's no big deal. Before I gooped the joint it was a puddle every day that was leaking.
 

YYCHM

(Craig)
Premium Member
IIRC the 1/2 cup of oil was just below the lowest shaft. If I would stop giving the apron a shot of oil every week it would stop dripping, lol. It is seeping from the shaft but only a drop every couple of days so it's no big deal. Before I gooped the joint it was a puddle every day that was leaking.

I couldn't get 1/2 a cup in her, close, but not a full 1/2 cup. The oiler indicates fluid clear to the top. An hour after filling it I spotted a drop forming on the bottom of the apron:(
 

YYCHM

(Craig)
Premium Member
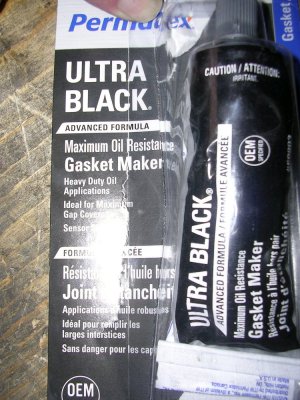
What did you use for gasket?

DSCN3705.JPG

It's leaking out the lower shaft openings as I suspected. I filled it 1/8 cup at a time and let it sit for an hour between top ups. The leak didn't surface until I put the last 1/8 cup in which brought the fluid level above the bottom surface of the lowest shaft.
 
Last edited:

YYCHM

(Craig)
Premium Member
@Brent H

4JAWBACK.JPG

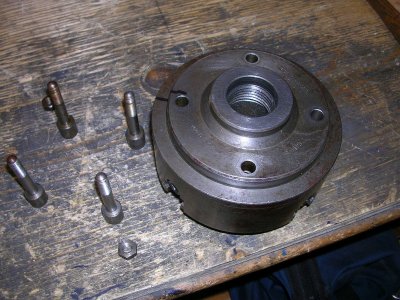
When you cleaned up this 4J for me did you take it apart? I assume it has a back plate but I sure as heck can't get it off? If it's not a back plate why would it have bolts running through it?

Thanks,

Craig
 

Brent H

Ultra Member
@YYCHM : that is the back plate - I think I took it apart - maybe not - if you take it off it will get you into the gear works of the chuck. (back of the chuck is the back plate)

Make sure you mark it for orientation so the bolts go in the right holes and the plate fits exactly where it was fitted.

See the thin line on the circumference - that is where it is fit together.
 

YYCHM

(Craig)
Premium Member
@YYCHM : that is the back plate - I think I took it apart - maybe not - if you take it off it will get you into the gear works of the chuck. (back of the chuck is the back plate)

Make sure you mark it for orientation so the bolts go in the right holes and the plate fits exactly where it was fitted.

See the thin line on the circumference - that is where it is fit together.

Hmmmm..... I don't see an alignment line? So, I can't just swap backing plates with @Johnwa eh? The backing plates on my 3Js are inter changeable.
 

Brent H

Ultra Member
@YYCHM - I can't find a pic where I specifically took it apart - I would say that the thread section is a pretty tight fit - you can probably knock it out carefully but it may take some force.
 

YYCHM

(Craig)
Premium Member
@YYCHM - I can't find a pic where I specifically took it apart - I would say that the thread section is a pretty tight fit - you can probably knock it out carefully but it may take some force.

Hmmm.... so far with the bolts removed I have tried mounting it on the spindle and turning the chuck loose from the plate. That was a no go. Then I installed my spindle mockup into the plate and tried tapping the plate off. That didn't work either. I've applied some penetrating oil and will try again tomorrow. If it takes a hydraulic press to get if off, I'll probably just leave it be.
 

RobinHood

Ultra Member
Premium Member
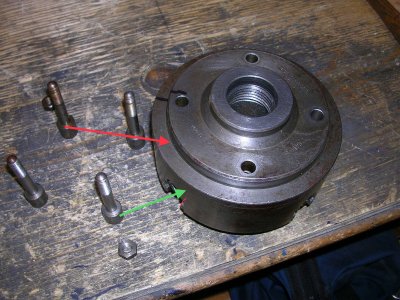
Which line are you trying to spilt it at? Red arrow or green?

BA9DC570-7956-47AE-B7C3-648C5276A5C1.jpeg

Looking into the bore from the front / back, do you see a step? If there is a step, you might be able to use an aluminum or brass drift and a hammer as a persuader to help it separate.

My guess is there is corrosion or just old, dried gunk holding it together.
 
Top