
-
Scam Alert. Members are reminded to NOT send money to buy anything. Don't buy things remote and have it shipped - go get it yourself, pay in person, and take your equipment with you. Scammers have burned people on this forum. Urgency, secrecy, excuses, selling for friend, newish members, FUD, are RED FLAGS. A video conference call is not adequate assurance. Face to face interactions are required. Please report suspicions to the forum admins. Stay Safe - anyone can get scammed.
-
The 2026 Calgary Area Meetup is set for Saturday May 30th at 10am. The signup thread is here! Robinhood has graciously offered to host the meetup again this year. Please note that you MUST RSVP to the notice linked above if you wish to come.
You are using an out of date browser. It may not display this or other websites correctly.
You should upgrade or use an alternative browser.
You should upgrade or use an alternative browser.
3D Printer Happened
- Thread starter Susquatch
- Start date


The line you see at the front of the build plate is a priming move for the head to make sure theres filament extruding when the print starts.
I assume it has to be removed after each print......

@140mower bet you didn't think this thread would drift off to printing poop chutes did ya?The printer poop spits out the hole at the rear of the machine. Some folks print poop chutes to direct the bits into a bin.
The line you see at the front of the build plate is a priming move for the head to make sure theres filament extruding when the print starts.
🙂
I have overwritten a couple but generally you can dispose of it after every print.I assume it has to be removed after each print......

Here is my first print. I posted it high res so the swat crew can study every nuance
Assume a 0.4mm nozzle is installed by default?
Yup that's a Benchy.... 🙂
Now to the good stuff.
OK, so let's say my next print is that spool tray that @Arbutus showed us.

Tips/Techniques Thread 'Dry filament storage system'
Some filament needs to be dried before use. If you live in a soggy climate, it takes less than a couple of days for your dried filament to suck up enough water to cause problems.
So the filament goes back in the dryer for another 6 hours...
This is my gadget to keep the dried filaments dry for weeks at a time.
Its an open tray with a slot to hold a cheap hygrometer. The tray is loaded with an indicating dessicant which changes from orange to green when it is exhausted.
The filament is dried in the AMS or dryer as usual, until the humidity reads below 10%, then sealed in the...
So the filament goes back in the dryer for another 6 hours...
This is my gadget to keep the dried filaments dry for weeks at a time.
Its an open tray with a slot to hold a cheap hygrometer. The tray is loaded with an indicating dessicant which changes from orange to green when it is exhausted.
The filament is dried in the AMS or dryer as usual, until the humidity reads below 10%, then sealed in the...
- Arbutus
- filament storage
- Replies: 22
- Forum: 3D Printing

How do I go about printing that tray? Should all of this be obvious? I assume I load his "DessicantTray.f3d" into the printer somehow, but it's not obvious to me how that is done. I had a good look at the Android Bambu Handy app that I installed during the setup. But I see no way to upload a file to it.
Or am I solidly opening the door to the big bambu bamboozel? I upload to my account at bambu and then print from there?
Or is this the place I've heard about where you put the file on a thumb drive and stick it into the printer USB port and then print from there?

The objects the printer can recognize include .STL (triangulated mesh surface), .STEP (Mesh + metadata), .3MF (Objects, machine setup, + metadata)
.F3D is just for Fusion360 CAD
In the Bamu Studio app, the leftmost tab is Prepare. This is where you add, position and adjust your model and assign filaments and print profiles.
When thhe model is positioned, you click SLICE. This generates the layer lithograph to generate the GCode.
After slicing, the next step is PRINT. Then you wait. And Wait, And...
If you want to save the complete setup with filaments, superposition, with supports included, then the entire build plate object is saved as a .3MF file.
You can share .3MFs and if you get someone else .3MF that will also import the associated profiles into your local ecosystem.
🙂
.F3D is just for Fusion360 CAD
In the Bamu Studio app, the leftmost tab is Prepare. This is where you add, position and adjust your model and assign filaments and print profiles.
When thhe model is positioned, you click SLICE. This generates the layer lithograph to generate the GCode.
After slicing, the next step is PRINT. Then you wait. And Wait, And...
If you want to save the complete setup with filaments, superposition, with supports included, then the entire build plate object is saved as a .3MF file.
You can share .3MFs and if you get someone else .3MF that will also import the associated profiles into your local ecosystem.
🙂

Doggggboy
Ultra Member
The print head has gears that clamp the filament to feed and reverse it during printing. The AMS also feeds the filament through the ptfe tubes to both read the print head and retract back onto the reel.Oh, I see! Those tubes feed the filament to the print head? Ok, I thought it was compressed air or something. I guess it's ok if they carry filament.
It didn't. Maybe it's a setting?

OK.OK, so let's say my next print is that spool tray that @Arbutus showed us.
Tips/Techniques Thread 'Dry filament storage system'
Some filament needs to be dried before use. If you live in a soggy climate, it takes less than a couple of days for your dried filament to suck up enough water to cause problems.
So the filament goes back in the dryer for another 6 hours...
This is my gadget to keep the dried filaments dry for weeks at a time.
Its an open tray with a slot to hold a cheap hygrometer. The tray is loaded with an indicating dessicant which changes from orange to green when it is exhausted.
The filament is dried in the AMS or dryer as usual, until the humidity reads below 10%, then sealed in the...
- Arbutus
- filament storage
- Replies: 22
- Forum: 3D Printing
How do I go about printing that tray? Should all of this be obvious? I assume I load his "DessicantTray.f3d" into the printer somehow, but it's not obvious to me how that is done. I had a good look at the Android Bambu Handy app that I installed during the setup. But I see no way to upload a file to it.
Or am I solidly opening the door to the big bambu bamboozel? I upload to my account at bambu and then print from there?
Or is this the place I've heard about where you put the file on a thumb drive and stick it into the printer USB port and then print from there?
Have you got a connection from your PC to the printer via the Bambu desktop application? Should be here:
"C:\Program Files\Bambu Studio\bambu-studio.exe"
You can put an icon on the desktop:

When you run it you get this:
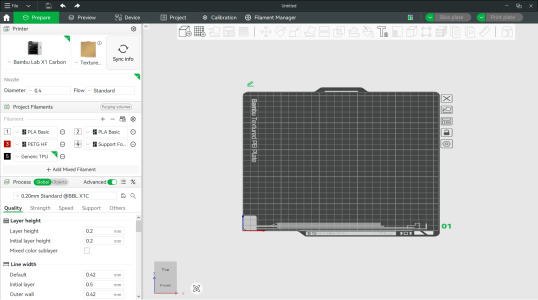
You select what model printer and the type of print bed. Smooth or textured. They usually come with textured.
When you click on the sync info it will read the RFID tags on the reels in the AMS and fillin the filament list. #1 will be the default printing choice.
Anyway, File, import, the STL file is usually easier if the 3MF was meant for a different printer. This way it uses the default values. When the desiccant tray is loaded it's on its side. So you select rotate enter 90 degrees. If it's the wrong direction enter 180 to flip it over.
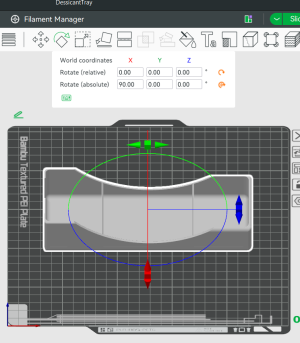
Next with the item highlighted with the solid line do a right click or Ctrl-K and clone one more so you can print two of them. (if you want to try that right away).
To arrange them for better printing motion select the 4th from the left to arrange the parts. Makes sure none are sitting on top of each other.
Now if you right click again on each item you can change the filament from the default slot #1. Easier to do that before you clone them.
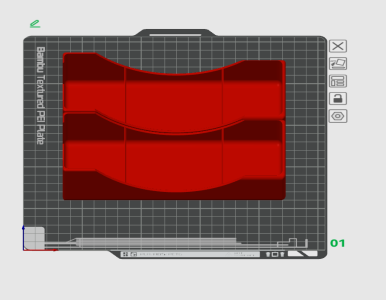
Above is an example of PETG RED. The click on the slice print button on the top right
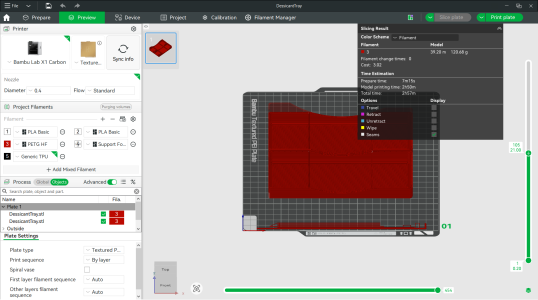
And we see it will take about 3 hours to print this. So now click on send the print plate button.
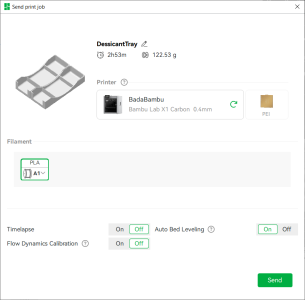
If it's the first time you are using this filament between power cycles set flow dynamics on and bed leveling on. Although theoretically the Bambu filament doesn't need the flow dynamics where some other cheaper PLA will.
Once you've done one print you can set all three switches off. Click on send.
At that point it will tell you that it's being sent through the cloud to your printer and assuming you have all that network stuff connected it will start heating the bed and then the extruder and then load the filament and do the prelim stuff.
If you've printed the benchy you've already done a lot of this.
And when you have the trays printed and you've received your cereal boxes etc...
pour some of the indicating desiccant into the 3 spots on the tray and lower it into the cereal box. Then set the reel on top of that and close up the box.
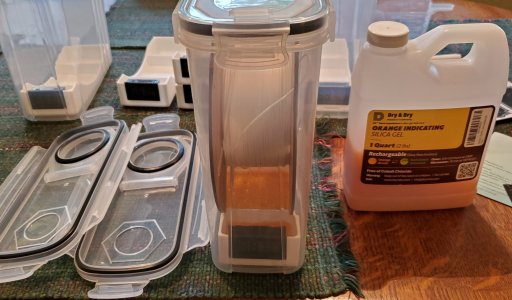
This Elegoo spool of PLA had already spent some time in the dryer earlier today so it was even still a tad warm. When I inserted it the RH was 50% and 19.5 degrees (cold in the house at the moment).
Now 30 minutes later it's at 10% RH and 20.6C.
Assuming the box doesn't leak I'm going to guess it will stay at this for quite some time.
pour some of the indicating desiccant into the 3 spots on the tray and lower it into the cereal box. Then set the reel on top of that and close up the box.
This Elegoo spool of PLA had already spent some time in the dryer earlier today so it was even still a tad warm. When I inserted it the RH was 50% and 19.5 degrees (cold in the house at the moment).
Now 30 minutes later it's at 10% RH and 20.6C.
Assuming the box doesn't leak I'm going to guess it will stay at this for quite some time.
Last edited:
In the Bamu Studio app, the leftmost tab is Prepare. This is where you add, position and adjust your model and assign filaments and print profiles.
Bambu Studio App? I missed that one in the setup. Is that Android or PC or both? (I confess I am not used to calling pc programs apps..... LOL)
When thhe model is positioned, you click SLICE. This generates the layer lithograph to generate the GCode.
Positioned? What does that mean?
Have you got a connection from your PC to the printer via the Bambu desktop application? Should be here:
"C:\Program Files\Bambu Studio\bambu-studio.exe"
Missed this info when I posted last. Probably crossed paths in the nearest wormhole.
No desktop programs installed yet. Nothing in the setup process suggested I needed that.
What you say about using the pc program makes sense. It will have to wait till tomorrow though.
Assume a 0.4mm nozzle is installed by default?
I'm not sure Peter. I could look tomorrow. Is there a reason you ask that?
Odds are it's the 0.4mm. That's pretty well standard.I'm not sure Peter. I could look tomorrow. Is there a reason you ask that?
Is there a reason you ask that?
Just that if you see a 'better' Benchy result that happens to be printed with a 0.2mm (higher resolution) you dont experience Benchy Envy Syndrome thinking something was defective with your printer which may be operating 100% just on a coarser squirt.
BTW if you import an STL or STEP you need to define the nozzle & a few other basic settings in Bambu Studio (slicer). It may be set to 0.4 from factory. the plate it came with & other defaults, but once you start adjusting this stuff, just know youyr specific settings get written into the Bambu .gcode3MF file itself, which is fed to the printer. ie if you slice with a 0.4mm but inadvertantly have a 0.2mm nozzle mounted... likely failed print or other issues. So need some way to track this in the file name or whatever if you flip nozzles more routinely. Getting a bit ahead, but be aware of this for now.
You can also access your Bambu from your phone. That's one of the reasons they go with the 'cloud' stuff.Missed this info when I posted last. Probably crossed paths in the nearest wormhole.
No desktop programs installed yet. Nothing in the setup process suggested I needed that.
What you say about using the pc program makes sense. It will have to wait till tomorrow though.
But for the PC, or MAC or Linux
and for your phone
From the phone for example I can check out what I've printed etc. If I'm out of the house I can get a quick look via the camera to see if that 10 hour print has hung up or whatever...
Going back almost 15 years ago the only way to talk to the printer was via a USB connection or sneaker-net with an SD card that had the G-Code. You then started it from the touch pad on the printer.
What showed up pretty quickly from that was a program, written by a young lady in Germany, called Octoprint that ran on a Raspberry Pi2. I still have the Pi2 and and setting it up now as a kiln controller but that's another story.
Anyway, by connecting the Raspberry Pi to the 3D printer controller USB port and having the Pi on the network you suddenly had a Internet Explorer, Firefox, or whatever interface to your pretty dumb otherwise printer.
Octoprint on the Pi is amazing and mine uses a USB camera attached to the Pi3 now which monitors and runs the SOVOL-06. I drag and drop the gcode file onto the user interface. I can then tell it which one in local storage I want printed. I can watch the temperature on a graph. I can even watch each layer on a graphical display as it's being laid down. The Bambu doesn't have that feature.
So go for the Bambu Studio. The term positioning means where you put the part on the build plate.
For example these 3 parts make up a cherry pitter which removes the pits so the cherries can go into a canning jar with some booze. Here below I've just dropped them on the plate and moved them so they don't sit on top of each other.
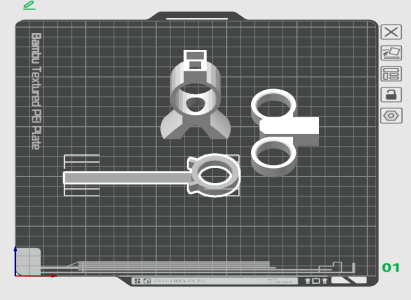
And if I click on the arrange button 3rd from the top on the right there the system puts them in what it thinks is an optimal position for print speed.
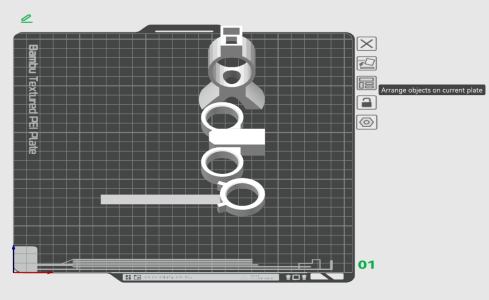
And if I click on the arrange button 3rd from the top on the right there the system puts them in what it thinks is an optimal position for print speed.
Dohh. That was kinda obvious. Brain is slowing down daily now. I wondered why the benchy was so far over in one corner.
How about rotation? How do you control what surface is facing down on the plate?
And is there a scale function?
Odds are it's the 0.4mm. That's pretty well standard.
@PeterT - yes, it's 0.4. I just used the android app to find out. Trip to the barn wasn't required. Great idea to append it to the file name.
Time will tell if I ever use a smaller nozzle.
I'll install Bambu Studio later this morning.