• Scam Alert. Members are reminded to NOT send money to buy anything. Don't buy things remote and have it shipped - go get it yourself, pay in person, and take your equipment with you. Scammers have burned people on this forum. Urgency, secrecy, excuses, selling for friend, newish members, FUD, are RED FLAGS. A video conference call is not adequate assurance. Face to face interactions are required. Please report suspicions to the forum admins. Stay Safe - anyone can get scammed.

Tool Vevor Drill Bit Sharpener Improved

Tool
I don't have the files, hopefully David does. If not, I may be able to get them.

I'd give VERY HIGH ODDS that your PP-13C is the same as a Vevor 13C not the 13B. The basic units are all very similar, but the A, B, C, D, etc each have slightly different implimentations.

As far as I have been able to ascertain, the Vevors and other brand clones of the 13x and 20x models are all Chinese copies of the Chinese MRCM sharpener. Yes, the Chinese guys even copy the other Chinese outfits...... LOL!

I think they are all simply amazing drill bit sharpeners. I don't think you can get a better Sharpener for the money.
Thanks for the feedback.
My PP-13C is a few years old and is different to the ones now being sold by the local Australian outlets.
Mine has the collet positioned at the leading edge of the grinding wheel for web-thinning - just like the RM-13B.
The new PP-13C has the collet positioned at the trailing edge of the grinding wheel for split-pointing - just like the RM-13A.
My goal is to convert my PP-13C to a dual purpose sharpener - web thinning + split pointing.
Truth be told, I really only need the split pointing capability...

Can you tell me what the Vevor 13C has that is different to the 13B?
I could find no reference to the 13C on any internet searches.

Cheers
Barry
 
I don't have the files, hopefully David does. If not, I may be able to get them.

I'd give VERY HIGH ODDS that your PP-13C is the same as a Vevor 13C not the 13B. The basic units are all very similar, but the A, B, C, D, etc each have slightly different implimentations.

As far as I have been able to ascertain, the Vevors and other brand clones of the 13x and 20x models are all Chinese copies of the Chinese MRCM sharpener. Yes, the Chinese guys even copy the other Chinese outfits...... LOL!

I think they are all simply amazing drill bit sharpeners. I don't think you can get a better Sharpener for the money.
Toronto builder was pretty involved in this as
well. Has he left the chat?
 
Can you tell me what the Vevor 13C has that is different to the 13B?
I could find no reference to the 13C on any internet searches.

I'm sorry Barry, my old age memory screwed me over again. I was confusing the A & B with the C. Vevor doesn't sell a C - at least not here in Canada. However

The point is still the same though. Setting the names and numbers aside, all those different models seem to be very similar. It's a dogs breakfast sorting through what the differences are. My real point despite my model number error is that whatever you have prolly exists under another brand and model. You just have to figure out what that is.

Mine is Vevor B which does web-thinning. So it might be the same as your C. In practice, the web thinning acts very much like a split point grind. If you review this thread in detail, I posted pictures.

The idea behind all this work was to develop new fixtures for the basic grinder so it could do, web thinning, split points, and hopefully some basic endmill sharpening.

The basic grinder motor is very flexible and well made. It is mounted solidly on a steel plate and the collets all fit into fixtures that are indexed in various ways to accomplish the intended tasks. There is no welding. All the fixtures screw together.

There is lots of hope that you can reach your goal. But as I said earlier, you should check first to find out if yours already produces a decent split point via web thinning.
 
@CWret has posted a really good How to Use the Vevor Drill Bit Sharpener' here:

 
Welcome aboard.
I probably have the STL files. I can repost.
Hello David,

New member from Newport South Wales, my apologies for dredging up an old thread but after using a "Parkside" DD750X clone this past week it's sparked my interest in the MR13A/B/D machines, are the .stl files still available please?

Regards

Paul
 
Tagging @TorontoBuilder as he's the originator of the STL files.

I had the files and had them posted. Then I discovered a couple of dimensioning errors and issues that needed tweaking. Especially for those who wanted to be able to use the large collet holder to sharpen larger drills.

So I removed the old files since I didn't want people to print and try to use files that would not work.

Then I had a flare up and got very ill and didn't get any more work done on the project.

It has been so longer that I can't recall exactly what the critical issues were. But one of them may have been that the main upright motor mount needed to shift rearward in order to use the larger collet holder.

I can find the fusion files and post them for anyone who wishes to try tweak them for themselves. I was also hoping to get back to this project myself soon.
 
I also wanted to note that the 3D printed parts I was making were strictly intended as "proof of concept" tools to get the potential mods into other people's hands quickly for their feedback before committing a design to CAD and releasing it to people so that they could manufacture the parts from durable metal.

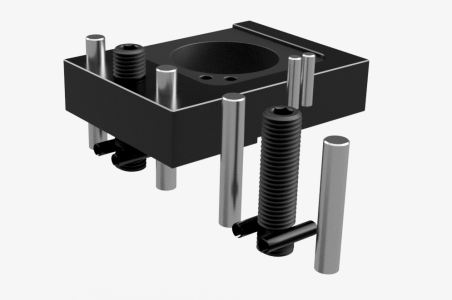
The mod requires 3mm for the stops. 5mm pins or shafting as guides, and 8mm allen "jack" screws to be modified with a groove and spring/roll pins to retain the jack screws in their position.

1778088172266.png


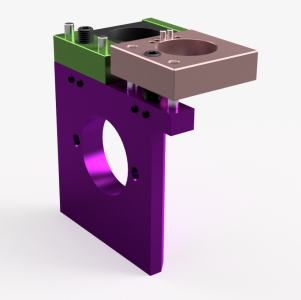
Attached here are the last revision of the parts for the "simple" conversion to MR13D variant. If you try these please advise us if they need revisions to the geometry, and why you feel that is the case.

Bonus points if you post plan view photos so we can see thru the collet holders to see where your centers line up on your grinding wheels. And use at your own risk, no promises or warranty of any kind is provided. Assume these wont work and you can't go wrong 😉


Key drawing: Dusty Rose is Block B rev 2, Black is Tool Block A rev 2, Green is Tool Block A Mount rev 2, and Purple is Dual Motor Mount rev 3b

1778088895200.png
 

Attachments

I had the files and had them posted. Then I discovered a couple of dimensioning errors and issues that needed tweaking. Especially for those who wanted to be able to use the large collet holder to sharpen larger drills.

So I removed the old files since I didn't want people to print and try to use files that would not work.

Then I had a flare up and got very ill and didn't get any more work done on the project.

It has been so longer that I can't recall exactly what the critical issues were. But one of them may have been that the main upright motor mount needed to shift rearward in order to use the larger collet holder.

I can find the fusion files and post them for anyone who wishes to try tweak them for themselves. I was also hoping to get back to this project myself soon.
Thanks for the prompt response good sir, sorry to hear you have been ill.
The work you have done is marvelous certainly way beyond my meagre capabilities, I would be grateful for anything you have issues or not, If I can add something I will.

Best regards

Paul
 
Okay I've now gotten other prerequisites on my list taken care of....

Acquire small parts. Check

Acquire steel stock. Check

Heat treatment oven connected. Check

Surface grinder moved into shop. Check

This weekend I'm wiring it up with a new VFD installing and dressing fresh grinding wheel.

Plans. Check

So time to go from 3d printed parts to metal parts.
 
Okay I finally sat down with my old parts, my new parts, my sharpener and my notes.

I wanted to go back and recall why I was not happy and wanted to pull the test files so no one wasted time on them.

There is one crucial point I at first did not have a firm understanding of, but knew instinctively was creating "issues" I wanted to fix. More on this in a minute.

And no the issue I wanted to address foremost was NOT the POS projection setting tool. That is an absolute horror show I plan to fix too. More on that later too.

My starting point is the MR13A. I have no other drill grinder as a reference because I'm both on a fixed income and cheap.

So I used photos to estimate the datum points for locating fixtures.

One thing you can notice if you watch Stefan's video it that the face of the collect holder and the upper face of the fixture plates act as a depth stop that determines where and how much material is removed during the split point and web thinning process.

The Motom's web thinning fixture plate has a pivot to provide fine depth adjustment while the point splitting fixture has no adjustment. The lack of adjustment for split point grinding told me there is a fixed datum I needed to find.

From the video it appears that the point splitting and web thinning fixtures should share the same datum line that is identical, but the web thinning fixture plate in on a pivot rod to allows for slight adjustment to accommodate drills with differing web cross sections. It is the only variable to the subsequent split pointing and web thinning operations.
For a standard 13D conversion I wanted to match the Motom D grinder closely since it performs better than the clones. BUT I could not get any datum for the height of the fixtures above the wheel center line. Therefore I could not gauge the plane where the drill bit is supposed to contact the wheel when using the split point and web thinning fixtures.

However do I arrive at that? I chose to experiment and designed parts that allowed for experimentation.

What I found was that the secondary fixtures don't reference the drill tip, but rather they reference the primary facet.

When you use the main point angle fixture, you grind the primary facets until the machine stops removing material because the collet holder shoulder bottoms out completely against the fixture.

This means that at the end of the main sharpening step, the spatial distance from the collet holder's registration face to the newly ground primary facet is now a fixed, mathematically locked constant across all drill sizes.

SO while I made both my fixture plates adjustable, in order to empirically determine the datum point, I was not happy with the arrangement as a working model.

I had intended to revert to the Motom type design entirely having ascertained better datum to be able to model the parameters. This is why I pulled the models, they sucked as working arrangement. More on this in a minute.

Now, here are remaining issues that I wanted to solve....

Firstly is the projection adjustment has to be flawless to assure consistent sharpening of the point angle.

The point angle is the crucial adjustment factor based on diameter. The tool provided to set the projection sucks ass.

Next I was going to adjust the model to meet the motom design, and that meant redesigning all the parts to very precise new dimensions.

Then I was going to test with new 3D printed parts.

I was also going to design a stand alone projection depth adjuster similar to how a 5C collet stop works.

I wish I had completed the modeling before my health took a turn back then.
 
I was also going to design a stand alone projection depth adjuster similar to how a 5C collet stop works.
Maybe you are already aware but just in case, maybe it should read how 5C collet stop 'mostly' works. All depends on the reference point. When you screw the stop/pin accessory into the colletit, it is now fixed in position. Then insert the collet into chuck, then insert the part until it contacts stop, then draw the collet into its tapered seat. Say you faced the part with the cross slide & registered this distance to as 0.000" something you want to repeat. Now if you put in another part of a slightly different, say slightly smaller diameter & repeated to the same stop, the length would be different. Because the collet tightening would collapse it more before seating, which displaces the collet which takes the stop along for the ride. The fixed 0.000" position will now point to a longer length on the part. Not sure if this pertains to your mod but maybe worth considering
 
I wish I had completed the modeling before my health took a turn back then.

@CWret and I did a fair bit of work after your health dropped off. I'm sure I speak for both of us when I say we are happy to help.

The Vevor Grinder was also a very popular purchase by members with most of them reporting very satisfactory experiences. Did you see that thread?
 
@CWret and I did a fair bit of work after your health dropped off. I'm sure I speak for both of us when I say we are happy to help.

The Vevor Grinder was also a very popular purchase by members with most of them reporting very satisfactory experiences. Did you see that thread?
I did see that the user base is huge now, but not how many are confined to 13a, 13b or made a useable D version, or how many like mr Pete bought one of each a and b.

I only have room for one, and I have 1000s of bits to resharpen and enough carbide bits that I want absolute precision.

Then I bought a large collet holder to do large bits, and I plan to use that with custom jigs for the surface grinder. Same for end mill sharpening.
 
And no the issue I wanted to address foremost was NOT the POS projection setting tool. That is an absolute horror show I plan to fix too. More on that later too.

Actually, I found that it works pretty well. But you do have to learn to use it the way they intended. It is NOT intuitive. However, it seems to work well once you do learn to use it. Just forget the labels. They are outright wrong - prolly a translation error.

My only complaint is a lack of adjustment. The dial only adjusts where the back of the drill blade hits it. It does not adjust for depth or web thickness. It's very misleading. But it works once you know that.

What I found was that the secondary fixtures don't reference the drill tip, but rather they reference the primary facet.

I did not arrive at the same conclusion. I found instead that both the primary facet and the web thinning or split point all use the same reference - namely the collet set point reference - which goes away on the first grind, but remains in an imaginary place until the collet is loosened.

One thing you can notice if you watch Stefan's video it that the face of the collect holder and the upper face of the fixture plates act as a depth stop that determines where and how much material is removed during the split point and web thinning process.

It does need a depth of cut adjustment. The shims that @CWret used work but there should be a better way.

Then I bought a large collet holder to do large bits, and I plan to use that with custom jigs for the surface grinder. Same for end mill sharpening.

Craig and I both bought the larger collet holder and the larger collets. They were available on Temu for a few days. By the time mine arrived they were no longer available.

I also bought a few small collets which are also unique from regular ER20 Collets.

One thing I should admit is that I removed the motor shaft collar so I could adjust for bigger drills...... BIG Mistake. I still don't have it indexed properly.
 
I did not arrive at the same conclusion. I found instead that both the primary facet and the web thinning or split point all use the same reference - namely the collet set point reference - which goes away on the first grind, but remains in an imaginary place until the collet is loosened.

Yes, all end up being set by the flat on the front of the collet holder.... but only the initial insertion into the collet matters.

Where are you using shims @CWret ? On the web thinning, or on the point splitting? On what machine? I can recall what model you had any more.

One thing I should admit is that I removed the motor shaft collar so I could adjust for bigger drills...... BIG Mistake. I still don't have it indexed properly.
This is why I decided on a new separate machine for larger drills.

I'm not sure if I'll build another MR type of just make fixtures for the surface grinder yet. I can not print a new entire machine if I want, but then I can do the same with fixtures and fill a 3D printed shell with steel sleeves and epoxy granite
 
Where are you using shims @CWret ? On the web thinning, or on the point splitting? On what machine? I can recall what model you had any more.

I expected that he would have chimed in by now. Since he hasn't, I'll answer for him. He used shims during the depth set process which results in a longer deeper drill setting. He also used shims during the grinding process for shallower grinds. I decided the easiest was to find a set of shims. If I can't find them, I'll make them. You probably only need two or three that can be stacked.

Craig has an A. I have a B.

The member survey lists the size that everyone got. There are a few D's and if I recall correctly, there is even a G.
 
I expected that he would have chimed in by now. Since he hasn't, I'll answer for him. He used shims during the depth set process which results in a longer deeper drill setting. He also used shims during the grinding process for shallower grinds. I decided the easiest was to find a set of shims. If I can't find them, I'll make them. You probably only need two or three that can be stacked.

Craig has an A. I have a B.

The member survey lists the size that everyone got. There are a few D's and if I recall correctly, there is even a G.
The shims are used for web thinning, to lift the bit away from the wheel so the take less of a bite out of a thin web. So only applicable on the A model and D model. Maybe I'll leave the adjustment and try to use larger precision ground guide pins.

Or I'm trying for perfection when I need not? I mean most of my drilling is small diameter work... not a lot of web thinning to be done
 
Back
Top