-
Scam Alert. Members are reminded to NOT send money to buy anything. Don't buy things remote and have it shipped - go get it yourself, pay in person, and take your equipment with you. Scammers have burned people on this forum. Urgency, secrecy, excuses, selling for friend, newish members, FUD, are RED FLAGS. A video conference call is not adequate assurance. Face to face interactions are required. Please report suspicions to the forum admins. Stay Safe - anyone can get scammed.
-
Several Regions have held meetups already, but others are being planned or are evaluating the interest. The Calgary Area Meetup is set for Saturday July 12th at 10am. The signup thread is here! Arbutus has also explored interest in a Fraser Valley meetup but it seems members either missed his thread or had other plans. Let him know if you are interested in a meetup later in the year by posting here! Slowpoke is trying to pull together an Ottawa area meetup later this summer. No date has been selected yet, so let him know if you are interested here! We are not aware of any other meetups being planned this year. If you are interested in doing something in your area, let everyone know and make it happen! Meetups are a great way to make new machining friends and get hands on help in your area. Don’t be shy, sign up and come, or plan your own meetup!
You are using an out of date browser. It may not display this or other websites correctly.
You should upgrade or use an alternative browser.
You should upgrade or use an alternative browser.
Tool Vevor Drill Bit Sharpener Improved
- Thread starter TorontoBuilder
- Start date
Tool
well my parts were not printed with a ton of walls, so you can only remove so much material before you cut into the hollow infill section.
I don't get it. If you can't machine it cuz it's too thin, how come sanding doesn't do the same thing?
I'm just being whiny... sanding is not that hard
Ah, now it makes sense.
TorontoBuilder
Sapientia et Doctrina Stabilitas
If I used some form of cutter it would be too aggressive... whereas 240 grit sand paper is slow and carefulI don't get it. If you can't machine it cuz it's too thin, how come sanding doesn't do the same thing?
Ah, now it makes sense.
Canadium
Ian
I'm betting the plastic is shrinking as it cools.I obviously need to calibrate my printer.
Mind you, .14mm undersized is definitely within the margin of error for a 3D printer.
TorontoBuilder
Sapientia et Doctrina Stabilitas
yes, but when you calibrate your printer it will print slightly over size to account for shrinkage.I'm betting the plastic is shrinking as it cools.
But you'd need to calibrate every filament to be super precise. It is better to anticipate a bit of post printing finishing
TorontoBuilder
Sapientia et Doctrina Stabilitas
First cuts with my MR-13B vevor drill bit sharpener modified to be an MR-13D machine.
This is only with the plastic prototype parts held in place with wishful thinking and a few roll pins and without the tool plate adjustment screws. It performed exactly as I thought it would. More on that later.
Of course the normal drill angle grind via the grinding seat remain unaffected. So lets look at tool plate A depressed to it's deepest cut setting. This is supposed to be the point splitting grind. As expected the tool is tool high to cut appropriately. I expected this and was going to modify either the motor base, or the back of the tool block mount to have a recess to allow the block to move lower. As it is it barely grinds the corner you can just see highlighted below.

Now, on to the web thinning cut from the B block tool. I had this block elevated on a roll pin with a diameter of ~2.5mm. This is the result. I struggled holding the cell phone and trying to close focus but these pics should suffice.


To my mind this is near perfect web thinning and very close to a split point grind using only the web thinning setting, as I expected.
So I surmise that I can take 2mm off the duo motor mount height and then test the tool blocks again at that level after which I can reassess the next tweak to dial in the design.
Of course I'll also wait to see the outcome of @DavidR8 and @YotaBota 's tests before making any revisions.
Thoughts?
This is only with the plastic prototype parts held in place with wishful thinking and a few roll pins and without the tool plate adjustment screws. It performed exactly as I thought it would. More on that later.
Of course the normal drill angle grind via the grinding seat remain unaffected. So lets look at tool plate A depressed to it's deepest cut setting. This is supposed to be the point splitting grind. As expected the tool is tool high to cut appropriately. I expected this and was going to modify either the motor base, or the back of the tool block mount to have a recess to allow the block to move lower. As it is it barely grinds the corner you can just see highlighted below.
Now, on to the web thinning cut from the B block tool. I had this block elevated on a roll pin with a diameter of ~2.5mm. This is the result. I struggled holding the cell phone and trying to close focus but these pics should suffice.
To my mind this is near perfect web thinning and very close to a split point grind using only the web thinning setting, as I expected.
So I surmise that I can take 2mm off the duo motor mount height and then test the tool blocks again at that level after which I can reassess the next tweak to dial in the design.
Of course I'll also wait to see the outcome of @DavidR8 and @YotaBota 's tests before making any revisions.
Thoughts?
TorontoBuilder
Sapientia et Doctrina Stabilitas
I'm going to have to chamfer the edge of the tool block holder because there will be interference with the grinding wheel, and maybe take a 1mm off the bottom thickness of the tool holder as well...

TorontoBuilder
Sapientia et Doctrina Stabilitas
Are all the parts interchangeable between the duo-motor and the 13B or am I missing something in this process?
We were supposed to meet up yesterday but I had a hiccup with my new BBU batteries and couldn't make it. I'll need to reschedule with @DavidR8 for later next week.
For the first 13D kit that @DavidR8 has printed you make direct replacement of the motor mount assembly, then you add the two tool blocks and the motor support block. Easy peasy.
The blocks need a little refinement as they are now but not much. Since you're not connecting with David immediately I can make some revisions if David wants to print them too.
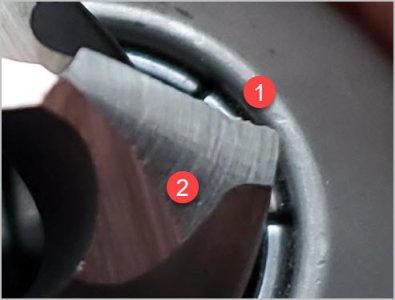
That looks pretty good & probably 99% of needs. (1) is something I'm noticing on my TCG sharpening contraption. An otherwise very nice facet grind but unpredictable edge as a function of the flute. The cheaper the drill, the more unpredictable the geometry. Has nothing to do with the grinder but its a byproduct to be aware of. I pulled out one of my Precision Twist HSS drills, no problemo. (2) those striation I know are magnified as happens with digital pics on metal & of no consequence since its all non contact relief. But presumably you have the same rake marks on the edge. This is where diamond grit & how good it actually is comes into play. Some of the Ali plates I've been buying (to hand dress stones & such) vary in quality. They literally dullen in hours of use whereas another will last & stay sharp. You need grit to hog but may find tune-ups can get away with finer #. Anyway for the money, that Vevor system looks pretty reasonable value to my eye.
Attachments
Canadium
Ian
Yes but the degree of shrinkage probably is dependant on many variables like the degree of infill so may be very difficult if not impossible to predict precisely.yes, but when you calibrate your printer it will print slightly over size to account for shrinkage.
But you'd need to calibrate every filament to be super precise. It is better to anticipate a bit of post printing finishing
By the way how much infill is being used on these parts? I used to use 100% on my machine parts.
TorontoBuilder
Sapientia et Doctrina Stabilitas
The bit I have sharpened it from a really crappy set, and indeed the hooked front edge is a by-product of the flute grind.That looks pretty good & probably 99% of needs. (1) is something I'm noticing on my TCG sharpening contraption. An otherwise very nice facet grind but unpredictable edge as a function of the flute. The cheaper the drill, the more unpredictable the geometry. Has nothing to do with the grinder but its a byproduct to be aware of. I pulled out one of my Precision Twist HSS drills, no problemo. (2) those striation I know are magnified as happens with digital pics on metal & of no consequence since its all non contact relief. But presumably you have the same rake marks on the edge. This is where diamond grit & how good it actually is comes into play. Some of the Ali plates I've been buying (to hand dress stones & such) vary in quality. They literally dullen in hours of use whereas another will last & stay sharp. You need grit to hog but may find tune-ups can get away with finer #. Anyway for the money, that Vevor system looks pretty reasonable value to my eye.
That image the drill bit is missing the A tool grind so when it is completed it should be nearly perfect IMO. It will grind away the triangular area in red and provide a nice secondary relief to the cutting edge rather than that curved surface that falls away from the backside of the cutting edge. Yes the striations are magnified several times, and have no impact on the grind. Just one piece of grit larger than its brethren.

My parts are the default cura infill rate, I didn't print them so I dont know what the actual setting are, but from the sound and weight of each part, they're minimal use of plastic.Yes but the degree of shrinkage probably is dependant on many variables like the degree of infill so may be very difficult if not impossible to predict precisely.
By the way how much infill is being used on these parts? I used to use 100% on my machine parts.
These were also merely prototype parts to test positioning. I would print them differently for production parts. I dont think they need 100% infill however given the minimal stresses on the parts.
Last edited:
TorontoBuilder
Sapientia et Doctrina Stabilitas
here is a different view of the web thinning grind. The result is very close to a split point. The split point grind will be the cherry on top.
I'm tempted to try to machine away some material so I can test today. Otherwise Monday night at the earliest for reprinted parts

I'm tempted to try to machine away some material so I can test today. Otherwise Monday night at the earliest for reprinted parts
TorontoBuilder
Sapientia et Doctrina Stabilitas
That is about what I get with web thinning in the standard 13B and I'm not sure how much more beneficial a split point is than this. The split seems to be the holy grail though.
That is the point of this experiment, to see how much better the duo machine sharpened bits are.
I'm mighty impressed with the first phase, which yielded a beautiful web thinning grind on the very first go. I also feel the duo will be more important on the wider drill bits.
Seeing the discussion above between @PeterT and @TorontoBuilder about crappy drills, I thought I had posted some photos of what can happen with crappy drills but apparently I only shared those with @TorontoBuilder by txt message. I should have shared with everyone.
Better late than never. Here is a 1/2" drill from one of those cheap poop 115 bit drill sets.
Notice how the web grind is non-symetric side to side.


And here is the exact same grind on a brand new unused dormer drill. I hated to sharpen a brand new quality drill, but decided to take one for team non-cone.


These are all web thinning set to generate a split point.
It might be a bit early, but I'd also like to extend a huge thankyou to John for launching us all onto this fun trip and for all the work he is doing for everyone. Also a big shoutout to everyone who bought one of these tools, took measurements or photos, added their ideas and thoughts, pissed on the parade, and/or helped with 3D printing prototypes.
I'm personally having a riot and I can't wait to try it!
Better late than never. Here is a 1/2" drill from one of those cheap poop 115 bit drill sets.
Notice how the web grind is non-symetric side to side.
And here is the exact same grind on a brand new unused dormer drill. I hated to sharpen a brand new quality drill, but decided to take one for team non-cone.
These are all web thinning set to generate a split point.
It might be a bit early, but I'd also like to extend a huge thankyou to John for launching us all onto this fun trip and for all the work he is doing for everyone. Also a big shoutout to everyone who bought one of these tools, took measurements or photos, added their ideas and thoughts, pissed on the parade, and/or helped with 3D printing prototypes.
I'm personally having a riot and I can't wait to try it!
TorontoBuilder
Sapientia et Doctrina Stabilitas
My next project...
@TorontoBuilder have the STLs changed since I printed them?
TorontoBuilder
Sapientia et Doctrina Stabilitas
@TorontoBuilder have the STLs changed since I printed them?
@DavidR8 yes they have, and I was going to review them one last time. I just got side tracked on my gerstner style tool chest design.
When did you need the revised stls
Absolutely no rush whatsoever.@DavidR8 yes they have, and I was going to review them one last time. I just got side tracked on my gerstner style tool chest design.
When did you need the revised stls