• Scam Alert. Members are reminded to NOT send money to buy anything. Don't buy things remote and have it shipped - go get it yourself, pay in person, and take your equipment with you. Scammers have burned people on this forum. Urgency, secrecy, excuses, selling for friend, newish members, FUD, are RED FLAGS. A video conference call is not adequate assurance. Face to face interactions are required. Please report suspicions to the forum admins. Stay Safe - anyone can get scammed.

Tool Vevor Drill Bit Sharpener Improved

Tool
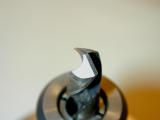
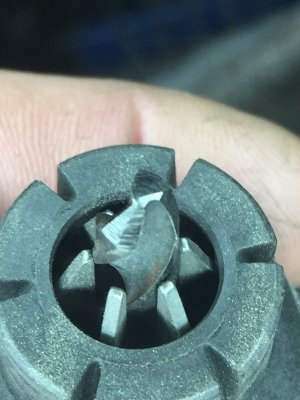
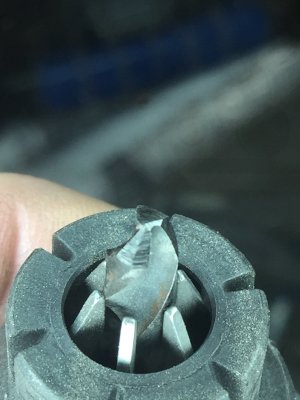
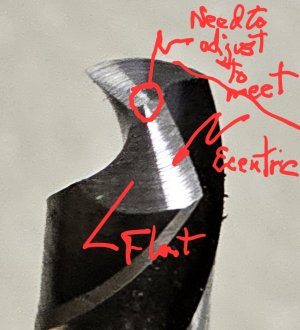
So please confirm what we are looking at here. To my eye:
1 = primary relief & its curved or helical, either by cam action or swing action? (as opposed to a facet by definition flat planar surface)

Yes.

2 = secondary relief.

Yes.

Is this surface also a helical grind, just at a slightly higher relief angle?

No. It is a flat grind (facet)

Or is this kind of combo web thin because it seems to extend up into the center core forming +/- something like a split point. Or maybe there is a step 3 web thinning near the center web after 1 & 2?

here is typical 4 facet grind for visual reference
View attachment 57045

This is where it gets complicated. Apparently, the Vevor 13A cuts a facet that can be described as a typical split point. As per your photo.

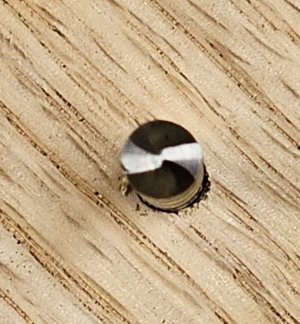
The 13B cuts a variety of back relief (facet) angles. In the photo in my previous post, you can see that I was able to adjust the angle in a way that very closely looks like a split point. It drills like one too. There is no tendency to wander. But it will likely get dull faster.

It also gets harder to do on the bigger drill bits. I was able to grind a split point on a 1/2" drill, but there is hardly any metal removed at the relief.
 
Yes.


Yes.


No. It is a flat grind (facet)


This is where it gets complicated. Apparently, the Vevor 13A cuts a facet that can be described as a typical split point. As per your photo.

The 13B cuts a variety of back relief (facet) angles. In the photo in my previous post, you can see that I was able to adjust the angle in a way that very closely looks like a split point. It drills like one too. There is no tendency to wander. But it will likely get dull faster.

It also gets harder to do on the bigger drill bits. I was able to grind a split point on a 1/2" drill, but there is hardly any metal removed at the relief.
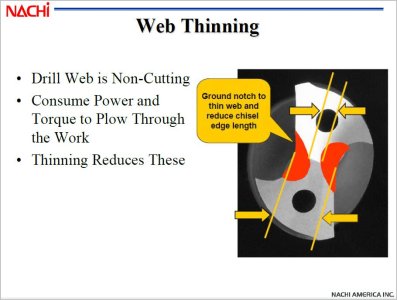
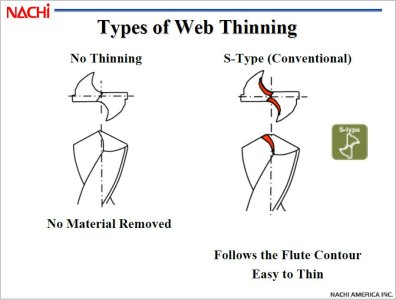
As I said when I first looked at these machines, the 13B does web thinning that when executed well results in a point that is very similar to point splitting. The duo machine allows users to get a grind that is for all intents and purposes is 4 facet equivalent. IMO anyway and miles better than most new bits in my budget
 
All - The Vevor 13A/B is a relatively high quality drill bit sharpener. But the manual is horrible. Writing a better manual should be part of our joint project.
 
All - The Vevor 13A/B is a relatively high quality drill bit sharpener. But the manual is horrible. Writing a better manual should be part of our joint project.
I've done a bit if technical writing, but what is the value proposition for me?

I guess if I were to make parts for the conversion and supply a manual there is some pay back for me. Until someone else steals my plans and makes the same conversion parts for cheaper and faster...

Then I go bankrupt because I can't pay for my 10x12' waterjet cutter....

jk.

I'll do a manual and a video just to kill time
 
PeterT is on the right path above.
4facet.pngsharpenedon 13.jpg

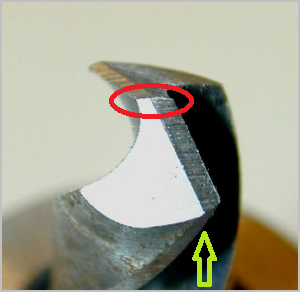
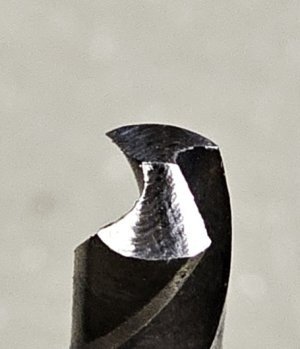
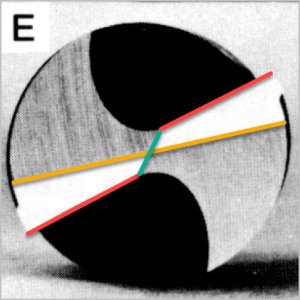
The second photo is from Susquatch above. It is before the relief has been added to the bit. This is a conical grind.


Peter's photo shows a 4 facet grind. All the facet lines come together to form more of a point then you see on a conical grind (at the red circle) The line between the facets (green arrow) runs across the diameter of the drill with the cutting edges forward of this center line. The relief is aft of this center line.

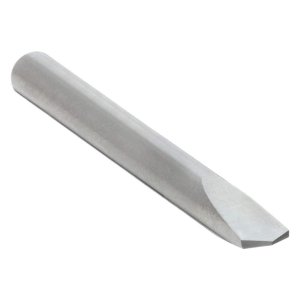
In one of my watchmaker books there is a great description that explains making a spade drill bit. The spade bit can also be set up with a 4 facet and it makes it easier for me to see this.
This a generic image I got off line with a regular splade bit. (does not have the 4 facet....I can not find a good image of this.) In the two photos above imagine grinding off the remaining material from the drill bit to make the spade bit shape below. You can see how the four facet grind would make a good spade bit. The conical grind. Not so much. Now here is the problem...the shallow grind drill bits (135 degree) will have more of an issue getting the correct geometry with a conical grind. That is were the 4 facet excels.

spade bit sample.jpg


I need to find some good references to back this up. I might be remembering the details incorrectly. Going to take me a bit to find where I seen this.
 
Last edited:
Just on a side note here...... the sheet metal guys where I worked had one of these drill sharpeners in their shop. It was very similar to the Vevor/Motom. I used it a number of times on bits I brought in from home. I was in love with it. I do not remember the name of it, but I'm sure it was a brand name industrial unit. My employer never cheap'd out on tooling. I wish I had paid more attention to who made the unit. Now here is the interesting part. This is going back over 20 years ago. These have been around for a while.
 
PeterT is on the right path above.
View attachment 57049View attachment 57050

The second photo if from Susquatch above. It is before the relief has been added to the bit. This is a conical grind.


Peter's photo shows a 4 facet grind. All the facet lines come together to form more of a point then you see on a conical grind (at the red circle) The line between the facets (green arrow) runs across the diameter of the drill with the cutting edges forward of this center line. The relief is aft of this center line.

In one of my watchmaker books there is a great description that explains making a spade drill bit. The spade bit can also be set up with a 4 facet and it makes it easier for me to see this.
This a generic image I got off line with a regular splade bit. (does not have the 4 facet....I can not find a good image of this.) In the two photos above imagine grinding of the remaining material from the drill bit to make the spade bit shape below. You can see how the four facet grind would make a good spade bit. The conical grind. Not so much. Now here is the problem...the shallow grind drill bits (135 degree) will have more of an issue getting the correct geometry with a conical grind. That is were the 4 facet excels.

View attachment 57051

The second photo if from Susquatch above. It is before the relief has been added to the bit. This is a conical grind.


I need to find some good references to back this up. I might be remembering the details incorrectly. Going to take me a bit to find where I seen this.

the mistake people are making is looking at the result at each step of the grinding process and implying "it is not the superior 4 facet grind" rather than the final result from a well tuned duo machine... which provides equivalent performance.

The real point is, this machine can allow the "average person" to grind excellent points on the drill bits within a selected size range, and that are better than out of the box performance of most hss bits
I'm not disagreeing with you. This machine allows grinding great sharp drills. I still have some drills I ground with a similar machine that I am very happy with.

I have looked at a completed drill bit that has gone thru all stages of the unit. Sharpen, relief, and point split. It is the first step of sharpening on this machine which prevent this from being a 4 facet grind.


All I am saying is I do not believe this is a 4 facet ground drill bit. There are definite advantages of a 4 facet grind. These advantage may or may not be there with this type of grind. However a sharp drill bit is 100% better then a dull bit in every way.
Yeah I'm only helping foster discussion as well. I appreciate the points you and others are adding very much.

But let me toss out that we've got the order of operations wrong... according to the manufacturer the point is split first... then the angle is ground.

1735763643258.png


I finally found a good grind comparison between the 13 type machines, the A, B and the D. D for duo. Sadly not the head on angle I'd prefer


1735763881158.png


1735763927290.png


1735763965041.png
 
I just bought the 13B even though I'm okay with the Drill Dr.
Now this is the old version of the DD when they only had one model.
Not bad for $40usd and I've been using it for 8yrs.
 

Attachments

  • IMG_1365.JPG
    IMG_1365.JPG
    614.5 KB · Views: 12
  • IMG_1369.JPG
    IMG_1369.JPG
    540.3 KB · Views: 12
The second photo is from Susquatch above. It is before the relief has been added to the bit. This is a conical grind.

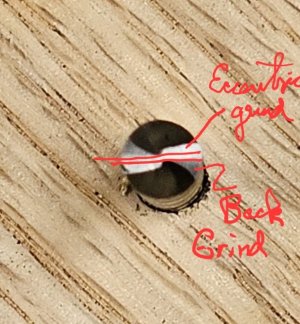
No, it is not a conical grind. It is an eccentric grind. Or as @PeterT calls it, a helical grind.

Peter's photo shows a 4 facet grind. All the facet lines come together to form more of a point then you see on a conical grind (at the red circle) The line between the facets (green arrow) runs across the diameter of the drill with the cutting edges forward of this center line. The relief is aft of this center line.

This is just my newness to the setup on the Vevor.

My photo wasn't quite there but it's easy to adjust.

20250101_172344.jpg

Maybe that still isn't a perfect photo or a perfect grind, but I have zero doubt about the ability to get there. The problem is that the Vevor 13A is already setup to do a split point. But the 13B does a range of back reliefs. So the 13B has to be adjusted to get a good split point. What the group is doing (mostly @TorontoBuilder) is setting up the 13B with a 3rd grinding port that will automatically cut a split point just like the 13A does.

Please don't waste too much time trying to find good descriptions Perry. We already know what needs to be done, it's just a devil to get there when you are not starting at ground level.
 
@Perry - there is another way to see the three different grinds that we are discussing. Eccentric, Conical, & Flat.

We all know what a cone and a flat look like. It's harder to describe an eccentric cut. But I'd like to try. Imagine sections cut from the grind like pieces of a pie. Now imagine reducing each slice of pie to a smaller and smaller wedge until each slice is just a narrow line (think calculus). Each line of both conical and eccentric grinds will be a straight line. But in a conical grind, all the segments have the same slope. In an eccentric grind, each one has a different slope. That's because the grinding wheel contact angle changes as the drill is rotated eccentrically.

To make a conical cut, you just rotate the drill and collet axially. To make an eccentric grind, the axis of rotation changes through a range of angles as the drill shaft is rotated because it is on a cammed actuating guide.

Maybe I'm just making it worse.

I think it might help to focus on how it works instead of why it doesn't work. LOL!!

Here is another markup. The two lines need to be brought together by deepening the back grind. This is an adjustment on the 13B.

20250101_175546.jpg

20250101_180308.jpg
 
J.... Now here is the interesting part. This is going back over 20 years ago. These have been around for a while.
In Stephan's video on the Motom he states that he believed Motom was the original inventor and they began selling them around 1990. That is the reason I stated in an earlier post that the Vevor machines are yet another Chinese knock off in this case of the Motom. All be it perhaps that these Vevor models are not the traditional poor quality knock offs that we have become accustomed to. Evidence that China is getting better at producing quality products.
 
As I said when I first looked at these machines, the 13B does web thinning that when executed well results in a point that is very similar to point splitting. The duo machine allows users to get a grind that is for all intents and purposes is 4 facet equivalent. IMO anyway and miles better than most new bits in my budget

I mostly agree, at least in what I think you are describing. Attached pics may help or make things worse. Even drill manufacturers can vary in their terminology & description sometimes.
The 4-facet is not magical, its just a another way of grinding that has also pros & cons & tradeoffs. Compared to a [lets call it a non-facet or curved primary grind] - they both have a cutting edge, a rake angle & relief angle. Same principle as a lathe tool. And they both have a 'something less than ideal cutting' core until we do something about it.

If we we temporarily disregard the core, the primary cutting edge is much the same if we make the angles equal. So when you here someone say there is no difference, I can almost guarantee he is entering a pilot hole which is entirely mitigating the center core issue. The 4-facet has a geometric feature (when ground correctly) where the secondary relief line intersects the center point. This is an improvement for centering but its still not perfect because the (green line) is not really a great cutting edge. I view it as a crude, self-correcting help knock-your way back to center mechanism. Better than nothing for sure but still room for improvement. The curved grind can't do this geometric cross the center feature. So if it ended there we would say 4-facet is better than an old school curved grind, but I think that's almost entirely related to the core web issue. A thick web makes the drill sluggish, takes more power, makes more heat, drifts off center etc.

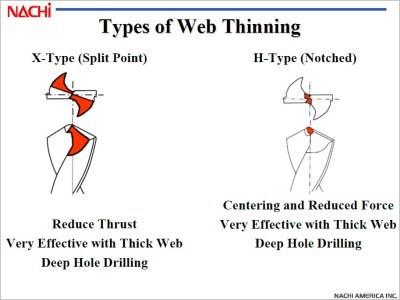
Enter web thinning. This reduces the problematic dead area, what I call the core. But if all you did was hogged it out at some random angle, the web would become reduced which is good, but its still not forming a point or 'cutting'. But if the web thinning grind angle is axially orientated at such an angle to make the exposed edge a cutting edge, we get the benefit of thinner web and cutting action (at the expense of increased fragility tip ). BTW, this can & is done on a 4-facet grind as well superimposed on the green line.

There is more to say on drill geometry but I'll leave it here. I think having sharp, symmetrical edges with some kind of web thinning/centering improvement is 99% of most of us will require in the shop. If the machine accomplishes this quickly & consistently, its heads &tails better better struggling with dull or buggered up drills. Or not using them at all. All I would add is, give your drills a sanity check beforehand. A drill with runout or unequal flutes or banana axis or.... is not going to benefit from a perfect nose grind.
 

Attachments

  • SNAG-01-01-2025 4.18.34 PM.jpg
    SNAG-01-01-2025 4.18.34 PM.jpg
    73.4 KB · Views: 7
  • SNAG-01-01-2025 4.18.43 PM.jpg
    SNAG-01-01-2025 4.18.43 PM.jpg
    59.9 KB · Views: 7
  • SNAG-01-01-2025 4.18.53 PM.jpg
    SNAG-01-01-2025 4.18.53 PM.jpg
    72.8 KB · Views: 7
  • SNAG-01-01-2025 4.26.47 PM.jpg
    SNAG-01-01-2025 4.26.47 PM.jpg
    146 KB · Views: 8
  • EDT-01-01-2025 4.38.47 PM.jpg
    EDT-01-01-2025 4.38.47 PM.jpg
    47.5 KB · Views: 7
There is more to say on drill geometry but I'll leave it here. I think having sharp, symmetrical edges with some kind of web thinning/centering improvement is 99% of most of us will require in the shop. If the machine accomplishes this quickly & consistently, its heads &tails better better struggling with dull or buggered up drills. Or not using them at all.

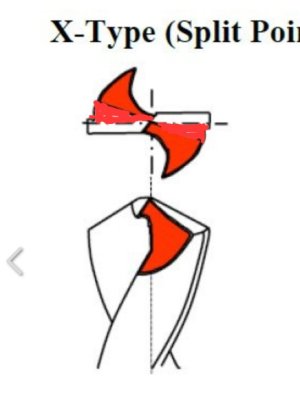
What I was aiming for is a slight varient of your X-Type. Sort of like this:

Screenshot_20250101_193303_Chrome.jpg
All I would add is, give your drills a sanity check beforehand. A drill with runout or unequal flutes or banana axis or.... is not going to benefit from a perfect nose grind.

Good point. Can't make a silk purse out of a sows ear.

I think the drill bit I demoed was a decent drill once upon a time. Can't say that for sure. It was in my reject drawer. And I believe it was originally a decent drill but not a premium one. One tell-tale sign is a non-symmetric web thinning grind. That said, it started a hole as well as a good spotting drill and drilled like a brand new dormer. So maybe not technically perfect but practically so. I am impressed.
 
I still have not found the original info I was looking for but I did find this. From https://modelenginenews.org/meng/quorn/drilljig.html

First, we probably should define just what "4 facet" sharpening is, and how it differs from conventional "conical back-off" sharpening. In order to cut, a twist drill, like any tool, requires a relief behind the cutting edge. This prevents the area of the drill behind the cutting lip from rubbing on the end of the hole as it turns and advances. But we also want a strong, long lasting cutting edge, so excessive relief will make the edge more acute, and hence more susceptible to wear and damage. Let's consider the "standard" drill sharpening method first.

Conical Back-Off​


Standard conical sharpening produces a point angle of 118 degrees, but it's not a cone. The actual tip is a straight line when viewed end-on, and an arc when viewed from the side. This is called the "chisel edge" (ref [WSP12]). This is an artifact of the sharpening process and is formed by the intersection of two conical sections. This achieves what we are after: a strong cutting edge (called the "lip"), with a "land"—the area behind the lip—that falls away at an increasing rate to provide the lip relief angle necessary if the drill is to cut. Jigs to produce this shape are straight forward (relatively
smiley.gif
) and a good one will produce a good result quickly—just the ticket if you are a drill manufacturer, or a user how just wants a hole and does not particularly care if it's a bit oversize, and may not be totally straight. The downside is that chisel tip. Unless the work carries a center-pop mark that is at least as wide as the chisel, the drill tip is going to wander all over the place when presented to the work. And if it starts crooked, you can be sure it's not going to get any better. This is why we generally drill a pilot with a "center" or "Slocumbe" drill (as they as called in England and her former colonies). This provides a cavity to clear the chisel point so that by the time the chisel actually reaches metal, a hole has been formed to guide the drill and there's some kind of chance it will stay on track.

Four Facet Sharpening​


The 4 Facet point, as seen here, is formed by grinding two flat areas (facets) on each land. The first is shallow; 80 degrees relative to the drill axis, representing a relief of 10 degrees from the plane of the drill tip. Behind this is ground a secondary relief of 25 to 30 degrees. The important part (and why you will not produce this kind of tip, hand held against the bench grinder in a hurry) is that all 4 facets MUST intersect at a single point. However, given a Quorn and some accurate, concentric way of holding the drill in the precise axis of the Toolholder Bracket, the Quorn will produce this tip perfectly with very little effort. The steps are:
 
I mostly agree, at least in what I think you are describing. Attached pics may help or make things worse. Even drill manufacturers can vary in their terminology & description sometimes.
The 4-facet is not magical, its just a another way of grinding that has also pros & cons & tradeoffs.

The only difference

1735778167447.png

In the above photo the light area is a flat facet angling away from cutting edge when cut using 4 facet cutter.

When using the MR-13 system the light area is a curved surface with a very slight radius angling away from the cutting edge. Really no difference.

After completing all stages of the grinding both systems create a split point and narrower web leaving no chisel, and operate functionally the same. But with an MR-13 you need a duo system to obtain the best result.
 

I think this discussion from model engine news is going in a different direction than the objectives of this thread. If we were trying to make a quorn, this might be good background for some of us. But I think most of us already know most of this. That said, I freely confess that I did learn that some people call a helical grind a conical grind while admitting that its not really a cone (that's all very confusing to an engineer like me). It's also somewhat interesting that the author took a backhanded shot at Professor Haddock and then makes a rudimentary technical mistake about how the intersection of two cones defines a "standard conical back-off sharpening".

I also got a good laugh at the possibility that I might be "some kind of complete loon who is not afraid of complex projects".

Personally, I have tried for years to buy a quorn or similar tool at a price I could afford and ended up deciding it was cheaper to just throw dull drills away and buy new ones. Then just as I was ready to give up, @canuck750 got a Vevor 13B for Christmas. That got the attention of a bunch of us and certainly me. We then discovered that the Vevor 13A claims to be able to grind a split point. But the A and B units are very similar. @TorontoBuilder did some investigation and convinced himself (and me) that either unit could be converted into a combination of the A and B models.

This thread is about trying to make that Vevor 13A/B. Clearly, a Vevor 13A/B isn't going to be as good as machines like quorns, but it's good enough for my needs, and more importantly, it's affordable. On top of that, it looks like there is some hope we can also sharpen endmills.

Does that make sense?
 
Good find.

I wonder if the order would make a difference?

Good question. On first blush, I thought it might. But only in terms of the depth of the cut which has to be adjusted anyway. So now I think not.

I can try it tomorrow.
 
Back
Top