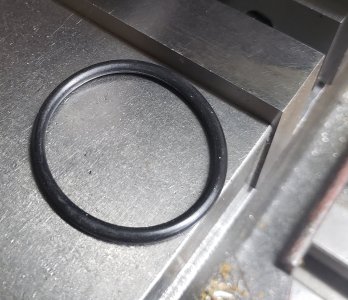
I was thinking that a thread which has tips and tricks of machining would be advantageous to everyone, novice to master. The poster would put up pictures, and full description. But we don't need others replying, this way we don't have to scroll to the next tip. Just a reaction is fine. And if someone else has another version of that same tip or trick, put it up. Any topic, something that someone would say, "ahaa, why didn't I think of that." Make it a sticky so we see tips everyday. In that vain, here is mine: parallel seperator. One set is rifle magazine springs. The other is a rubber O-ring, for thinner parts using just one parallel.
-
Scam Alert. Members are reminded to NOT send money to buy anything. Don't buy things remote and have it shipped - go get it yourself, pay in person, and take your equipment with you. Scammers have burned people on this forum. Urgency, secrecy, excuses, selling for friend, newish members, FUD, are RED FLAGS. A video conference call is not adequate assurance. Face to face interactions are required. Please report suspicions to the forum admins. Stay Safe - anyone can get scammed.
-
Several Regions have held meetups already, but others are being planned or are evaluating the interest. The Calgary Area Meetup is set for Saturday July 12th at 10am. The signup thread is here! Arbutus has also explored interest in a Fraser Valley meetup but it seems members either missed his thread or had other plans. Let him know if you are interested in a meetup later in the year by posting here! Slowpoke is trying to pull together an Ottawa area meetup later this summer. No date has been selected yet, so let him know if you are interested here! We are not aware of any other meetups being planned this year. If you are interested in doing something in your area, let everyone know and make it happen! Meetups are a great way to make new machining friends and get hands on help in your area. Don’t be shy, sign up and come, or plan your own meetup!
You are using an out of date browser. It may not display this or other websites correctly.
You should upgrade or use an alternative browser.
You should upgrade or use an alternative browser.
Tips of the Trade
- Thread starter thestelster
- Start date
Former Member
Guest
I use steel (bent to a V) packing straps as spring seperator. Free and easy to make whatever size you need.
Chip Maker
Super User
Beat me to it!I use steel (bent to a V) packing straps as spring seperator. Free and easy to make whatever size you need.
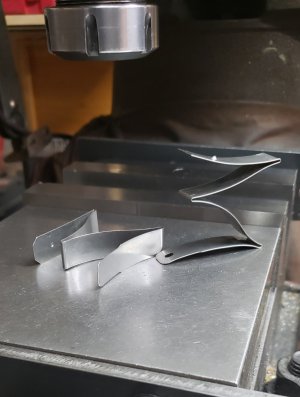
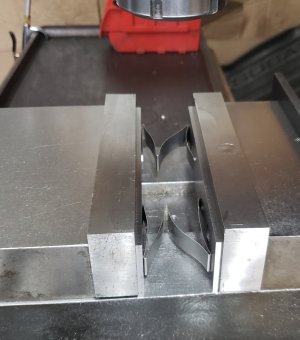
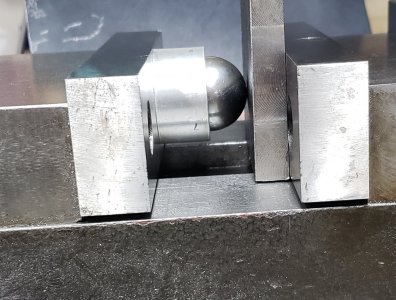
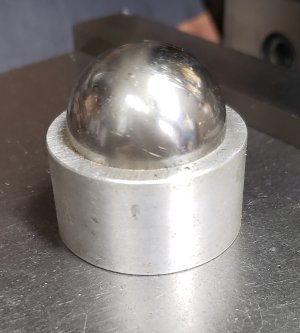
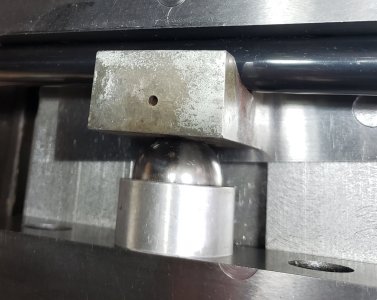
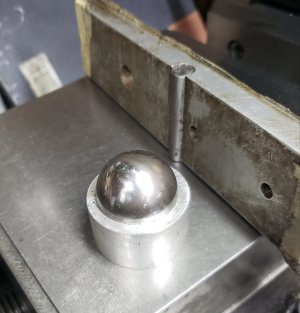
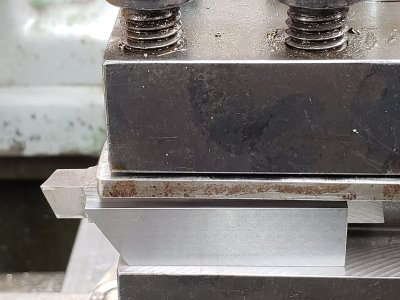
A couple methods of holding tapered parts in the milling machine vise. One is a ball bearing in an aluminum piece of round stock with a hole in the center. The aluminum to protect the vise jaw. This will hold parts in two axis. The other is an aluminum plate with a steel rod in the center, for holding parts tapered in one axis.
Attachments


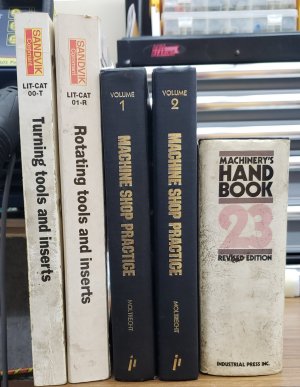
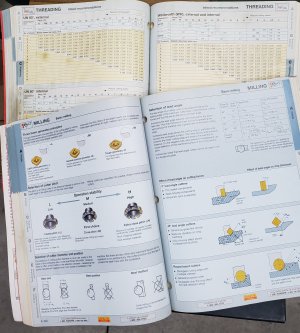
More important than the maker of your lathe or milling machine, or the size of your tool collection, or the height of your drill press, or weight of your vise is.... knowledge! Knowing how to use all this stuff we aquire to do the things we want, is of the utmost importance. I have never had formal machine shop training, (except in Jr. high school), so I've had to rely on books and manuals, (now a days its YouTube), but there are a number of books and catalogs, and apps, that I use, almost daily. The apps that I use, and found to be the most helpful are: FSWizard (speeds, feeds, fastener dimensions, etc); Drill Bit Charts (tap/drill info); Pocket Welder Helper (welding settings). What references can you guys suggest?
Attachments
I do wood working in the same area as the metal working so when it came time for a cover for the lathe I was going to buy some light canvas and make one, turned out to be not so economical.
Easy and inexpensive solution is a BBQ cover, I cut about ten inches off the bottom and it fits great.

Easy and inexpensive solution is a BBQ cover, I cut about ten inches off the bottom and it fits great.
No. The material I believe is 1018 MS and case hardened with Cherry Red.@Aliva - are your taper holders 3D printed?
Six O Two
(Marco)
That's a great solution! I have the same issue, and my lathe is currently under a mattress bag, and my mill and welders are under sheets from the Sally Anne.I do wood working in the same area as the metal working so when it came time for a cover for the lathe I was going to buy some light canvas and make one, turned out to be not so economical.
Easy and inexpensive solution is a BBQ cover, I cut about ten inches off the bottom and it fits great.
Former Member
Guest
In the late 80's I worked just north of Kingston ON as a a summer student for a few years, and met a old english crazy chap named Jack (about 72 at the time) Interesting to say the least, but he was a trained machinist Locomotive's from England. His entire shop had wood framed machinery (not cast iron) drill press, bandsaw, vertical mill, shaper, horizontal mill, lathe and some stuff I didn't recognize. Bearings where all Lignum Viti. Now did this work yes He showed me one or two in action. Where they precision absolutely, less than 0.001 accuracy, likely pushing a tenth or 2. I ask why wood I was cheap and he could upscale when ever needed. Everything was 110 powered,
So when I hear and think something can't be done because I don't have this or that, I think of Jack and his shop. We all should. Its not the tools it the user.
Side note, he also brewed his own beer (to be avoided drinking) but thats another story.
So when I hear and think something can't be done because I don't have this or that, I think of Jack and his shop. We all should. Its not the tools it the user.
Side note, he also brewed his own beer (to be avoided drinking) but thats another story.
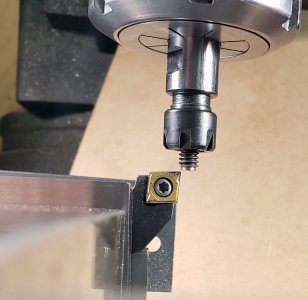
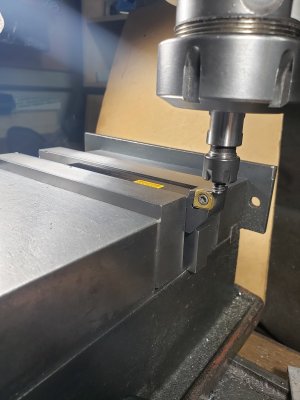
So, let's say your lathe is out of action, on the fritz, it is no more, or perhaps just pining for the fjords, and you have to make a cylindrical part, or face off a piece of drill rod, or make dog points on set screws. What do you do? Well, if you have a milling machine, you do this:
-clamp you cutter in the mill vise so the top of the cutter faces you
-indicate the fixed vise jaw, and move your table to the cutters height, and lock that axis
-chuck your part in the mill collet
-tilt your head to the right, so you can orientate yourself, and the rest is a piece of cake.
-clamp you cutter in the mill vise so the top of the cutter faces you
-indicate the fixed vise jaw, and move your table to the cutters height, and lock that axis
-chuck your part in the mill collet
-tilt your head to the right, so you can orientate yourself, and the rest is a piece of cake.
Attachments
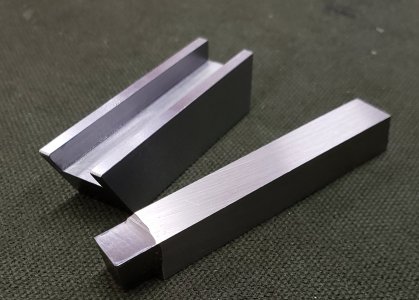
My lathe originally came fitted with a lantern style tool post. I purchased a cheap 4-way tool post, which was not very rigid, so I made a bigger, stronger, badder one. I designed it to use 3/4" square shank indexable carbide insert tool holders. And the cutting edge is perfectly to center. Every so often I use HSS tool bits. But grinding a 3/4" HSS bit takes forever and is expensive. So I'll use smaller ground bits stacked on top of other bits and shims to get to the proper height. Always a PITA, and time consuming. Tying to hold the stacked pieces together angling them this way or that, out a bit, in a bit, etc. (And yes, I am definitely thinking about a QCTP, but weighing the pros and cons.) So to make life a little simpler when using HSS, I decided to make a little carrier to hold the 3/8" ground tool bit. I used a piece of discarded O1 tool steel that was laying around from a previous project. Its about 5/8" square, I machined a 3/8" slot in the middle withe an endmill, and then a dovetail cutter to remove the last 0.002", and relieve the bottom corners so the tool bit sits flush. The angled section was already there so decided to just keep it. It works quite well. I should make one for a 1/2" tool bit, so that I can slip a feeler gauge shim in the slot under the tool bit to reach center through repeated grinding.
Attachments

@Chicken lights will appreciate this one . . .
When I was at my buddy's truck shop, I had to replace a number of air brake air chambers ("brake pots") on trucks, tractors, and trailers. They all come with extra long actuator rods that are cut to length for your particular application. The threads are protected with a sleeve that remind me of what I will refer to as "East Asian Finger Trap" type weave. Well, they're free, and are great for wrapping big drill bits, big reamers, big taps, etc. so they don't get banged up in the tool box. If you aren't connected with any truckers I bet bringing a dozen doughnuts to your local heavy duty shop would get the techs there saving them for you.


I know a lot of people have racks for their MT drill bits but a drawer is more space-effective for me. As a bonus, you can pretty much read the labeling on the bit shanks through the weave.
When I was at my buddy's truck shop, I had to replace a number of air brake air chambers ("brake pots") on trucks, tractors, and trailers. They all come with extra long actuator rods that are cut to length for your particular application. The threads are protected with a sleeve that remind me of what I will refer to as "East Asian Finger Trap" type weave. Well, they're free, and are great for wrapping big drill bits, big reamers, big taps, etc. so they don't get banged up in the tool box. If you aren't connected with any truckers I bet bringing a dozen doughnuts to your local heavy duty shop would get the techs there saving them for you.
I know a lot of people have racks for their MT drill bits but a drawer is more space-effective for me. As a bonus, you can pretty much read the labeling on the bit shanks through the weave.
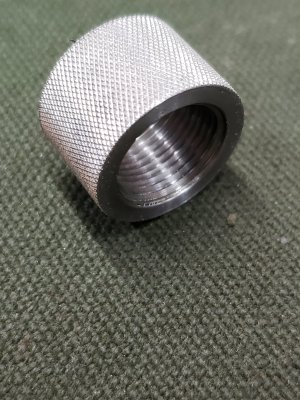
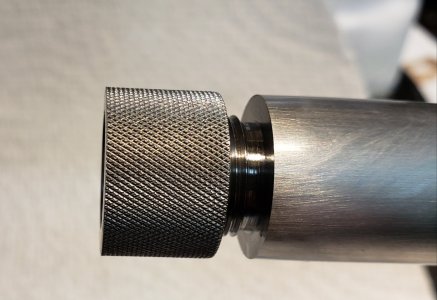
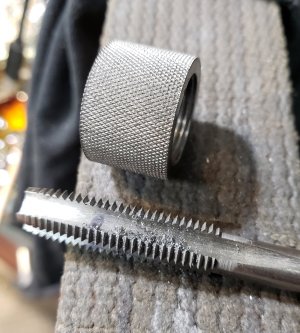
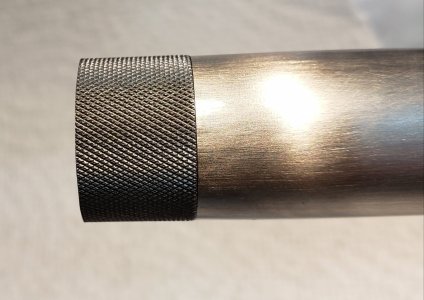
I had to make a threaded sleeve to protect the threads on a threaded shaft. In my case to protect the threads of a rifle barrel to which a muzzle brake is attached. The thread protector I made is knurled on the outside, and with an internal thread, in this case 9/16"-24tpi.
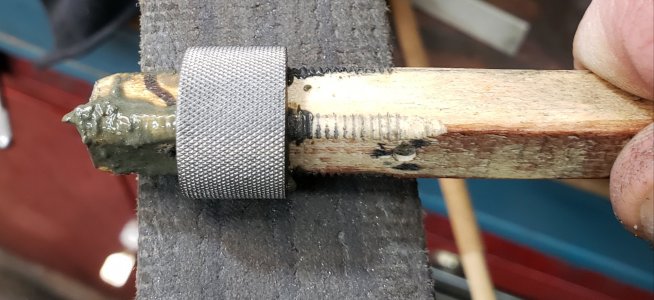
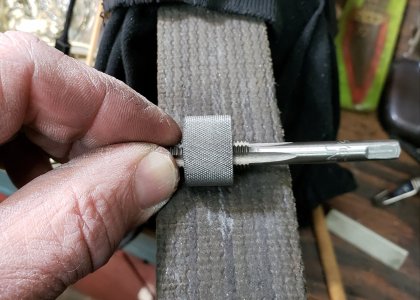
Whenever I make a part that has internal thread, over 1/2", I like to cut 95% of the thread on the lathe, then finish it off with a tap. In my case, I do not have a 9/16-24 tap, so I had to do all the thread on the lathe. Its easy enough to check the progress of the threading operation if you have a short male section: see if it screws all the way in, if not, remove another thou and test again. But I had to test the internal thread by trying to screw on the 24" rifle barrel, which to say the least is awkward, and you can easily damage the male threads on the barrel. So I get to the point that it seems to be fine, without screwing the barrel all the way on. I had already knurled the part, and thinking the internal thread of the protector sleeve was proper, I cut off the part. Deburred the inside with a wire brush attached to my cordless drill, and proceeded to thread the new sleeve onto the barrel threads. Of course, it only threads on about half way nicely and then gets tight. You can't force it: stainless on stainless, it will gall and weld itself together. So now what? I have to open the threads just a tad to make it thread easily all the way on. I can't work on the male threads, because the muzzle brake threads on perfectly. I've used many techniques in the past successfully. So 1st try: a wooden dowel coated with grinding paste. Screw the part onto the wooden dowel, in and out. The dowel should be as large as the major diameter of the thread or slightly larger. This usually works well if it just needs a smidgen. Not this time. 2nd try: find a smaller tap with the same pitch, in my case 7/16"-24, place the tap in the threaded sleeve, and roll the part, just like rolling dough. Of course being carefully that the tap threads are nestled in part threads, and test often. This worked perfect.
Whenever I make a part that has internal thread, over 1/2", I like to cut 95% of the thread on the lathe, then finish it off with a tap. In my case, I do not have a 9/16-24 tap, so I had to do all the thread on the lathe. Its easy enough to check the progress of the threading operation if you have a short male section: see if it screws all the way in, if not, remove another thou and test again. But I had to test the internal thread by trying to screw on the 24" rifle barrel, which to say the least is awkward, and you can easily damage the male threads on the barrel. So I get to the point that it seems to be fine, without screwing the barrel all the way on. I had already knurled the part, and thinking the internal thread of the protector sleeve was proper, I cut off the part. Deburred the inside with a wire brush attached to my cordless drill, and proceeded to thread the new sleeve onto the barrel threads. Of course, it only threads on about half way nicely and then gets tight. You can't force it: stainless on stainless, it will gall and weld itself together. So now what? I have to open the threads just a tad to make it thread easily all the way on. I can't work on the male threads, because the muzzle brake threads on perfectly. I've used many techniques in the past successfully. So 1st try: a wooden dowel coated with grinding paste. Screw the part onto the wooden dowel, in and out. The dowel should be as large as the major diameter of the thread or slightly larger. This usually works well if it just needs a smidgen. Not this time. 2nd try: find a smaller tap with the same pitch, in my case 7/16"-24, place the tap in the threaded sleeve, and roll the part, just like rolling dough. Of course being carefully that the tap threads are nestled in part threads, and test often. This worked perfect.
Attachments
As usual, that is cool work! I like this one a lot because I have this problem from time to time too.
Usually I just test fit with the matching part and creep up on the part with the threading tool until it works. This has always worked for me provided the parts are still mounted in the lathe with the threads still properly indexed. Picking up the thread with a refixtured part that is only a few thou from completion does not work well at all.
Sometimes I have used lapping compound by starting carefully with compound at the far end of the female thread and working outward toward the front so as to avoid excessive lapping on the initial thread when the part cannot yet be fully engaged. But I don't like that approach at all. Yes it works, but I have never learned to trust the final result.
Usually, I end up making a special set of go-no-go plug gauges. Basically two duplicates of the male thread measured with a thread micrometer, a regular micrometer, and a knife micrometer so I get the thread root right, the thread OD right, and the thread pitch diameter right. These gauges are then used to make the matching parts a perfect fit. This is a lot of work. Thankfully, it is often work I can use on future work so I don't usually mind doing it. But still, if i could avoid it, it would be a giant step forward.
So I am keen to understand what you are doing better than I can discern from your description.
How are you keeping the tap cutting edge held solid enough to cut evenly around the circumference?
Are you actually cutting or are you really just taking off a few rough spots or high spots?
Would an inside wire brush work just as well? Perhaps with some valve grinding compound on the brush?
I'm aware of the fact that this is just a cover cap to protect the threads. If so, the thread fit between the two parts isn't really that important. Why didn't you just cut the cap thread a wee smidge bigger than needed and depend on the 60 degree thread profile to center the parts when the cap is hand tightened during final installation?
I'm also wondering if you could do a taper at the interface to guarantee a perfect fit that only relies on the thread for fastening such that thread alignment isn't that important. It wouldn't be universal anymore and your gunsmithing application might need to be universal to fit other aftermarket parts, but for one-offs it might make the whole thing a lot easier to do.
That is what I do as well, as I did this time, but the cap was in the chuck, and I tried fitting the barrel which is awkward, trying to keep it straight, threading on, and deepening the thread. I was eventually able to screw the barrel onto the cap easily halfway, and assumed that the thread was finished. You know what the say about "assume".Usually I just test fit with the matching part and creep up on the part with the threading tool until it works. This has always worked for me provided the parts are still mounted in the lathe with the threads still properly indexed
I'm holding the tap with two hands and pressing downwards slightly and drawing the part towards me. It is cutting but very minimum, actually more like scraping.How are you keeping the tap cutting edge held solid enough to cut evenly around the circumference?
Are you actually cutting or are you really just taking off a few rough spots or high spots?
OMG Susquatch!! Yes, that is the proper way, but I'm too time conscious (lazy 🙂).Usually, I end up making a special set of go-no-go plug gauges. Basically two duplicates of the male thread measured with a thread micrometer, a regular micrometer, and a knife micrometer so I get the thread root right, the thread OD right, and the thread pitch diameter right. These gauges are then used to make the matching parts a perfect fit.