• Scam Alert. Members are reminded to NOT send money to buy anything. Don't buy things remote and have it shipped - go get it yourself, pay in person, and take your equipment with you. Scammers have burned people on this forum. Urgency, secrecy, excuses, selling for friend, newish members, FUD, are RED FLAGS. A video conference call is not adequate assurance. Face to face interactions are required. Please report suspicions to the forum admins. Stay Safe - anyone can get scammed.

Tecnico’s First Mill

The X axis play comes out at .035 and the Y is .020 and even through the travel so more reason to be pleased.

If the wear is even across the length of the screw, chances are that you can tighten the nut a wee bit to remove a lot of that too. That's what happened on my Hartford. Just be careful not to over do it. A little backlash isn't a big deal as long as you know it's there and know how to work with it.

If you overdo it, you can accidentally accelerate the wear.

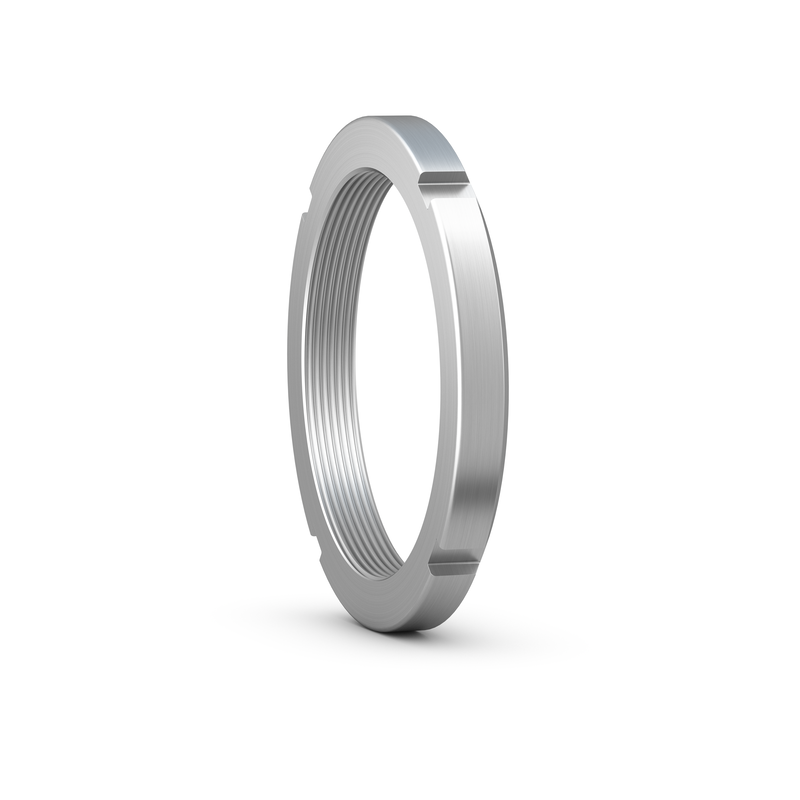
That's one thing that's still on my to do list, I have to make up a special tool though. If you didn't know, the Long Chang/First (& Sharp etc.) back lash adjuster/lock nut is not like a BP, you need the special tool to turn the adjuster sleeve and the ring lock nuts - see the lock nut image below.
0901d19680cb9349.png


Tool designed but not yet built.

Interesting to note that the leadscrews seem to be wearing very evenly (if at all?), probably because the nuts are part of the one-shot oiling circuit so they are regularly lubricated vs. what I have read about (some?) BPs that rely on splash/drip coming off of other parts (if I read correctly).

Making the adjustments is on the to do list but not at the top. The rest of the story? I got zinged a few days ago, my S.O. is a sharp one, she recently pointed out that I seem to be using the mill to make things to go with the mill and not other projects LOL! She encourages my play but sometimes those little zingers pop out! :oops:

At least I fixed the ice maker yesterday. :D

D:cool:
 
Last edited:
That's one thing that's still on my to do list, I have to make up a special tool though. If you didn't know, the Long Chang/First (& Sharp etc.) back lash adjuster/lock nut is not like a BP, you need the special tool to turn the adjuster sleeve and the ring lock nuts - see the lock nut image below.
0901d19680cb9349.png


Tool designed but not yet built.

Interesting to note that the leadscrews seem to be wearing very evenly (if at all?), probably because the nuts are part of the one-shot oiling circuit so they are regularly lubricated vs. what I have read about (some?) BPs that rely on splash/drip coming off of other parts (if I read correctly).

Making the adjustments is on the to do list but not at the top. The rest of the story? I got zinged a few days ago, my S.O. is a sharp one, she recently pointed out that I seem to be using the mill to make things to go with the mill and not other projects LOL! She encourages my play but sometimes those little zingers pop out! :oops:

At least I fixed the ice maker yesterday. :D

D:cool:

Ya, I didn't know that. Dipsticks!

I'd guess your screws are not worn at all and it's all in the nuts.

If I had that problem making a special wrench for that, it might not happen. At least yours are on your to do list.

If my CFO ever figured that out they might be adding Yeti's to the critically endangered list.
 
Endangered Yeti, LOL!

Dipsticks? Maybe for not making a piece by piece copy of a BP but on the other hand from what I've seen in BP documents the LC way might be better except for the tool. In the small details it generally looks like they kept the interface/form factor of the BP but made small common sense mods for their production. There are quirks in there, the M6 R8 key is one. I was expecting to find the same oddball BP set screw pair but the First/LC parts are common off the shelf parts except they're metric. The socket head cap screws holding the rear chip protector mat on the column are 1/4-20 but the head hex is metric - seriously! I've learned to not assume what I'm going to find for fasteners when I put a wrench on this thing! I'd still rather deal with the mix of metric and imperial in this machine than the unobtainum BSF/Whitworth fasteners in my Brit. Myford lathe!

Anyhow, you can probably buy a tool from Sharp, (they supply one with each new mill) don't know the price nor have I seen anything but a line drawing so I can't really say how good the tool is but it doesn't look convincing to me so with all that I'll go ahead and make my own version.

I'm not too worried about the teasing mill zingers, if it's going to be anything like the lathe there is going to be a steady stream of "I fixed that/made that using the mill". It looks good when it's a Christmas present or fixing something around the house or a McGuyvered special tool for fixing her car! It's all in good sport.:)

D:cool:

I have no delusions about how much better the First is. It's an awesome machine.

I was just expressing my frustration at the need for any special tools in any machine!

I spent a career in the auto industry. Hence the term dipstick! Nothing used to irritate me more than all the special tools the auto companies made their dealers buy. How is the average mechanic supposed to afford all that? And how about the car owner? Make the parts so they are easily serviced for Pete sake!

Anyway, I think you have an absolutely awesome machine. I didn't mean to imply otherwise.
@Susquatch No worries, I didn't interpret your comments to mean that the machine was not as good, it was more that the maker would go and change things so it was different from the machine that they were copying and making service/parts supply different from the original. That said, if they were going to change it IMHO they didn't do badly on some of the details. The imperial fastener with metric hex drive is odd though!

I agree 100% on the "special tools" and serviceability of some cars, what were they thinking? Not the consumer. I sat in a meeting where electro-mechanical integration was being discussed and the push was to integrate the engine ECU in a non-servicable assembly with the throttle body - because it lowered the initial cost of manufacture. I inquired about the service scenario when the throttle body (servo/shaft/pot etc.) failed/wore out and the answer was that it would be covered during warranty and after that was out of scope = customer pays. I understand the thought process but in my mind leaving a serviceability path available will pay dividends.

I think that's why I enjoy fixing things that have been built to cost/throw away vs. quality like the two LCD monitors I'm using with my desktop, it's kind of like thumbing my nose at the bean counters. They were about to be recycled when I scooped them up and for less than $10.00 investment (failed capacitors) they're good as new. It just rubs me the wrong way to see the waste of throwing things away vs repair but that's not today's economy/culture.

D:cool:
 
@technico I sorta see why the 1/4-20 with a metric head. On any machine you try to minimize the tool numbers for a variety of reasons. I've gone to the trouble to modify fasteners and make new ones just to reduce the tool set by one. [edit] The metric head prolly matched other fasteners on the lathe...

The nonsense is the thread: perhaps it was to blindly copy the holes of the original, and they just kept doing it that way. I dunno.
 
Last edited:
@technico I sorta see why the 1/4-20 with a metric head. On any machine you try to minimize the tool numbers for a variety of reasons. I've gone to the trouble to modify fasteners and make new ones just to reduce the tool set by one. [edit] The metric head prolly matched other fasteners on the lathe...

The nonsense is the thread: perhaps it was to blindly copy the holes of the original, and they just kept doing it that way. I dunno.
I get what you mean about minimizing interface tools, the flip side is that the 1/4-20/metric hex breaks the rules about non-standard fasteners when it's just not needed. I can argue the 1/4-20 makes sense because it's the same as a BP and that's what a maintainer would expect to find on a cloned BP. Less chance of messing up the threads by trying a metric in the hole by mistake.

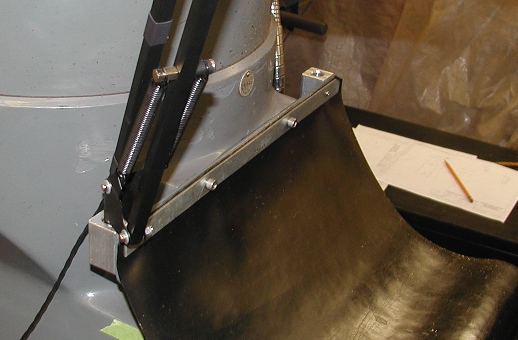
I'm not complaining, I replaced them with longer STD 1/4-20 SHCS to enable me to add a lamp bracket held by the same fasteners. I would have left them if I wasn't adding the bracket. I did change out the smaller M2.5s that hold the rubber sheet in the support strips with #4-40 though since I had those on hand in a longer length and not the metrics plus it makes everything on that end all imperial.

D:cool:
 
After that overhaul, the power feed will be good for another 35 years or longer than I expect to need it!

Talk about a quart of stuff in a pint bottle!
You're a better man than I am. I broke mine open, counted the parts cost for new cabling, pin connectors, springs, neon bulbs, and my chance of fitting the quart back into the pint bottle, and decided to chip in the extra $100 to get the Vevor unit and hopefully not worry about for a similar 35 years!

The next thing to look at was the cutting oil/coolant pump. From looking in the drain back holes in the base I knew the sump would need some clean-up since I saw chips and even a shell casing in there so I drained the oil and dug in. As expected there was some debris at the drain back ports so that got cleaned out. I’m planning to put some sort of fixed retainer on the drop-in gratings but that will come later.

Next up was checking the pump. At some point in its life the pump bracket parted company with the pedestal casting (2x 6mm bolts) so the pump was kind of laying there over above the sump. Easy fix and the pump works fine.

I'm just contemplating my pump now, and I suspect you'll know the answer better than me: does it just filter and pump out from the sump? I don't see any obvious drain - I clear it out through those square ports? I should ask these questions from in front of the machine instead of sitting at the cabin...

Great job - I hope to find the enthusiasm to clean mine up at some point, but right now that enthusiasm is directed to making chips!

Paul
 
You're a better man than I am. I broke mine open, counted the parts cost for new cabling, pin connectors, springs, neon bulbs, and my chance of fitting the quart back into the pint bottle, and decided to chip in the extra $100 to get the Vevor unit and hopefully not worry about for a similar 35 years!
Actually it wasn't that bad, just like shaving a Yak, one piece at a time. Cable was a buck or two a meter and the rest of the bits were pretty cheap all told. There were a few choice words before it was back together but in the end it's back on the machine and doing its thing. If you do decide to toss it, let's talk......

I'm just contemplating my pump now, and I suspect you'll know the answer better than me: does it just filter and pump out from the sump? I don't see any obvious drain - I clear it out through those square ports? I should ask these questions from in front of the machine instead of sitting at the cabin...
I don't believe there are any filters in the pump system, it's just a centrifugal (impeller) pump like a sump pump with a hose up to the spout. There is a drain plug at the back of the column, just pipe thread. I (carefully) tilted the machine to try and get as much fluid out as I could but it didn't by any means empty it. I also went in with a putty knife and scooped up the junk that fell in at the screens on the base. I'm going to have to come up with a way to secure them because right now it's just gravity and that's not enough.

Any thoughts about what you're going to use for cutting oil?

Great job - I hope to find the enthusiasm to clean mine up at some point, but right now that enthusiasm is directed to making chips!
Hmmmm.... I decided that I'd do the clean up first so it wasn't hanging over me like the sword of Damocles! Call it pride of ownership. I wanted a fresh start before I got immersed in projects and never got around to the cleanup & main't.

D:cool:
 
Given the screens are just gravity-held, I'm surprised my machine still has them.

For fluid I have no real idea formed yet. KMS has some 50:1 stuff kicking around that I expect I'll try once I figure out some shielding.

You may have an auto-feed, slightly mangled, coming your way. DM me if you're serious.
 
It’s about time I got around to updating what I promised back in August. :oops:

Dolly Updates:

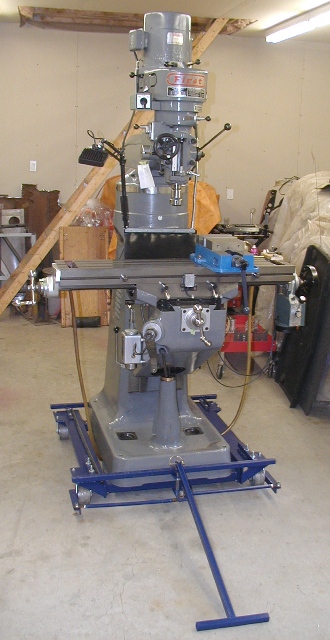
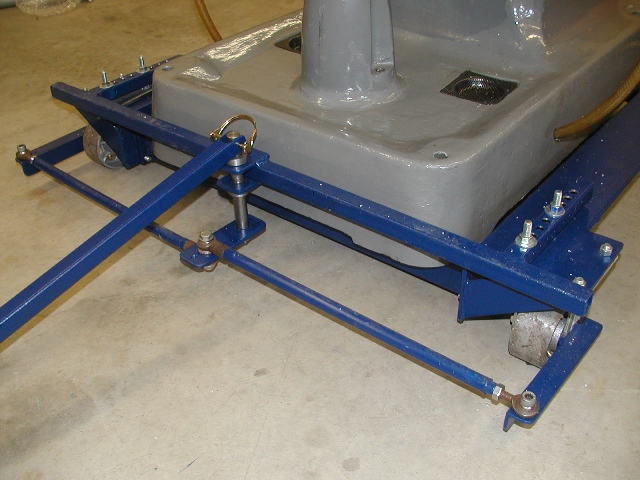
The dolly was nice to have for loading & unloading but with 4 castoring wheels it was a challenge making it go where I wanted at times. I’m still not sure where the machine is going to eventually reside in my shop so having it readily mobile is useful. To that end I changed out two of the swivelling castors for fixed and added steering to the others.

Pretty simple, I added steering arms to the castors using the wheel axle to mount them and linked them to a tow bar. That mod makes moving the machine around the shop much easier. In fact I have to chock the wheels to make it stay put. Big difference.

First16.jpg


First17.jpg

Quill feed wheel:

I mention this in case someone decides to pick up a low cost replacement from AliEx like I did. The speed handle on the quill feed wheel got knocked off some time in the life of my machine so I ordered up a replacement and I suppose it shouldn’t have come as a surprise that even though it was touted as being “Bridgeport” it came in with a metric bore that was too big and the alignment dowel was in the wrong place.

I wound up boring out the hub and making a proper fitting bushing from Acetal and pressing it in. I witnessed the pin location with a point in the hub and fit the pin in the right place. Done!

Folding Axis Handles:

I started out on this to replace just the handle on the power feed end of the X axis as a safety improvement (AliEx folding handle) but after using it I liked the ergonomics for fine adjustments so much that I bought hand wheels for the other end of the X and the Y as well. To my eye these look exactly like what H & W are selling for $US 132.50. A small spacer is needed to make them fit correctly.

Handles.jpg

LED Work Lamp:

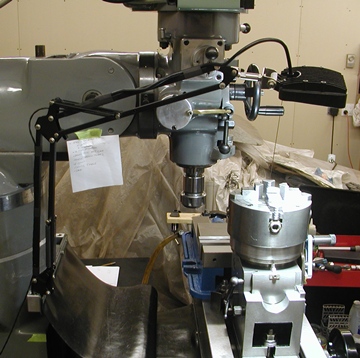
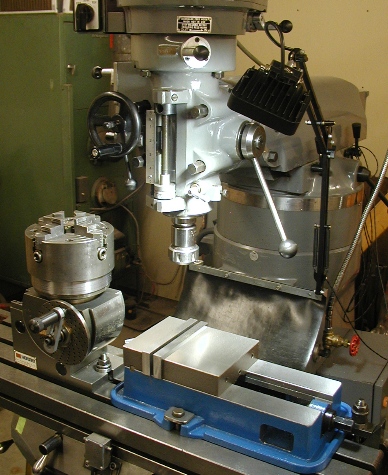
I wanted something a bit better than an IKEA lamp so I repurposed a few things from Princess Auto and rolled my own. The arm is a microphone stand PA had in the surplus aisle and the lamp is a 9 – 30VDC, 5 LED mini square automotive spot light. A small adapter was needed to mount the lamp to the arm.

Lamp1.jpg


Lamp2.jpg

I made up a double ended receiver bracket that uses the way guard fasteners on the column so no drilling required.

Lamp3.jpg

The lamp is powered from a 12V tap on the power transformer via a bridge rectifier/capacitor arrangement. The lamp cable is connectorized at the box.

The lamp itself puts out lots of light and I like that it is not hot to the touch so I can grab it and move the head to where it lights what I want. Definitely worth the trouble to design & build it.

Well, that’s about it for the story of bringing the machine home and getting set up. There are more stories to tell about using the machine to make things but I think that’ll become a thread in the “Projects” category.

D:cool:
 
Last edited:
I also didn't have the quill feed wheel - I now have a cheap-deluxe plastic thing. Given how much I use it I'm amazed how every mill seems to have lost them!
 
I also didn't have the quill feed wheel - I now have a cheap-deluxe plastic thing. Given how much I use it I'm amazed how every mill seems to have lost them!
Hah! I think deluxe-plastic is standard, it's only cheap if you replace it from AliEx! (and don't count your labor).

D:cool:
 
Hey Dave,
That is a nice mill trolley.
I bet it makes moving and re-positioning a breeze.

Is that a VEVOR Mill Vise ?
I bought the small VEVOR swivel vise and found the quality to be ‘A1’.
How is your vise screw standing up ?
I an not sure about the screw and nut material so I am using synthetic grease on it.
 
How is your vise screw standing up ?
I an not sure about the screw and nut material so I am using synthetic grease on it.

This is interesting to me Len.

I found that grease had a bad effect on my drill press vice screw. I had hoped it would improve the performance but it ended up being a trap for steel particles that subsequently chewed away at the screw and the nut. For about 10 years or so I've been using way oil and compressed air to keep the screw both well oiled and clean. So far so good. No more aggressive wear.

I'm just guessing here, but I tend to think that grease doesn't really work well on exposed surfaces that can get contaminated by dirt and swarf. On the other hand grease works very well in cavities that can be flushed with fresh grease using a grease gun.

Anyway, your comment caught my attention and I wonder what your thoughts are.
 
I made up a double ended receiver bracket that uses the way guard fasteners on the column so no drilling required.

I just noticed this @Tecnico . It looks really cool and I love not having to drill. Can you provide some more details on how you did your way covers?
 
I just noticed this @Tecnico . It looks really cool and I love not having to drill. Can you provide some more details on how you did your way covers?

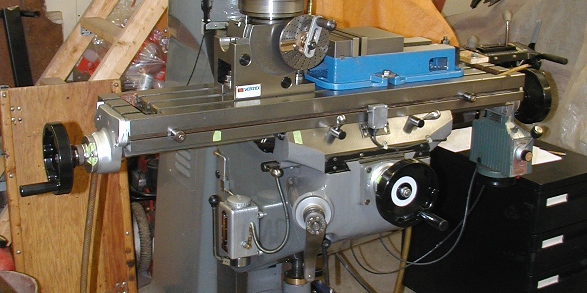
The column side is sandwiched between a couple layers of ~1/16" steel, the other end is attached to the Y base using an identical strip. There's a flat sheet of ~1/16" rubber in between. According to the First Illustrated Parts Catalog that's how they're built. There isn't a cover on the front of the Y axis and I've been pondering what/whether to do there.

I like the flat sheet cover, it doesn't fill with chips like the 1000 fold accordion type.

Trivia: The column side came with 1/4-20 SHCS with metric heads. o_O

Upgrades coming for the Hartford?

D:cool:
 
Hey Dave,
That is a nice mill trolley.
I bet it makes moving and re-positioning a breeze.

Is that a VEVOR Mill Vise ?
I bought the small VEVOR swivel vise and found the quality to be ‘A1’.
How is your vise screw standing up ?
I an not sure about the screw and nut material so I am using synthetic grease on it.
Thanks Len, a lot of thought and a few calculations went into the dolly. I knew I had to plan the (trip home) loading/off loading thoroughly because I was unsure if I could count on a lot of help on the day and the dolly was as sure a thing as I could come up with. Next best would have been a cowboy with a roll back truck and I didn't like the sound of his idea of offloading; tip till it slides off! I'm really pleased, even surprised with how easy it is to move the machine around in my shop. When it finds a long term spot in the shop I'll probably chock it up off the wheels or take them off and let it sit on the floor. The height isn't a problem for me. ;)

I don't have a lot of time on the vise but I'm glad you brought up the grease, I've been looking at the swarf collect with some concern. After cleaning all the grease off my lathe leadscrew (the grease recommended by Myford) I put ISO 36 (I think) oil on it (also recommended by Myford) because I thought it was gathering up too much swarf. Same thought with the vise and @Susquatch 's comments support the thought.

Just a few words on the 6" Vevor vise: I weighed up the tradeoff of the "economy" vise vs. stalking something like a Kurt and came to the conclusion that I immediately needed more than the little drill press vise or the hold down kit that came with the machine and Kurts don't grow on trees in these parts so I went for it. I don't regret it at this point.

The Vevor is definitely built to cost WRT features and finish but is also surprisingly precise, at least by my measurements on the table of the mill. I was surprised by this after reading various sources on the web. I did some deburring to clean up the castings before I put it in service and I had to mod the handle before it was usable but it's fine after that.

Where they skimp is on the lock down ball, it's cast in, not a separate ball and the casting needed smoothing up and the leadscrew has a plain bearing not a ball but I think I might be able to retrofit. I'm thin on experience with a Kurt (the office had one) and with the hands on time with the Vevor I can say that I haven't found glaring shortcomings so far. For me it was the right tool at the time and who knows what the future will bring.

Anyhow, that's the story for now!

D:cool:
 
I like the flat sheet cover, it doesn't fill with chips like the 1000 fold accordion type.

Ya, but if it's like mine some do end up in there and lord knows what hell they are planning for me down the road...... I'd like to stop them completely if I can.

Trivia: The column side came with 1/4-20 SHCS with metric heads. o_O

I am starting to believe the fastener industry is corrupt.

Upgrades coming for the Hartford?

Only a few more. I want effective way covers and an rpm sensor. But perhaps at some point a power x feed too.
 
Back
Top