• Spring 2024 meetup in Calgary - date Saturday, April 20/2024. discussion Please RSVP Here to confirm and get your invitation and the location details. RSVP NOW so organizers can plan to get sufficient food etc. It's Tomorrow Saturday! you can still RSVP until I stop checking my phone tomorrow More info and agenda
  • We are having email/registration problems again. Diagnosis is underway. New users sorry if you are having trouble getting registered. We are exploring different options to get registered. Contact the forum via another member or on facebook if you're stuck. Update -> we think it is fixed. Let us know if not.
  • Spring meet up in Ontario, April 6/2024. NEW LOCATION See Post #31 Discussion AND THE NEW LOCATION

Tecnico’s First Mill

Tecnico

(Dave)
OK, so that’s a play on words. It is my first mill but it’s also a First LC1 – ½ TM (Long Chang, out of Taiwan).

A few weeks ago I saw an ad for machine shop equipment for sale (and in my back yard for a change) so I went to have a look and with a few twists & turns I had a deal for the mill.

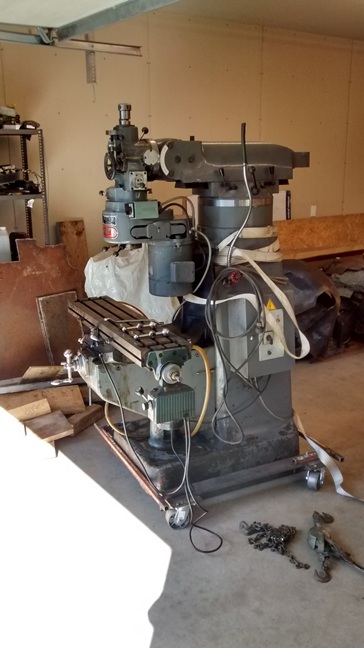
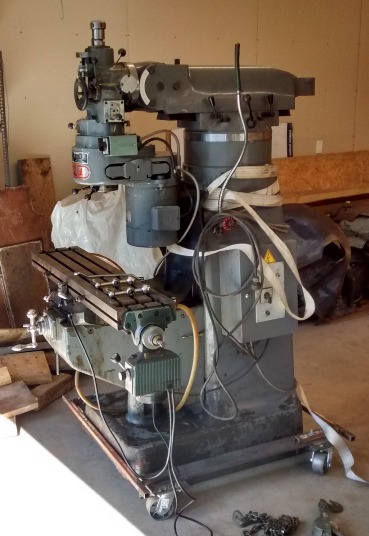
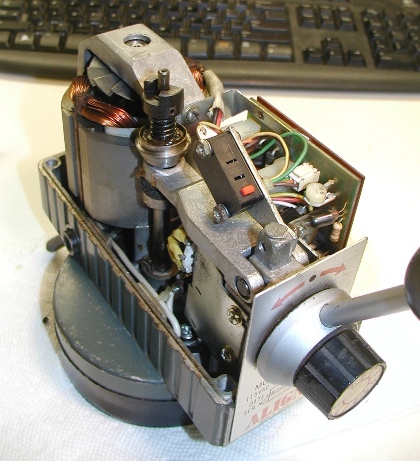
The machine is a step drive version and as it turns out it’s 2 HP and surprisingly wired for 110/220 single phase. So much for the idea of playing around with a VFD! It was bought new in 1987 by a one man machine shop with a “gun customizing” business so it wasn’t as heavily used as a production shop. He also had a lathe, surface grinder and some other gear to occupy his time. Anyone interested in a K. O. Lee surface grinder?

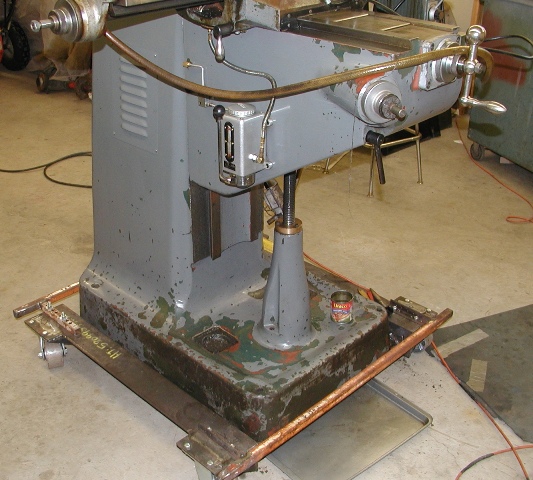
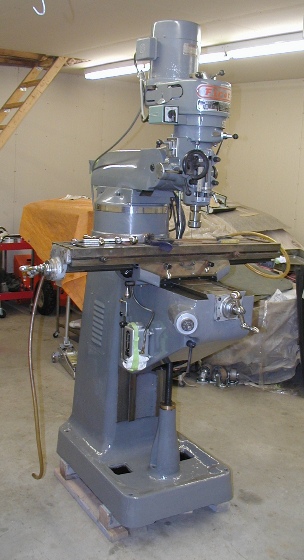
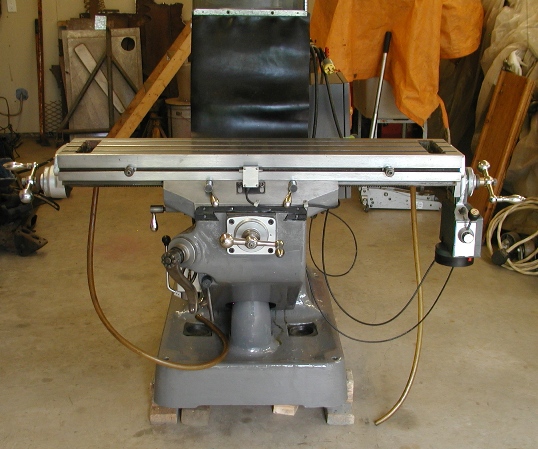
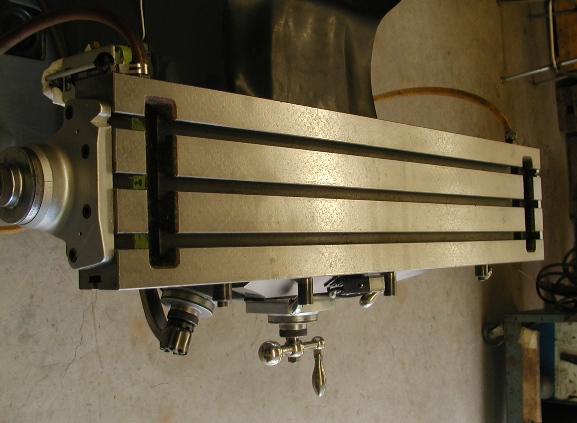
There’s some visible wear in the flaking of the Y-axis but the end play is only .045 on the X and .020 on the Y with little variation end to end so all good indications. It also has an X-axis power feed, a coolant pump and by my eye has a 4” riser on the pedestal.

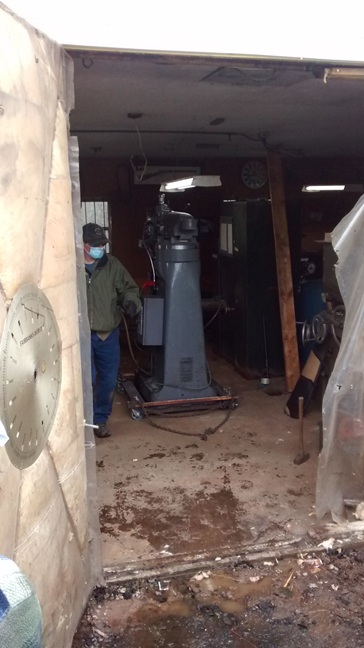
Everything works and generally looks to be a good machine but needs some TLC to get the grunge off.

It comes with a drill press vise(!), a Vertex dividing head, 3 jaw (Burnerd) & 4 jaw chucks (with no obvious means of mounting, probably missing something), no backing plates, a boring head, fly cutting tools, a Rohm R8 keyed chuck, a few ER collets, a hold down kit & a bunch of misc. slitter and slot cutting tools. Basically I think the family wants to clear out the shop. The bonus is I got the Illustrated Parts Catalog and I'm supposed to get the manual which I haven't been able to find on the web.

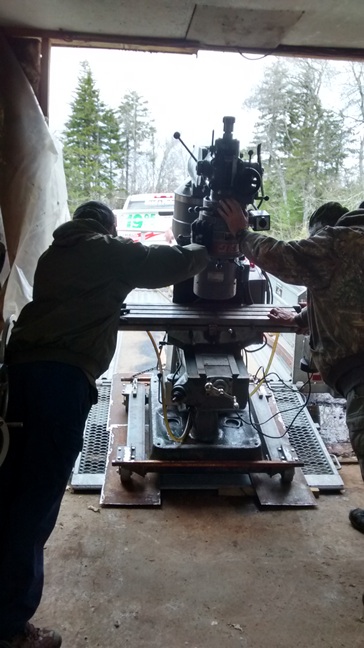
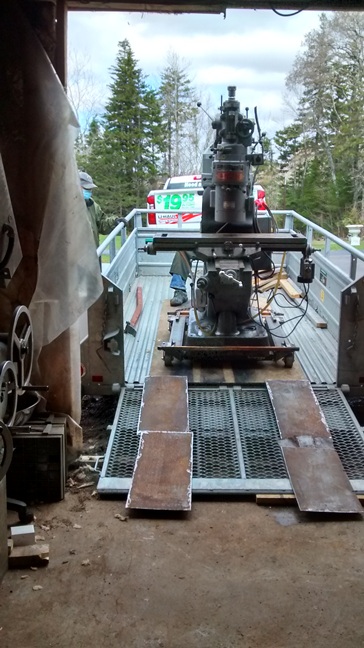
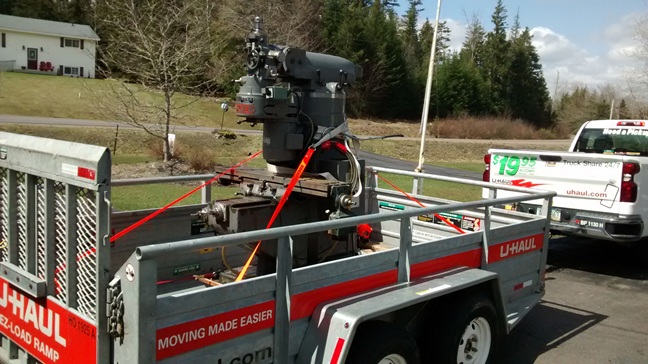
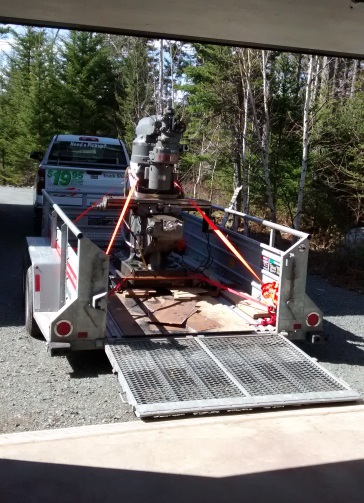
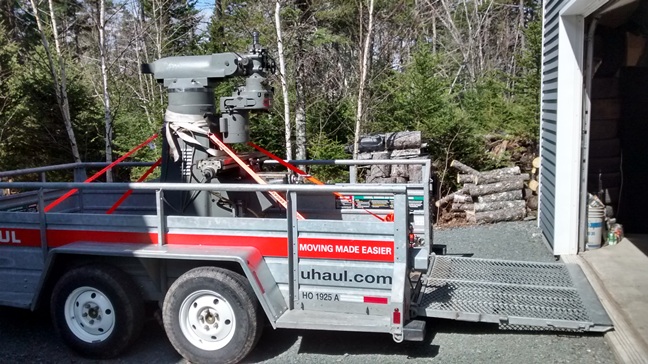
So, there it is until Saturday when the move happens. I’ve decided to rent a U-Drive pickup and one of their dual axle trailers with a ramp. Thinking about Dabbler’s advice I scouted out the trailer on the weekend and decided that it would do. The two I looked at had a plethora of reasonably robust looking tie down loops and the trailer looks like it could transport a tank let alone something as light as a mill!

The bed is heavy corrugated metal over what look like plenty of 2 x 3 x ¼ tubes. The corrugated metal will play heck with the castors so I’ll put down a piece of plywood or maybe plate and I’ll have to protect the ramps with some plate because they’re only expanded grate but I have the plate so that’s not a big deal. I’ll plan to tilt the trailer with the jack or run the back wheels of the truck up on ramps or both to get a nice slope up the ramp although the trailer is actually quite low by itself.

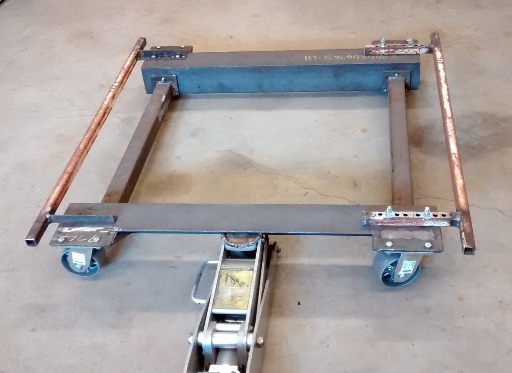
The dolly should roll up and down that nicely and once it’s in the trailer I’ll jack it up and block it up on wood for the trip.

I'll post some photos when I figure out what's with my hosting provider.

D:cool:

Edit: I meant to add that I'll continue the thread as I bring the machine home and come up to speed with it so it'll be a living thread.
 
Last edited:

YYCHM

(Craig)
Premium Member

Tecnico

(Dave)
Trust me, pics are in the works but tonight my host is not cooperating, I have to figure what's going on there.

It does look a lot like this though: LC1 1/2 TM

Oh, I see that Craig posted the same link.

D:cool:
 

Everett

Super User
Nice taste in mills, lol, I have a First LC1-1/2TM as well! No power feed yet, but was still thankful for the deal I got on mine too. You got a nice haul of tooling with yours, nicely done! I bought a copy of the manual from lathes.co.uk, so if you need any info, PM me and I can look it up for you. It was a few bucks but I was so tickled to get a knee mill that I splurged for the book and shipping from the UK and was not remorseful following the purchase, lol!
 

Tecnico

(Dave)
OK, so I promised pictures and more updates, here we go!

I talked about making a dolly to move the mill around on and to use as a base in my shop, here’s the dolly.

Dolly.jpg

It’s 4 x 4 x ¼ angle with 2 x 2 x 1/8 tubing joining them and 720 lb. rated steel wheel casters. All the numbers worked out for the weight of the machine. The 1” tubes across each end are to keep the machine in place on the dolly and will be adjusted to fit. Once the mill was in the trailer the dolly was raised and set on blocks to get it off the wheels for the trip home. I’m pleased to say that the dolly worked great as planned for the load and offload.

The plan is to move the mill into place and either take the wheels off and set the 2” tube on the floor or leave the wheels on and rest the dolly on 2 x 4s to take the weight off the wheels. That’s what the floor jack is for.

I arrived there with knocked down dolly in hand and a Macgyvered wheeled lever cobbled together from odds and ends including a rub rail from my last race car. If you’re ever going to move a piece of equipment you want one of these! I should have made the tab out of something a little thicker because I bent it sometime during the move.

Lever.jpg

My S.O. and I went, planning on having help from the late owner’s son, but we wound up with the whole family and it worked out great. I started by briefing everyone on what was going to happen and thankfully they all got with the program and let me orchestrate the show. Lucked in there! I can’t say enough how important it is to do a pre-operation brief so everyone knows what’s going to happen and that you know what you're doing. That and safety management.

The mill needed to be rollered out from against the back wall to where I could lift front & rear to block it up high enough to slide the cross members under, bolt the angles to them and then raise enough to get the casters on.

First1.jpg

From there it was line up the trailer, line the ramps with steel plate and come-along the mill up onto the trailer, column first for stability. I had dropped the knee, rotated the head to motor down position and moved the table to the column to manage the c of g. Loading actually went very well with lots of hands to guide. Not much load on the come-along either. I think if I did it again (and had time) I’d arrange to lock the swivels or only have 2 swivelling castors – hindsight.

First2.jpg
First3.jpg

Once on board the trailer the mill was moved to slightly bias weight to the trailer tongue, put up on blocks and lashed down with the come-along, 4 @1300 SWL straps to the column and 4 @500 SWL kept the base in place.

First4.jpg

The trip home was uneventful and the offload was OK although more hands would have helped but we managed by moving slowly and methodically. The one thing I regret when building the shop is to not have set a big eye in the floor at the back wall so I could winch things off of trailers. This is the second time I had to make do unloading something and in this case I couldn’t get enough slope on the trailer for it to self-unload.

First5.jpg
First6.jpg

Anyhow the machine made it home safe and sound!

First7.jpg

Now a few words about the trailer. @Dabbler mentioned that in his experience U-Haul and other trailers did not have adequate tie-downs so the week before the move I went by the local U-Haul and checked out their 6 x 12 dual axle trailers and found that they had suitable tie-downs and an adequate ramp so I was confident that I was prepared. Well, to my surprise the 6 x 12 trailer they picked out for me and had hooked up when I arrived had tie-downs in it that looked about the gage of paperclips! Fortunately they had another and quickly swapped it out without a peep. Heed the warning from @Dabbler that the trailer you get might not be adequate.

Well, that’s about it for now, more to come as I go over the mill & bring it into service.

D
Well done! Congratulations on the new toy, looking forward to the updates and projects to come. :cool:
 

Tecnico

(Dave)
Well done! Congratulations on the new toy, looking forward to the updates and projects to come. :cool:
Thanks, I'm looking forward to lots of interesting and useful projects.

Right now, clean up 35 years of accumulated patina and get set up to run. Future? I have some ideas including the requisite DRO!

D:cool:
 
Forget DRO go straight to CNC.

I used Centriod Acorn system with the CNC4PC board for Clearpath servos and clear path Servos.

Commercial type controller and software, plug and play for the most part. Total time invested to get up and running about a week, between money making work (actual time line about 3 months with about 2 days of downtime not including cleaning and setting up leadscrews and ways).

Well worth it.
 

Chicken lights

Forum Pony Express Driver
The trip home was uneventful and the offload was OK although more hands would have helped but we managed by moving slowly and methodically. The one thing I regret when building the shop is to not have set a big eye in the floor at the back wall so I could winch things off of trailers. This is the second time I had to make do unloading something and in this case I couldn’t get enough slope on the trailer for it to self-unload.
A snatch block and a length of aircraft cable come in handy, letting you load and unload a trailer easily. Position the snatch block in the middle of the trailer, run the aircraft cable down the trailer to the piece being loaded, hook the cable to a vehicle/tractor and yank it on. Opposite for unloading. (And if it’s a janky pull you can move the snatch block to different sides of the trailer to change the angle of the pull)

To actually get it into the garage you’d still need an anchor point inside the garage, for the snatch block, but it wouldn’t need to be heavy for just a mill.

Nice job getting it home!!
 

Tecnico

(Dave)
Forget DRO go straight to CNC.

I used Centriod Acorn system with the CNC4PC board for Clearpath servos and clear path Servos.

Commercial type controller and software, plug and play for the most part. Total time invested to get up and running about a week, between money making work (actual time line about 3 months with about 2 days of downtime not including cleaning and setting up leadscrews and ways).

Well worth it.
What kind of money are we talking about for the CNC hardware? This mill for me is for personal use so not much prospect for payback.

D:cool:
 

Tecnico

(Dave)
A snatch block and a length of aircraft cable come in handy, letting you load and unload a trailer easily. Position the snatch block in the middle of the trailer, run the aircraft cable down the trailer to the piece being loaded, hook the cable to a vehicle/tractor and yank it on. Opposite for unloading. (And if it’s a janky pull you can move the snatch block to different sides of the trailer to change the angle of the pull)

To actually get it into the garage you’d still need an anchor point inside the garage, for the snatch block, but it wouldn’t need to be heavy for just a mill.

Nice job getting it home!!

Hi @Chicken lights. In my case getting on the trailer was straight forward because the trailer had convenient & beefy tie down loops I could center a come-along on with a loop of chain. Getting on the trailer was more of a cardio work-out with the come-along than anything! It was the getting off the trailer part that was more complicated.

In my case I have a car in the shop (multi-purpose shop!) so I hooked a chain to a tow hook and all I needed to move the mill was to pull up on the chain span (which multiplied the force by geometry) but unfortunately the car was off center so I had to jig around a bit to pull & straighten. I kept the come-along connected with some slack cable to manage movement/prevent overrun but the trailer & ramp were about level going into the shop so not much help toward self-unloading!

In the end it was done safely, that's the important part. I'm going to have to put my thinking cap on for a loop at the back wall though for future need.

D:cool:
 

Tecnico

(Dave)
It’s about time I got caught up on the story of my First mill, I’ve had my head down doing the clean-up and maintenance to get it to the point where I want to call it ready to put to use. Basically I wanted to set a baseline where the to-do list was minimal.

This is where I started: Lots of general grime and a fair bit of flaking bondo around the column/base.

First8.jpg

I spent a lot of time with a stiff bristle brush, scraping tools and a can of Varsol removing 35 years of accumulated grime, lubricant and cutting oil residue and even traces of Cosmoline. Some of the cutting oil residue was more like varnish and took a fair effort to clean up.

First9.JPG

After clean-up, I’m pleased with the general condition of the machine, other than cosmetics it seems to be well cared for, little wear and not abused. The one shot pump reservoir was half full and there was oil on the ways so it looks like the pump works and was used. I notice that there is an oil feed to the lead screw nuts so that’s good for longevity.

The X axis play comes out at .035 and the Y is .020 and even through the travel so more reason to be pleased.

First10.JPG


Digging into some of the components I decided to have a look at the power feed for the X axis. I needed to replace the circuit breaker/switch, the plastic lever had gotten bumped during handling and broke off so I had to dismantle the unit to get at it.

When I got it open I found the cable entry strain reliefs were in need of replacement and the neon(!) power indicator lamp was black inside so while it was open I replaced that too. Finally, the fast feed override push button mechanism needed cleaning (more brown varnish) and its flexible cap needed replacement. Other than that it got a thorough cleaning and re-greasing.

While I was at it I replaced all the cabling from the power distribution box and also the cable to the table limit switch because the jackets were cracking. I also overhauled the limit switch because it too was covered with and full of the brown varnish like cutting oil. In the end I also replaced the plunger spring (Grainger) inside because it was broken and I made an actual gasket for the cover to keep contaminants out.

Finally I gave the housing a thorough cleaning.

After that overhaul, the power feed will be good for another 35 years or longer than I expect to need it!

First11.JPG

Talk about a quart of stuff in a pint bottle!

While replacing cabling on the power feed I had a good look at the junction box on the machine and I’m impressed with the layout & workmanship. Cables are neatly run, secured & labelled at both ends and there’s a schematic for the transformer.

The next thing to look at was the cutting oil/coolant pump. From looking in the drain back holes in the base I knew the sump would need some clean-up since I saw chips and even a shell casing in there so I drained the oil and dug in. As expected there was some debris at the drain back ports so that got cleaned out. I’m planning to put some sort of fixed retainer on the drop-in gratings but that will come later.

Next up was checking the pump. At some point in its life the pump bracket parted company with the pedestal casting (2x 6mm bolts) so the pump was kind of laying there over above the sump. Easy fix and the pump works fine.

At that point I propped the mill up on blocks and took it off the dolly so I could get full access to the base for paint touch up and also paint the dolly. My approach was to make the machine respectable looking and seal all the open surfaces rather than a full like-new overhaul (or quick cosmetic cover-up) so I smoothed up the old bondo as much as I had patience for (awful stuff) primed and painted. The (2K/epoxy) primer is important because it seals the bondo etc. against being softened by the top coat. I also used 2K top coat because it cures quickly and is very resistant to chemicals. I managed to get a good match from my local NAPA using their scanner, turns out the closest match is Mercede$ grey LOL!

So, here’s the finished touch up, not bad if you don’t look closely at the base but more importantly for me it’s all one color and looks pretty good when I look at it, ‘way better than when I got it.

First12.JPG


After washing and cleaning the cutting oil residue I used some rust remover to clean up any red dust residue caused by humidity and gave the table a brushing and I was pleased to see how good a shape the table was all around. On the work surface it is “flaked” and doesn’t show uneven wear from end to end and there’s only one small crescent about 1/16 wide at the edge of one of the slots where someone got too close with a drill bit so I’m really pleased. There are what are probably typical dings from dropping things on the table and I have to come back to those.

First14.JPG


First15.JPG

There were a few other things on the to-do list, the quill feed wheel is damaged and a replacement is in the works and I needed to replace one of the drive belt adjuster lock downs because the handle was broken off. First work I did with the machine was to remove the broken handle from the lock nut, more later.

So, next up was getting it back on the dolly and doing a run-up. For that I needed to re-terminate the power cable since some of the jacket was getting tired (to be replaced once the machine has its own designated spot in the shop).

Running up I found what I thought may be some quill shaft (?) bearing noise but giving it a dose of lubricant seems to help that and the belts squeak a bit but that will probably quiet with use.

So, to remove the remains of the belt adjuster handle from adjuster I set up to drill it out and discovered two things, first, the R8 key grub screw was sheared off and the Rohm chuck I received with the machine has a run out problem.

The R8 key was solved with a new M6x1x8 dog point grub screw (pack of 100 and a week from Grainger). Replacing it I discovered that my SYOV 25(?!) collet holder has a shallower groove at key height than my other R8 tools and I also needed to use a little Loctite 222 (small fastener, removable) to keep the dog point screw in place while I set the outer screw.

The Rohm chuck is a different story. It would appear that there is some debris or something in the mechanism that is affecting its accuracy. Probably more of that brown varnish cutting fluid. It’s different at different sizes. So after fiddling with it for a while I decided that I would set it aside until later to take it apart and invest in a new keyless Tegara which came at a reasonable price from Shars.

The last little bit for this instalment is the update on the dolly I have the mill on. As you can see from earlier in this thread the dolly I made for handling the machine on the trip home and in the shop worked out great for the move but would have been better without all 4 wheels castoring. I fixed that. The dolly now has two fixed and two castoring and the castoring wheels are linked and steerable. The dolly update story will come in the next instalment.

So, there we are for now. There will be more updates when I have time. Coming are the dolly steering, quill feed wheel, folding handle X axis wheel and the custom work lamp.

D:cool:
 
Last edited:
Top