-
Scam Alert. Members are reminded to NOT send money to buy anything. Don't buy things remote and have it shipped - go get it yourself, pay in person, and take your equipment with you. Scammers have burned people on this forum. Urgency, secrecy, excuses, selling for friend, newish members, FUD, are RED FLAGS. A video conference call is not adequate assurance. Face to face interactions are required. Please report suspicions to the forum admins. Stay Safe - anyone can get scammed.
-
Several Regions have held meetups already, but others are being planned or are evaluating the interest. The Calgary Area Meetup is set for Saturday July 12th at 10am. The signup thread is here! Arbutus has also explored interest in a Fraser Valley meetup but it seems members either missed his thread or had other plans. Let him know if you are interested in a meetup later in the year by posting here! Slowpoke is trying to pull together an Ottawa area meetup later this summer. No date has been selected yet, so let him know if you are interested here! We are not aware of any other meetups being planned this year. If you are interested in doing something in your area, let everyone know and make it happen! Meetups are a great way to make new machining friends and get hands on help in your area. Don’t be shy, sign up and come, or plan your own meetup!
You are using an out of date browser. It may not display this or other websites correctly.
You should upgrade or use an alternative browser.
You should upgrade or use an alternative browser.
SM1120 Finally found one!
- Thread starter YotaBota
- Start date
Lets see, two rolls of paper towel, six rags, half gallon of varsol, half tube of Autosol, 3 pounds of elbow grease and a half cup of spit polish later, and I still need to do the base. There was lots of brass chips around but not much steel, this machine is in really nice shape, it will last me a long long time. That's assuming I have a long long time to go") . I cleaned off a black dust around the pulleys. They must have had the grooves cut and then turned to diameter because the were burrs sharp enough to cut myself on the belt side edges. A quick run with the file smoothed that out so there shouldn't be any more belt dust.
. I cleaned off a black dust around the pulleys. They must have had the grooves cut and then turned to diameter because the were burrs sharp enough to cut myself on the belt side edges. A quick run with the file smoothed that out so there shouldn't be any more belt dust.
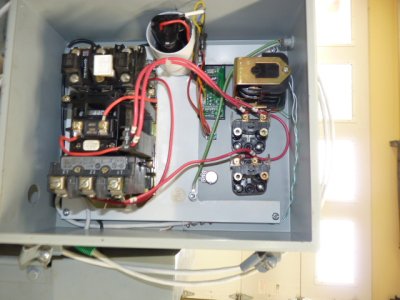
So I've been working on the VFD, TECO L510-202-H1-U 2HP 230V AC Drive | eMotors Direct, it actually works as I'd hoped. All the instructions are in real english and it was here is four days. I'm using the original contactor to feed the VFD and the original start/stop buttons to feed power to the vfd and the fwd/off/rev switch for control. I'll add the freq control and the tack to the panel as well, pic to follow.
Here's a picture of my Frankenwire test setup, I used 1" brads to extend the vfd connections for the test leads to clip onto.

After I get the lathe in it's final location and the vfd mounted I'll do the wiring to length.
. I cleaned off a black dust around the pulleys. They must have had the grooves cut and then turned to diameter because the were burrs sharp enough to cut myself on the belt side edges. A quick run with the file smoothed that out so there shouldn't be any more belt dust.So I've been working on the VFD, TECO L510-202-H1-U 2HP 230V AC Drive | eMotors Direct, it actually works as I'd hoped. All the instructions are in real english and it was here is four days. I'm using the original contactor to feed the VFD and the original start/stop buttons to feed power to the vfd and the fwd/off/rev switch for control. I'll add the freq control and the tack to the panel as well, pic to follow.
Here's a picture of my Frankenwire test setup, I used 1" brads to extend the vfd connections for the test leads to clip onto.
After I get the lathe in it's final location and the vfd mounted I'll do the wiring to length.
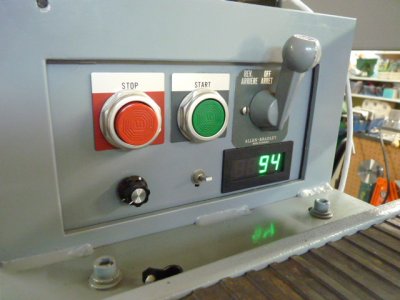
For all my whining about not wanting to rewire and be able to just plug in the VFD, the rewire worked out really well. I added the pot to control the vfd output just for tweaking the rpm if needed. The tach display fits like it was supposed to be there, it will be running off a battery so I have an on/off switch to use the tach only when wanted. I split a piece of plastic pipe and mounted it inside the cabinet to hold the battery. I took a page from Mr. Conroys tach install (thank you sir) and added a collar to the spindle to mount the magnet. The sensor is attached by a made up bracket bolted to an existing threaded hole.
Next is getting the lathe onto the work bench then finish the rest of the wiring and put it to work.
Next is getting the lathe onto the work bench then finish the rest of the wiring and put it to work.
Attachments

That looks great. You will love being able to change spindle speed with the turn of a dial.
The VFD is primarily for the 3phase, I still plan on using the machines speed controls.
I don't remember ever hearing a bad word against SM, some say they are a little light in weight but that is subject to personal opinion and the lathes purpose. I got hooked on SM with the 9" that I picked up over a year ago.That's a sweet looking machine.
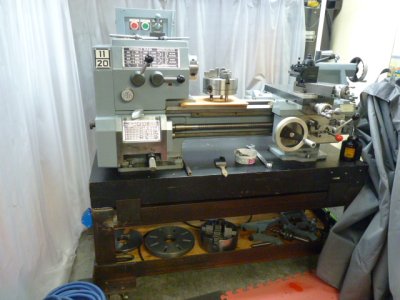
Well the cleanup is pretty much done and I'm really pleased with the condition of the machine. A big surprise was to find the 4jaw chuck/dog plate/face plate/follow and steady rest appear to have never been used. The 3 jaw chuck is the only one with any sign of being cleaned up and used. I don't think the TA has ever been used either. I'm feeling fortunate to have found a machine in this good a shape, no repairs needed or parts to find or replace.
The QCTP arrived yesterday (Accusize BXA) so today was spent milling the t-nut for the compound. It didn't take long to actually machine but it took all day to do it. lol
As for the stand, that big chunk of CI turns out to be cast ALUMINIUM. I never took a close look at it until this afternoon when I put a magnet to it and the magnet didn't stick, I just assumed it was CI.lol. The problem with the stand is that there is no storage so I think I'll build a new one with space for a big tool box and some peg board.
Attachments
Where is the motor on that machine? I though they were buried in the stand on those ones....
@Brent H , @RobinHood , @Crosche where is the motor mounted on your SMs?
@Brent H , @RobinHood , @Crosche where is the motor mounted on your SMs?
DPittman
Ultra Member
That looks like a stand you might be able to retrofit? If it's aluminum it wouldn't be so hard to cut and bolt in the necessary components you need (maybe).The problem with the stand is that there is no storage so I think I'll build a new one with space for a big tool box and some peg board.
DPittman
Ultra Member
That'd be the easiest part....build up sides and have a bottom drawer that slides out/open?Needs a chip tray.....
The motor is mounted the same as the 9" utilathe.Where is the motor on that machine?
The curtains are to to keep the gravy spillage off the lathe, lol
Post #13 shows the under side of that chunk of aluminium, to start cutting into the webbing would compromise the strength.
If I build a new stand a chip tray will be part of the plan.
It's all aluminium that has been cast, the sides and top are .500ish thick and the webs are about .375ish thick.
That would make one heck of a welding table!