I can’t deal with it anymore, it’s been the longest winter in 6-7 yearsSame here in Thunder Bay. I'm so done with winter!
-
Scam Alert. Members are reminded to NOT send money to buy anything. Don't buy things remote and have it shipped - go get it yourself, pay in person, and take your equipment with you. Scammers have burned people on this forum. Urgency, secrecy, excuses, selling for friend, newish members, FUD, are RED FLAGS. A video conference call is not adequate assurance. Face to face interactions are required. Please report suspicions to the forum admins. Stay Safe - anyone can get scammed.
-
Several Regions have held meetups already, but others are being planned or are evaluating the interest. The Calgary Area Meetup is set for Saturday July 12th at 10am. The signup thread is here! Arbutus has also explored interest in a Fraser Valley meetup but it seems members either missed his thread or had other plans. Let him know if you are interested in a meetup later in the year by posting here! Slowpoke is trying to pull together an Ottawa area meetup later this summer. No date has been selected yet, so let him know if you are interested here! We are not aware of any other meetups being planned this year. If you are interested in doing something in your area, let everyone know and make it happen! Meetups are a great way to make new machining friends and get hands on help in your area. Don’t be shy, sign up and come, or plan your own meetup!
You are using an out of date browser. It may not display this or other websites correctly.
You should upgrade or use an alternative browser.
You should upgrade or use an alternative browser.
New vise jaw product
- Thread starter Janger
- Start date
+++++ Tedious, won't quit🙁I can’t deal with it anymore, it’s been the longest winter in 6-7 years
I've been puzzling the problem today and came up with this.
It's a vise jaw which bolts in to the kurt vise same as the usual hard jaws. There would be two of them mirrored.
The pink blocks bolt to the red bar and squeeze the light green fingers against the middle of the E. The pink bocks are then further held in place with set screws through the top.
The jaw is 7.25" long by 4.5 wide and 2" tall. The fingers slide back and forth 1". I am thinking the big E would be milled from a solid block - but could one get away with making the 3 pieces from bar stock and bolting them to the back of the E perhaps with dowel pins? This would need more machining but it would use a lot less material than a solid block.
Machining the square holes to accurate heights of +/- 0.001" I think would be critical to prevent wobbling and lifting. The sides are less important.
No idea if I am going to make this but it has been interesting thinking about it.
See if I understand. After its cast & just cooled to solid, it has shrunk slightly so can slide out of the part? Then while resting slowly grows, at 30 min it equates to original dimensions?
What does the 0.0025" refer to? Do they mean inch per inch?
Hmmm.. that could be useful for other things.
Brownells> Unlike Woodsmetal which swells upon cooling and cannot be removed from a gun chamber, Cerrosafe shrinks during the first 30 minutes of cooling and then at the end of an hour, is EXACTLY chamber size. At the end of 200 hours it will have expanded approximately .0025". This factor is well known by all toolmakers and they will take it into consideration when making dies or reamers or gauges from your cast
Yes, I believe you do understand. And yes, it is inches per inch.
If I recall correctly, you can get more info on the Brownells website by clicking on an info tab or something like that and then downloading a pdf.
Or you can go to the cerrasafe manufacturers website and get the info there.
If that all fails, I'll create a pdf and upload it to a docushare facility of some kind.
I've been puzzling the problem today and came up with this.
It's a vise jaw which bolts in to the kurt vise same as the usual hard jaws. There would be two of them mirrored.
The pink blocks bolt to the red bar and squeeze the light green fingers against the middle of the E. The pink bocks are then further held in place with set screws through the top.
The jaw is 7.25" long by 4.5 wide and 2" tall. The fingers slide back and forth 1". I am thinking the big E would be milled from a solid block - but could one get away with making the 3 pieces from bar stock and bolting them to the back of the E perhaps with dowel pins? This would need more machining but it would use a lot less material than a solid block.
Machining the square holes to accurate heights of +/- 0.001" I think would be critical to prevent wobbling and lifting. The sides are less important.
No idea if I am going to make this but it has been interesting thinking about it.
View attachment 23123
I don't understand a few things John. Please forgive a few really dumb questions. But I can't provide any meaningful comments if I don't understand the basics.
Why only 3 fingers? Visually scaling it it looks like you need 6 in each opening of the E for a total of 12 fingers.
And what is the center post of the E for? Are you clamping two parts simultaneously or is it a sort of gauging (or hard) finger? If so, why isn't it skinny like the other fingers?
And why is the whole fixture so big? At 4.5" wide, that's 9" for two of them. No room left in your Kurt for a part.
Last edited:
I have just posted the procedure on how to use fusible metals as a holding fixture onto "Tip of the Trade"
Only 3 fingers -> I just didn't draw them all in yes I would need 12 of the movable fingers. The center post is fixed and here I'm copying the Norgen design which has a fixed center post too. I think it's because of jaw lift and the center post provides more rigidity. The Norgen one is also 0.75 wide. And it's big at 4.5" - My fingers move 1" back and forth which is more than the Norgen making it too long - you maybe right that I will not have enough room. I'll have to go measure. Didn't think about that issue much.I don't understand a few things John. Please forgive a few really dumb questions. But I can't provide any meaningful comments if I don't understand the basics.
Why only 3 fingers? Visually scaling it it looks like you need 6 in each opening of the E for a total of 12 fingers.
And what is the center post of the E for? Are you clamping two parts simultaneously or is it a sort of gauging (or hard) finger? If so, why isn't it skinny like the other fingers?
And why is the whole fixture so big? At 4.5" wide, that's 9" for two of them. No room left in your Kurt for a part.


@Susquatch you are right I'll get 1.45" of jaw opening space with it sized the way I have it. I guess that is why the Norgren fingers have less movement. I could make the red bar less wide say 0.5" instead of 1" and reduce the finger travel by another 0.5" that would add 2" total of additional space. Would the red bar then be too weak? It is not clear to me if preventing jaw lift is the job of the red bar or the friction between the fingers and the center fixed finger.
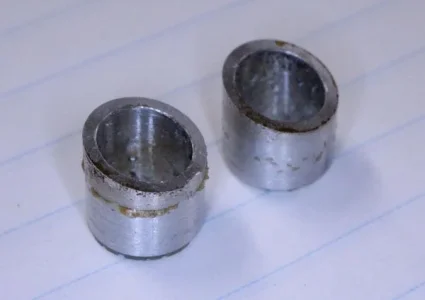
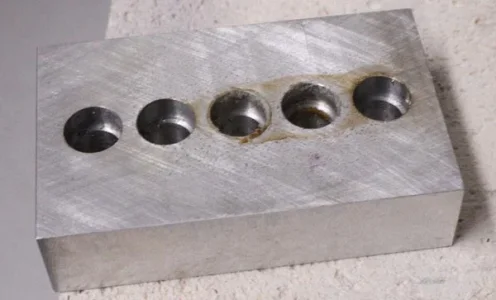
And here is how I use epoxy in a similar way. I couldn't find any jaws I have made in the past.
This method works exceptionally well on fragile parts and even fancy wood such as carvings. You can fill in any voids that might trap a chuck of epoxy with modelling clay or playdoe.
The part I am using as an example is a socket that has a conical body. Just humour me and assume it's an irregular hard to clamp part.
Two pieces of ordinary wood are used to create the bowl. Cardboard works just as good. No real clamping takes place yet.
The part is placed in the vice and then two sheets of saran wrap are used to make a bowl on either side of the part. Sometimes the saran wrap can be separated with more cardboard.
The two bowls can then be filled with liquid epoxy. And left to cure. Everything is easily separated and the saran wrap conforms to the part surface due to the weight of the epoxy. It can, also be smooshed to the part as it cures if better conformance is needed.


Sometimes the two halves don't want to separate easily because of interfolds between the two layers of saran wrap. Therefore I like to pull everything apart after the epoxy firms up and sets, but before it fully cures. If you miss the window, a hacksaw along the seam almost to the part but not quite usually does the trick.
Think of the whole process a bit like casting softjaws but without the sand or furnace.
Ive never tried @thestelster 's cerrosafe method, but it's just been permanently added to my list of tricks N tips.
I believe Saran wrap can handle boiling water so I bet it could handle cerrosafe too.
Another advantage of making the safe jaws right in your vice is that the fit to the vice is guaranteed to be perfect too.
Ive also used small hand made carboard boxes, and even just two zip lock bags that are sized for the job. But very few things will conform to the part as well as saran wrap will.
Another thing I like about the cerrosafe is the fact that a separating wall isn't needed. Just melt the stuff away when the job is done.
Lots of twists on the same theme, and lots of ways to solve different problems.
This method works exceptionally well on fragile parts and even fancy wood such as carvings. You can fill in any voids that might trap a chuck of epoxy with modelling clay or playdoe.
The part I am using as an example is a socket that has a conical body. Just humour me and assume it's an irregular hard to clamp part.
Two pieces of ordinary wood are used to create the bowl. Cardboard works just as good. No real clamping takes place yet.
The part is placed in the vice and then two sheets of saran wrap are used to make a bowl on either side of the part. Sometimes the saran wrap can be separated with more cardboard.
The two bowls can then be filled with liquid epoxy. And left to cure. Everything is easily separated and the saran wrap conforms to the part surface due to the weight of the epoxy. It can, also be smooshed to the part as it cures if better conformance is needed.
Sometimes the two halves don't want to separate easily because of interfolds between the two layers of saran wrap. Therefore I like to pull everything apart after the epoxy firms up and sets, but before it fully cures. If you miss the window, a hacksaw along the seam almost to the part but not quite usually does the trick.
Think of the whole process a bit like casting softjaws but without the sand or furnace.
Ive never tried @thestelster 's cerrosafe method, but it's just been permanently added to my list of tricks N tips.
I believe Saran wrap can handle boiling water so I bet it could handle cerrosafe too.
Another advantage of making the safe jaws right in your vice is that the fit to the vice is guaranteed to be perfect too.
Ive also used small hand made carboard boxes, and even just two zip lock bags that are sized for the job. But very few things will conform to the part as well as saran wrap will.
Another thing I like about the cerrosafe is the fact that a separating wall isn't needed. Just melt the stuff away when the job is done.
Lots of twists on the same theme, and lots of ways to solve different problems.
One of the builders on model engine forum uses epoxy grouting/fixturing extensively for finicky parts. He also glues odd castings onto sacrificial blocks of MDF.
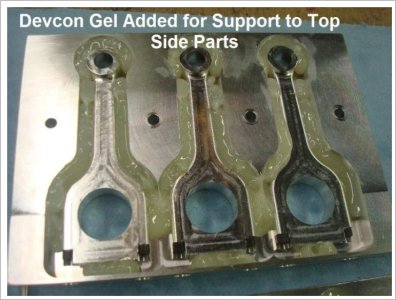
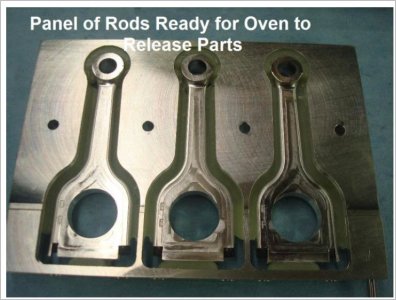
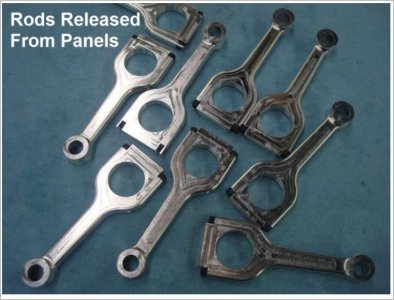
1/4 scale con rod example pics:
- mill side A profile to say 75% of depth
- grout the perimeter, now its a more stable 'solid' again
- flip the part, index fixture, mill side B remaining 25% (still retained by epoxy grout)
- heat the assembly, epoxy softens & out they come
I adopted the method for some of my parts & it works great (compound miter angle on small aluminum tubing parts). Any hardware grade 5-min epoxy will do. Actually preferable because it usually has a lower HDT. I don't use a release agent or film because a) the micro machining surface actually helps bond the parts in place during machining b) once the epoxy softens under heat it just goes rubbery & self-releases anyways. c) depending on the shape (draft) can still get you into trouble releasing. Some post-heat cleanup might be required but its not onerous, bit of acetone & mild scuff pad. the epoxy has essentially failed thermally so isn't bonded very strong. This is important if you want to re-use the same fixture multiple times. Don't use your house oven, the post-heat does create a bit of stench odor. I find epoxy a bit more consistent & reliable vs. CA for most applications because you can build up a supporting fillet or fully pot it depending on the shapes involved. And mostly the heat release with epoxy is just a bit more predictable - when it turns a caramel brown, its ready to demold.
Apparently there are some re-useable waxes that can be used this way but it seems more special heating equipment is required on both ends of the operation
Attachments

And here is how I use epoxy in a similar way. I couldn't find any jaws I have made in the past.
This method works exceptionally well on fragile parts and even fancy wood such as carvings. You can fill in any voids that might trap a chuck of epoxy with modelling clay or playdoe.
The part I am using as an example is a socket that has a conical body. Just humour me and assume it's an irregular hard to clamp part.
Two pieces of ordinary wood are used to create the bowl. Cardboard works just as good. No real clamping takes place yet.
The part is placed in the vice and then two sheets of saran wrap are used to make a bowl on either side of the part. Sometimes the saran wrap can be separated with more cardboard.
The two bowls can then be filled with liquid epoxy. And left to cure. Everything is easily separated and the saran wrap conforms to the part surface due to the weight of the epoxy. It can, also be smooshed to the part as it cures if better conformance is needed.
View attachment 23138View attachment 23139View attachment 23140View attachment 23141
Sometimes the two halves don't want to separate easily because of interfolds between the two layers of saran wrap. Therefore I like to pull everything apart after the epoxy firms up and sets, but before it fully cures. If you miss the window, a hacksaw along the seam almost to the part but not quite usually does the trick.
Think of the whole process a bit like casting softjaws but without the sand or furnace.
Ive never tried @thestelster 's cerrosafe method, but it's just been permanently added to my list of tricks N tips.
I believe Saran wrap can handle boiling water so I bet it could handle cerrosafe too.
Another advantage of making the safe jaws right in your vice is that the fit to the vice is guaranteed to be perfect too.
Ive also used small hand made carboard boxes, and even just two zip lock bags that are sized for the job. But very few things will conform to the part as well as saran wrap will.
Another thing I like about the cerrosafe is the fact that a separating wall isn't needed. Just melt the stuff away when the job is done.
Lots of twists on the same theme, and lots of ways to solve different problems.
That is pretty neat John - do you buy the epoxy in two big 1 gallon jugs - $90 on amazon for example.?
In my view, a little release agent is almost always a good thing with delicate parts. I like Brownells spray on release agent. I have several cans of it that I use sparingly because I worry about being able to get it reliably in the future. I have also used Johnson's wax (including the spray on variety) and
shoe polish wax. It's easy to buff (just rub it with a soft cloth) to a very thin coating that is easily removed with some alcohol. Or just leave it there forever as a rust preventative. All depends what you are doing.
Last but not least, wood parts sometimes need special care to avoid crushing it or damaging it. When hard epoxy just isn't appropriate, I often use Minwax High Performance Wood Filler. It's a two part epoxy too, but with totally different compressive and structural performance. It's much more like a wood product itself (and great for repairing rotted window/door jams too).
You can pull the saran wrap away from the part a bit to leave behind a curved surface that won't leave a dent in the wood part when it is clamped down. I use this technique when I am inside milling an existing fancy finished wooden object that I don't want to damage with a regular wood clamp.
Dan Dubeau
Ultra Member
I watched a toolmaker I worked with many years ago fix some oddball part (can't remember what, by fixing it to the spindle to get the right orientation, then hot glue it into a little pocket in a block held in a vise. When the glue set the part was held firm enough to finsih the machining he had to do. I thought, man that's a great idea, so I brought in a hot melt gun and stuck it in the bottom of my box. Many years later I was making these specialise collets and had to remachine one to a different size after a spec change, and struggled trying to machine something that flex so much. I finally got it done after making a special mandrel and with a lot of fuss, and posted about it on another forum. One of the guys said "I make stuff like that all the time, and use hot melt glue to fill the slots in the collet so it's easier to machine". I thought, man that's a great idea, so I brought in a hot melt gun and stuck it in the bottom of my box. Which is when i discovered I already had one in there the whole time....
I wish my memory was good enough to remember all the tips tricks and hints I've learned on the internet over the years. I retain a lot, and have a really visual photographic memory. But not all of it.
Janger that vise is pretty cool. Can think of a few things I've made over the years where it would be pretty handy. The gears are turning right now......
I've tried hot melt & it was a fail, probably a function of my particular part shape (exact same fixture as post#53 & other attempts). I recognize the sticks come in different strength formulations. Mine is probably medium, but its still nowhere near as strong or rigid as epoxy. But I think a lot success/fail depends on the part & fixture & machining operation. If a part lends itself to being well potted (maybe what you mean by pocket), then the cutting forces are absorbed into the adhesive & all is well. If you have thin, finicky parts with less glue support it doesn't take much machining force to dislodge. End milling is probably worse than turning. Epoxy is good for things like thinning washers because it can be lightly clamped with an even layer of adhesive in the sandwich. More viscous glues like hot melt can set uneven.
Clickspring uses CA all the time for thin stuff but he also uses a mandrel with grooves. I've used CA successfully too but it also has limitations. Without side support like what a more viscous adhesive can offer, the bond is entirely in shear. CA doesn't take interrupted cutting loads very well. I also find you have to heat higher/longer than epoxy to de-bond & its a gooier residue mess. The CA+masking tape trick is another bit of yeesh technique IMO. The problem is the tape adhesive breaks down with pretty much any kind of petroleum based cutting fluid & lower strength than CA itself.
Clickspring uses CA all the time for thin stuff but he also uses a mandrel with grooves. I've used CA successfully too but it also has limitations. Without side support like what a more viscous adhesive can offer, the bond is entirely in shear. CA doesn't take interrupted cutting loads very well. I also find you have to heat higher/longer than epoxy to de-bond & its a gooier residue mess. The CA+masking tape trick is another bit of yeesh technique IMO. The problem is the tape adhesive breaks down with pretty much any kind of petroleum based cutting fluid & lower strength than CA itself.
It all makes sense now John. And it's a great design for what you want it to do.
A few suggestions/comments.
I like the idea of that center part. It acts a bit like a hard stop on the part if everything else is pushed outward before closing the regular jaws. But I'd prolly make it thinner. Maybe the same size as the other ears.
If I were you, I'd make everything shorter. As we discussed earlier, that soft jaw design takes up most of your vise travel. In the absence of a design objective to the contrary, I'd prolly shoot for 1/3 Soft Jaw A, 1/3 Part, 1/3 Soft Jaw B. If anything different, perhaps 1/2 part and 1/4 each for the two jaws AFTER removing anything non-adjustable. That way the outside jawlets can always close around the part.
I would not fuss too much about the fit of the jawlets on their arbour. Let them move a bit but have rough surfaces for better clamping retention. I do think those pink clamping blocks need a good tight fit.
I hunger for vertical clamping conformity too Perhaps stacked mini fingers.... LOL!
Ya, an epoxy pour is looking pretty good right now....