• Scam Alert. Members are reminded to NOT send money to buy anything. Don't buy things remote and have it shipped - go get it yourself, pay in person, and take your equipment with you. Scammers have burned people on this forum. Urgency, secrecy, excuses, selling for friend, newish members, FUD, are RED FLAGS. A video conference call is not adequate assurance. Face to face interactions are required. Please report suspicions to the forum admins. Stay Safe - anyone can get scammed.
  • Several Regions have held meetups already, but others are being planned or are evaluating the interest. The Ontario GTA West area meetup is planned for Saturday April 26th at Greasemonkeys shop in Aylmer Ontario. If you are interested and haven’t signed up yet, click here! Arbutus has also explored interest in a Fraser Valley meetup but it seems members either missed his thread or had other plans. Let him know if you are interested in a meetup later in the year by posting here! Slowpoke is trying to pull together an Ottawa area meetup later this summer. No date has been selected yet, so let him know if you are interested here! We are not aware of any other meetups being planned this year. If you are interested in doing something in your area, let everyone know and make it happen! Meetups are a great way to make new machining friends and get hands on help in your area. Don’t be shy, sign up and come, or plan your own meetup!

New to me Ammco 7" Metal shaper

It's raining here and the bride is off gallivanting.

Four blocks under the shaper chest now. MUCH BETTER. but still a monster in 4th gear. It's too close to the natural frequency of the shaper and chest. This is gunna be a longer term project.

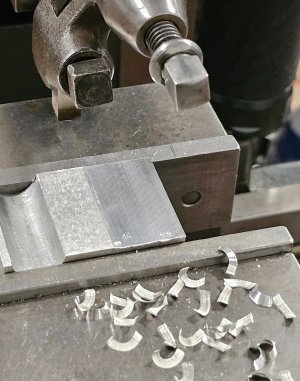
So, I took at stab at grinding a shear tool. That's no piece of cake. In the end, I abandoned the idea for now and made a plain rounded end tool. Most of us know what a radius point on a tool, or round inserts do for finishes. Well the shaper was no exception. A round edge was like a miracle. Not the mirror that @140mower described, but still beautiful.

20250505_103426.jpg

Left side was the first pass with a normal HSS cutter. Right Side is with a rounded edge cutter. The chips tell the story. If you look closely, you can even see a slight unmeasureable wave to the newly cut surface. Sorta like you see on a nice light surface grind. Very Nice.
 
I wouldn’t really worry about the 4th speed it will probably never be used what speeds do the rest of you use? For the limited time that I have had mine I have always used the lower setting.
 
I wouldn’t really worry about the 4th speed it will probably never be used what speeds do the rest of you use? For the limited time that I have had mine I have always used the lower setting.

I'd like to know what speeds folks use too!

FWIW, I tried my round nose tool on steel yesterday. It worked, but barely. The finish was not shiny at all, but was ok and could, easily be polished.

@140mower - After sleeping on it last night, I'm gunna have another go at grinding a shear tool. I think I understand the reason for the angle grind now. I believe it is there to generate a new angle on the tool, on which to subsequently grind the radius. The tool in the photo you provided was arbitrarily (I think) ground to about 45 degrees. I'd prefer more than that because my experience on the lathe has been better with a steeper angle, but I think you have to start somewhere. 45 is as good a place as any for a start.

I think the whole grinding process would be easier if the tool itself could be held at a variable angle on the tool holder. That would allow the operator to dial it in much faster.

What size hss blank are you starting with?
 
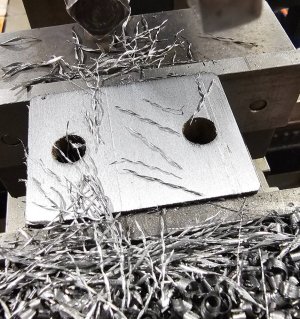
Ground a new Shear Tool this morning. Looking better. Not curls anymore. But too big and not long enough. I think I'm too deep (taking too big a cut and not enough angle on the tool. The finish is getting better though.

20250506_113038.jpg

The chips nearest the camera are from the previous grind discussed earlier.
 
Getting there. Cannot detect any roughness in the cut. But not shiny yet.

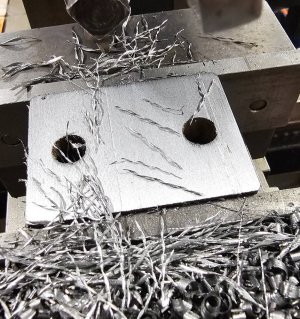
Roughly 120° grind, approx 4 thou depth of cut (too much slop on the depth dial to know for sure) less depth of cut, and slower feed 2 clicks.

20250506_115812.jpg

Any recommendations on how to deal with a gravity based backlash? My instinct tell me to lift the tool while adjusting and continue lifting until the adjustment is locked.

I might try mounting an indicator and use that in place of the depth dial scale.
 
You are getting closer..... Try halving the cut.... Very light cut and a fine feed are the order of the day.
Just running out the door.... You are on the right track, the chips are getting that long twisty wire look to them.
 
You are getting closer..... Try halving the cut.... Very light cut and a fine feed are the order of the day.
Just running out the door.... You are on the right track, the chips are getting that long twisty wire look to them.

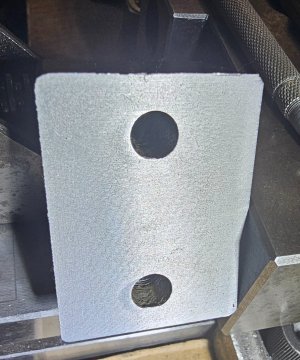
Getting there. Cannot detect any roughness in the cut. But not shiny yet. Aluminium would undoubtedly be better than Mystery Steel.

Roughly 120° grind, approx 4 thou total depth of cut (too much slop on the depth dial to know for sure), and slower feed 2 clicks.

20250506_115812.jpg

Any recommendations on how to deal with a gravity based backlash? My instinct tell me to lift the tool while adjusting and continue lifting until the adjustment is locked.

I might try mounting an indicator and use that in place of the dial.
 
Most of the time I use the second slowest speed, sometimes the slowest speed. I have the gibs snugged up on the feed, enough that the assembly does not drop on its own and positive feed, auto advance, 2 or 3 clicks, with about 0.005in. down feed, material dependent and cutter bit dependent. Sometimes up to 0.010 feed, aluminum, and project dependent, eg. finish and length of cut.
 
Tried mounting a dial indicator to gain control of my depth of cut. Can you believe that I have a half dozen plunge indicators not in service right now and not one single mag holder that is 3/8? All my 3/8 holders are in service. Crap!

Time to make a few changes. I grabbed two 8mm holders, a 13/drill, and a 3/8 reamer and opened their clamp to 3/8. So much for that naggy problem.

The downfeed is actually pretty good. With the lock loose, they downfeed pretty consistently drops the tool holder by the same amount the dial shows. I'm pretty happy with that.

Here is the final finish. Not a mirror, but it feels really nice.

20250506_151821.jpg
 
Back
Top