MT3 V.S. MT2

PeterT

Ultra Member
Premium Member
I think I got it now assuming this layout is correct. The difference in angle amongst sources seems to be a function of how they truncate and/or round-off digits. Since they provide no sketch or primary assumptions, its hard to know what's going on. Minutes & seconds resolution is just extra work obfuscating the issue, because that's not round to an even second either according to my math.

Rather than a right angle slope, I think the (Machineries Handbook) reference dimension of 0.602350" per foot is set equidistance to the centerline datum. (Not a right angle rise over run slope). Then to make an arbor of choice, you pick between 2 of 3 parameters: big diameter, little diameter, arbor length. Specifying any 2 defines the 3rd. The way I did the layout in CAD is make the arbor projected line parallel to the layout reference line. So the resultant angles to 8 significant figures are 2.8754058 degrees included angle, or half that = 1.4377029 deg taper setup. I'm not saying we can lay that resolution out in the shop, but its been bugging me why the literature values are sometimes different. If you see any issues let me know. The cool thing in CAD is I can make a design table lookup with each of the MT# distances defined, so just knowing this single number, all the dimensions drop out automatically to any desired arbor shank size.
 

Attachments

  • SNAG-2021-12-15 11.08.41 PM.jpg
    SNAG-2021-12-15 11.08.41 PM.jpg
    41.9 KB · Views: 2
  • SNAG-2021-12-15 11.09.20 PM.jpg
    SNAG-2021-12-15 11.09.20 PM.jpg
    40.8 KB · Views: 2
Last edited:

Susquatch

Ultra Member
Administrator
Moderator
Premium Member
Great work @PeterT !

To further complicate the matter, I found the article linked below which outlines the history of the Morse taper and coincidentally also puts it into the medical context I mentioned earlier.

For those not wanting to read the nitty gritty details, Morse invented his now famous taper in 1864 - long before precision measuring devices were available and perhaps more importantly long before modern mathematical calculators and computers were available. The "standard" was formally established using a standard taper gauge that Morse made and submitted to the Bureau of US standards. In other words, it's just like the King's foot and the metric conversion of 2.54. Nothing really practical or magic at all. Just an arbitrary reference object that could have been way off of anything you or I would choose.

According to the published article, "A Morse taper is defined by the angle that the taper surfaces make relative to the longitudinal axis of the component and by the mismatch angle between the male and female part. The original Morse taper angle defined by Stephen Morse for tools was a relatively small angle of 2° 50′, with the mathematical relation that tang 2° 50 = 5 %."

All of which TOTALLY agrees with what I remember being taught by an old man - about 55 short years ago.

Note in particular the 5% grade objective.

Also note the reference to different angles between the male and female parts. I have no idea what that is all about but it begs some more digging and a few more calculatory and physical comparisons.

Knowing all this and especially the physical standard, lack of precision measurement tools, and the lack of calculators & computers, I'm not sure that establishing precise numbers with 8 digits of precision makes any sense at all. In that context, I think it's a wonder that Morse Tapers today work as well as they do!

For those who are so inclined, here is the published article I refer to:


trlvn

Ultra Member
Interesting that from MT0 to MT7, each has a different amount of taper per foot. MT7 at 0.62400 inches per foot is the closest to a round number of any of them. As noted, all of them are very close to 5%--but not exact.

I wonder if Stephen Morse was employing that century's version of 'vendor lock-in'? IOW, if any company wanted to produce tooling compatible with Morse Tapers, they would have to obtain reference gauges from Morse's company. Which presumably would require a licensing agreement and royalties! People of that century certainly knew how to make money.

BTW, Machinery's Handbook mentions that Jarno tapers, as a counter example, always taper at 0.600 inches per foot.

Craig
 

Susquatch

Ultra Member
Administrator
Moderator
Premium Member
Interesting that from MT0 to MT7, each has a different amount of taper per foot. MT7 at 0.62400 inches per foot is the closest to a round number of any of them. As noted, all of them are very close to 5%--but not exact.

It's easy for me to see how that would happen.

Every time there was an improvement in measuring precision, or a new update of a standards handbook, or a new product offering, somebody would go into the national standards office, measure "the standard", and a new different or updated or revised number would show up.

I'm also wondering about that comment in the history writeup about the female and male angles being different. I can't really see why that would be, but it might explain why the different sizes seem to have different tapers.
 

LenVW

Process Machinery Designer
Premium Member
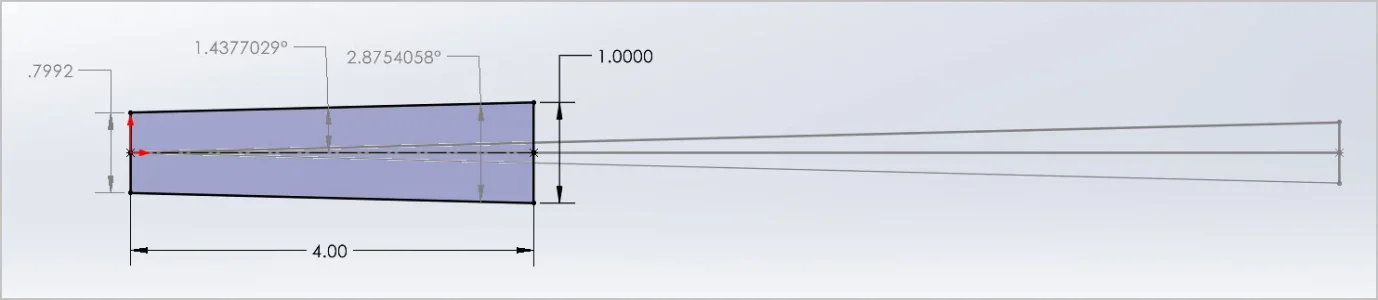
I believe that the original Morse taper as set by Mr Morse himself was not a measurement of the difference in diameter but rather was a specific angle of 2 degrees 50 minutes. I recall that this angle was chosen to arrive at a grade of 5%, but I can't make perfect sense of that just off hand.

By my math, a 5% grade actually has an angle of 2 degrees 51.6 minutes. Which is pretty darn close to the 2 degrees 50 minutes that I remember. Maybe it's "close enough???

I was also told that this angle was arrived at experimentally as optimum for good solid thrust retaining as well as ease of disassembly. Less angle would stay together well, but couldn't be disassembled easily. If so, then surely 51.6 degrees really is close enough to 50, so why keep an awkward number..... Though 5% is probably less awkward than 50 minutes.......

On reflection, I wonder if this small difference might be the variation that you have experienced @PeterT ?

Other tapers with different angles (eg Jacobs) claim the same benefit though so.....

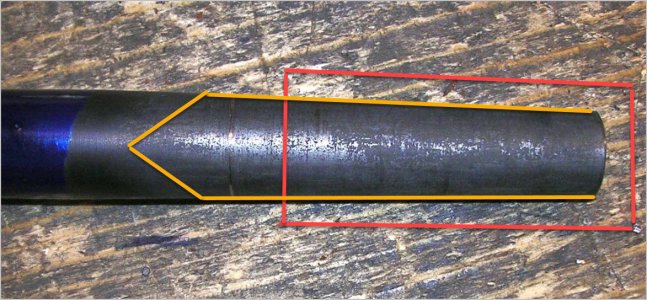
Recall, that Morse tapers were (and still are) primarily used for thrust applications (drill press, etc).

I think it's relevant to know that Morse was also the guy who invented twist drills and the original drills were made with Morse taper arbours.....

I suspect that the different angles you see everywhere are the result of the medical industry playing around with the numbers to achieve good bone interference fits for joint and bone osteoplasty which didn't work well using the original angles because of the dissimilar materials.

Coincidentally, I learned this latter fact from a bone prosthetic specialist I met in Edmonton. I stayed at his house while I judged a dog trial East of there. I accept what he told me.

In other words, there is no magic in the Morse Taper standard. It's kind of like the original foot or even the new meter (both just arbitrary numbers) one original based on the King's foot size and the other based on a specific arbitrary conversion of one inch = 2.54 cm.

Anyway, thats my old memetic version of the Morse Taper for whatever that is worth. It may or may not be correct.
Any taper works well to centre the tool and provide additional contact surface to drive the torque required for the operation. It depends on your choice and the spindle of the machine that you have.
Tapers accompanied by a ‘Drawbar’ are my choice for a secure tool connection because you are centred and maintain vertical position along the spindle centreline.
Morse was an auto mechanic who gained notoriety by having a National Standards Organization recognize the application of the taper. The recognition he received was much more important then the technical innovation of the taper.
It was another example of an application of basic mechanics and standardization that led to the Morse Taper becoming a common part of twist drills and machine spindles.
 

YYCHM

(Craig)
Premium Member
Well.... I went back to examining my taper attachment setup only using a DI this time....

Ruler1.JPG

To this end I mounted a 6" steel ruler on the guide bar as a distance reference using double sided tape. 12" wouldn't fit on the bar as it's only 8" long. 6" makes a nice reference for MT2 as 1" amounts to .025" offset and 6" comes to 0.15" offset. Initially I mounted the ruler at the end of the bar.... Well guess what... when you tried to set one end of the bar the zero location would shift.... Doha....

Ruler2.JPG

Locating the end of the ruler at the bar pivot point worked much much better LOL...

Taper.JPG

This time the target length was way closer to what it should have been. Rather than using felt marker, I darkened the taper with some Aluminum Black I had laying around. It appears to fit my MT3/MT3 sleeve really well but there is a very shallow rub mark at the 0.7" location. This taper actually extends out to 0.75" so, I'm wondering if I need to create a bit of a step at the 0.7" location so that it can't hang up at the sleeve entrance?

Craig
 
Last edited:

PeterT

Ultra Member
Premium Member
Not quite sure I understand your question, but you can extend the arbor length outside your socket & make it any kind of shape you prefer. The objective is have lots of contact inside the socket, after that , really up to you. Sometimes turn a cylindrical section adjacent to point segment which you could hold in lathe collet to do some end machining or whatever. I its just taper to taper then only option is insert into MT headstock socket. Sometimes the point section is double double tapered (necked down) for tool clearance. I think your first one was a it close to the quill barrel, might make it harder to get a cutting tool in there depending on the dimensions & depth of center relief. Now that you can make them, the sky is the limit. I would be a bit fussy about surface finish though. It will fit better & also reduce making marks inside your socket if it does happen to spin.
 

Attachments

  • EDT-2021-12-16 10.07.11 PM.jpg
    EDT-2021-12-16 10.07.11 PM.jpg
    210.9 KB · Views: 1

jcdammeyer

John
Premium Member
Here's a section from page 27 of my ELS user manual.
LIST: -------------------- |PREDEFINED TAPERS | |MRSE JACB ASRT CSTM | -------------------- Selecting any of the predefined tapers is done by scrolling through the list of tapers with the up/down selection keys and tapping the ENTER key to select a specific taper. The chosen taper value is stored into the DISTANCE menu entry. MRSE: -------------------- | MORSE TAPER LIST | | MORSE #0 | -------------------- MORSE 0 to 7 are in this list. ASRT: -------------------- | JACOB TAPER LIST | | JACOB JT33 | -------------------- JACOB from #JT1 to JT33 ASRT: -------------------- |ASSORTED TAPER LIST | | R8 TAPER | -------------------- This list includes R8, 5C , 3C, IT (7/24)

Looking at the code in the MenuScript.c file:
const rom TMENU_LIST MorseTaperList[NUMBER_OF_MORSE_TAPERS] = { { // Saved as Inch per Foot included (i.e. Change in diameter per foot) "MORSE #0 ", 0.6246 }, { "MORSE #1 ", 0.59858 }, { "MORSE #2 ", 0.59941 }, { "MORSE #3 ", 0.60235 }, { "MORSE #4 ", 0.62326 }, { "MORSE #5 ", 0.63151 }, { "MORSE #6 ", 0.62565 }, { "MORSE #7 ", 0.62400 } };

John
 

Susquatch

Ultra Member
Administrator
Moderator
Premium Member
Looking at the code in the MenuScript.c file:

Holy smokes...... Quite a bit of variation without obvious ryhme or reason. But exactly the same numbers as published in the Little Machine Shop chart shared earlier.

But even so, it's only a few thou difference across a foot. A few thou might matter over a short distance, but I seriously doubt that it matters one iota over a foot.

Sometimes I think we get too caught up in excessive precision because we can read it on digital instruments (that are probably not right). Yet another reason that I prefer analog.
 
Last edited:

PeterT

Ultra Member
Premium Member
Is ELS shorthand for Electronic Lead Screw?

The value for MT3 is identical to what I pulled out of Machinery Handbook
1639760598775.png
 

jcdammeyer

John
Premium Member
Is ELS shorthand for Electronic Lead Screw?

The value for MT3 is identical to what I pulled out of Machinery Handbook
View attachment 19075
Yes. Electronic Lead Screw. That's because when I wrote the code for it back in 2006 I used the Machinery handbook for a reference. So all the numbers are from that. I tested a few of the tapers using my Gingery Lathe which did create ones that matched the various tapered holders I had on hand.
 

YYCHM

(Craig)
Premium Member
Not quite sure I understand your question, but you can extend the arbor length outside your socket & make it any kind of shape you prefer. The objective is have lots of contact inside the socket, after that , really up to you. Sometimes turn a cylindrical section adjacent to point segment which you could hold in lathe collet to do some end machining or whatever. I its just taper to taper then only option is insert into MT headstock socket. Sometimes the point section is double double tapered (necked down) for tool clearance. I think your first one was a it close to the quill barrel, might make it harder to get a cutting tool in there depending on the dimensions & depth of center relief. Now that you can make them, the sky is the limit. I would be a bit fussy about surface finish though. It will fit better & also reduce making marks inside your socket if it does happen to spin.

TaperSketch.jpg

Peter, where your socket ends (little arrow) is actually further ahead (big arrow) and you can see a very shallow and faint score mark there (big arrow). I'm just wondering if I should stop the taper at big arrow so that it can't hang up at the socket entrance. I.E. taper to 0.7" and not 0.75". As for surface finish that piece of steel is some 3/4" c..p I got at Rona. It feels smoother than it looks, the Aluminum Black makes it look rough, almost as if it etched it.

Craig
 
Last edited:

PeterT

Ultra Member
Premium Member
Hard to say. A negative gouge on your arbor likely means you have a positive burr on the female surface. Like, as you turn the blank to test fit, the its scribing a little line on the arbor? Maybe a ding on the external quill edge which raised the lip? Or ramming a tool in & trapping some debris? What typically happens when you make a dent in a metal surface is it raises material on the adjacent area. That's the reason for stoning way surfaces (planing off the micro hill tops). I wouldn't go crazy lapping or anything until you've checked it out but logically could be he issue. Having the arbor in or out a little bit probably wont affect rigidity, but its more typical to have full contact & extend the point more.
 

Attachments

  • SNAG-2021-12-17 2.44.24 PM.jpg
    SNAG-2021-12-17 2.44.24 PM.jpg
    8.9 KB · Views: 0

PeterT

Ultra Member
Premium Member
Yes. Electronic Lead Screw. That's because when I wrote the code for it back in 2006...
Wow good for you. I know someone who built the Clough42 model & recently showed it running. ELS has to be one of the best enhancements one could add to a metal lathe. Crazy threads? No problem.
Have you turned some tapers you have pic of? Maybe I missed it or you are getting to that one day.
 

jcdammeyer

John
Premium Member
My ELS was designed and built just after the 'FROG' was discontinued. There was nothing else available and two of the main metal working forums blasted the idea of even having an ELS as why not just use LinuxCNC or MACH2...

So we formed the E-Leadscrew Yahoo group and set up strict rules for staying on topic. That was over 14 years ago. Now although I still have some inventory left I couldn't build it this way from scratch again. I'm like so many North American manufacturers essentially put out of business by China. None of the other Electronic Gear Systems based on Arduino (they call them ELS but not really an ELS like mine) only exist because all the parts are sold at lower prices than you can make here using only North American suppliers. Even now the PC board if made by a local Vancouver firm would cost more than all the parts for an Electronic Gearing System.

Anyway. With respect to tapering. A very old video. I'll see if i can find a photo of the R8 piece I made for testing that taper.


I've turned some wood tapers with 3 degrees for draft to be part of casting patterns but because only my Gingery has the powered X axis I don't use the taper feature on my South Bend. It has a mechanical taper attachment so I've used that when I've needed a taper. One day I'll power the cross slide on it too.
 

jcdammeyer

John
Premium Member
My ELS was designed and built just after the 'FROG' was discontinued. There was nothing else available and two of the main metal working forums blasted the idea of even having an ELS as why not just use LinuxCNC or MACH2...
These are all from 2006/2007.
 

Attachments

  • R8Sample.JPG
    R8Sample.JPG
    113.3 KB · Views: 4
  • MT-2_taper.jpg
    MT-2_taper.jpg
    36.1 KB · Views: 4
  • MT-1_taper.jpg
    MT-1_taper.jpg
    62.1 KB · Views: 4
Top