• Scam Alert. Members are reminded to NOT send money to buy anything. Don't buy things remote and have it shipped - go get it yourself, pay in person, and take your equipment with you. Scammers have burned people on this forum. Urgency, secrecy, excuses, selling for friend, newish members, FUD, are RED FLAGS. A video conference call is not adequate assurance. Face to face interactions are required. Please report suspicions to the forum admins. Stay Safe - anyone can get scammed.

Machine I hate my change gears!

Machine

VicHobbyGuy

Ultra Member
We have opposite problems. My minimum feed rate is a half thou/rev, but my minimum speed is only 70rpm. I'd like to get the speed down to 45 or so.
With the back gears the Logan will do as slow as 70 or 30 rpm, depending on the motor belt position.
 

VicHobbyGuy

Ultra Member
Actually other than creating a keypad template and boxing it up (there are 3D prints for that now too) there is no soldering required on my ELS kit anymore. But you do have to box it yourself.
Thanks, John. I joined your group at groups.io and I'll do some reading there. For now I'm going to see if I can get a stepper motor belted to the end of the leadscrew with a simple controller for speed and rotation direction. If that's successful, I may move on to an ELS at some point.
 

jcdammeyer

John
Premium Member
Thanks, John. I joined your group at groups.io and I'll do some reading there. For now I'm going to see if I can get a stepper motor belted to the end of the leadscrew with a simple controller for speed and rotation direction. If that's successful, I may move on to an ELS at some point.
There's a lot of history in that group.
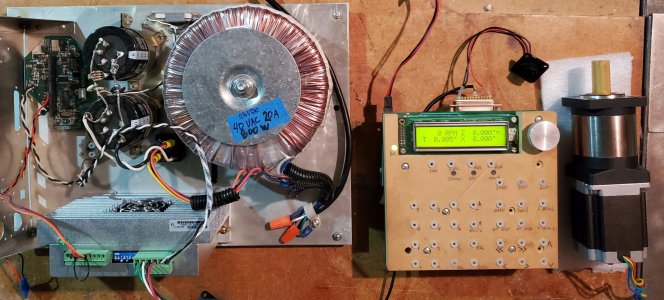
Here's the thing. The photo here is of ELS #1. Used a surface mount processor instead of a 40 pin DIP package which our list members thought would make it easier to update software.

I'm connected to a Bergerda Stepper driver good to 6A and that's connected (set for 3A) to the Size 23 motor I bought through Amazon. Has an 8mm shaft which fits the 25:1 planetary reduction drive I want to use for my power draw bar.

Anyway, I use this one to test things like this. I have another one returned by a customer who toasted the on board stepper drivers by hooking power up backwards. I sent him a replacement under warranty because he told me how he blew it up. That one ran my size 34 stepper motor on the knee of my mill for about 5 years.

What's cool about the test set in the photo is I have the Bergerda set for 1600 steps per rev. That times 25:1 is 40,000 steps per rev. I've set the ELS to think it has a 10 TPI lead screw and a motor driving it with 40,000 steps/rev. Now if I press the >> or << button it moves rather quickly and one full turn shows up on the display as 0.1".

So that's how I test stepper motors and combinations. The only reason I put an ELS on my South Bend Heavy 10L is because it's an imperial machine from 1942. No gears to be able to do metric threading. With the ELS set up for the 1600 step per rev with 2:1 belt drive I have 3200 steps per rev on a 10 TPI lead screw. If set the Metric Operation flag now all dimensions are metric as is motion distances etc. I can set it up to jog with the < or > button any multiple of 0.01mm. And I can do metric threading.

The bore to an unseen position or repetitive turning operations are all just a side benefit of being able to turn metric.

Or I connect the stepper driver to my rotary table and program the < > buttons to move the stepper enough steps to turn exactly 1 degree. Or if I'm doing gear teeth then the distance per tooth. Simple.

At this point in time other than using a PC running CNC software I always use my ELS for mucking with stepper motors or DC servos or AC servos. Great fun. Actually not totally true. I did use a Raspberry Pi4 running LinuxCNC through a MESA 7i92 Ethernet to parallel board to create stepping pulses for a test. So there are other ways.

StepperTestSet.jpg
 

VicHobbyGuy

Ultra Member
I believe that you have a total of 12 speeds on the Logan, 3 high, 3 Low, followed by motor pulley pulley selection 1 and 2.

For those that don't have it here is the gear selection chart.


I believe depending on date of manufacture the speeds are either 35 or 55 bottom end ( earlier models being slower).
I don't really see your point.
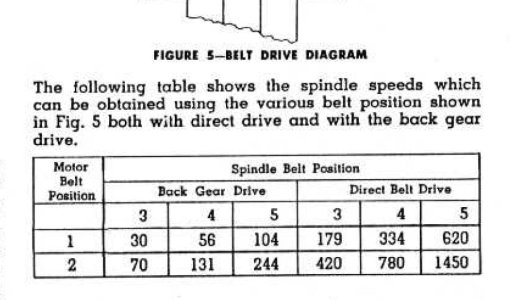
Here's a snip from the Logan 210 manual:
speeds.JPG
I've confirmed several of those spindle speeds using a hand-held tachometer (reflective tape on the spindle), so it seems accurate for my machine.
 

PaulL

Technologist at Large
Premium Member
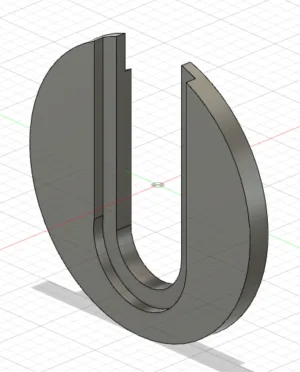
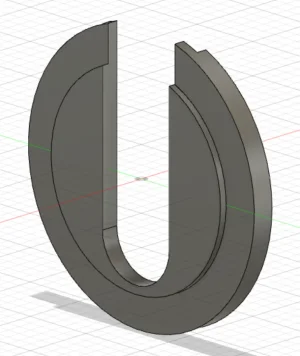
Mucked around in the shop yesterday to make a new clip. Insufficient visualization beforehand. Correcting that now:
1662562487912.png 1662562517062.png
So the order of operations: Turn to major diameter, face off. That face gets the wide slot. Mount vertically in vblock in mill. Cut the wide slot. Cut the deeper narrow slot. Return to lathe, parting tool to depth of the inner diameter. Then part off at the total thickness of the clip.
 

Susquatch

Ultra Member
Administrator
Moderator
Premium Member
Mucked around in the shop yesterday to make a new clip. Insufficient visualization beforehand. Correcting that now:

Is the bigger coin on the narrow slot side the one that holds the clip in place inside the sleeve when the bolt is tightened?

If so, is it possible to make it a wee bit thicker for better engagement? If not, could it be done by cutting the sleeve a bit deeper?

I say this for the obvious reason. The old one kept coming out.
 

Susquatch

Ultra Member
Administrator
Moderator
Premium Member
Mucked around in the shop yesterday to make a new clip. Insufficient visualization beforehand. Correcting that now:

Also, you probably already did this but just in case....

You should check the dimensional stack up to make sure that the overall thicknesses of the gears and washers do not exceed the stack up of the sleeve and clip. If they do, the gears and sleeve won't turn easily and the clip will not be firmly engaged inside the sleeve.
 

PaulL

Technologist at Large
Premium Member
I say this for the obvious reason. The old one kept coming out.
Yes, the smaller "coin" needs to be thick enough to register against the small hub (part 1 in the diagram) and not press its shoulder up tight to the spinning gears. I have dimensions scribbled on a page, and if I was better at Fusion I'd model all the parts and check clearances. As is, I'll likely make a couple of them with different depths to try. I don't expect it to be much of a problem.
 

PaulL

Technologist at Large
Premium Member
Ok, another hour in the shop, some more processes learned.
I've made this little thing, poorly, 4 times. The good news is that it only takes a couple of minutes!
1662598922772.png
First lesson: You can't eyeball center on the mill. 1.5mm out is a huge amount. So I machined a point to fit the same collet as my 8mm end mill and used that to match up to a center drilled into the stock. Much better. Took me three tries to figure that out. Slow thinker.
Fitting it up the arbor I've also learned a critical dimension, which is between the bearing surface for the nut (the first step down) and the back of the piece. That's set by the hub of the shaft and the space to the nut on it, which are in a fixed relationship. So now I need to figure out how I'm going to measure that step. My next step is to set up the Z axis on the DRO, which I've been putting off. Alternately I can figure out what the fine adjust wheel does to the quill, but it looks like a pain to control as well.

I will say the lathe is a joy without the rattling of the change gears! For these little parts it's not bad not having power feed. That's another point in favour of an electronic gear box.

Ok, tomorrow, Z-axis DRO goes onto the mill.
 

PaulL

Technologist at Large
Premium Member
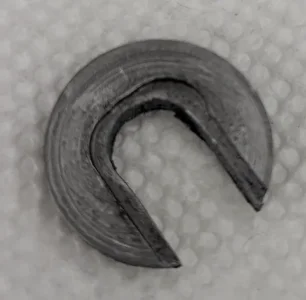
It took a lot of tries to make this little clip, and by being thighter on its tolerances it seems to work better than the one it replaced:
IUC6P4E9_Nik8fCajEa4YY0FCL5qZjR22QeW9UxJfeSGBMA8MQ96KIZkhoaT8XM89JaHBGWEm80UX6WGlF11vEPxL4_FBajIxnofu_eRVbSh_jnQgUcddWHXZTzXHltjtFLUpR4o_Yq623wDBC7eKHY4BSlyqGQNKymhLkXR2HsnJHFesgXgKePZQnprU2H3nTMJb9QLc6eZAGar2kehMGB-NjGbL4sH1FvQuMrArWm36VK5v5TOYsDvNJlfJbNcrK4JFGLjKIeIoggV8raZbO_bQyS9W9QKCcBR3hC-xbDhVAUCL6TioOKHkkI9Q3H_8vqrvy4Hcim3I5wCczf3zaSoqvCCmB9W1tXpoSKIbskanU_JcU9VQ2-ZqCBJ3f2CWwOOBJO1jhd6oVBjDxLPdvxJ45c9V1rXsqHh4L-zUUWYkOJLXFb_GtoLHEt5uz8sjubt_Z_my-VKAYcX1vozVFpVllZhjwpPH-8iSrj5Dm5IypCi3_qwykJt6lKqTStOCyXEFnJINIUF9XFUdmS0lKf0p-0ZS4nHxqV3rq9d_RNxXrBZKaGk_erAxBtRJ_-_Enaps4H2qT0P8J4yR3RxNmVjswhdvSWd6hyCLkBBCkMDEQ6sSw_b4_5k6Q78ANovDrjVX6PQvfVHjXsaWiVwqa7aD68H3og2zymItj4JDxUBUBb12SY5Vyk1HFC1L4ZaZCYhqQlhLAv-5zm0lKIpfkmPHtT4fP77ij1cR4TofQ4ZHUxxdr0zzB-4JbCn=w1964-h2608-no

I think the improved performance is purely from being a tighter fit between the nut and its fixed shoulder. It's tempting to make one with a retainer across the open gap, though that would be fiddly AF to do.
Now back to my drawbars for the MT3 ER32 spindle - one for the lathe, and a short one for my indexing fixture.
 

Susquatch

Ultra Member
Administrator
Moderator
Premium Member

PaulL

Technologist at Large
Premium Member
Here's a tool for my tools ;-)
NK_d8ARmaWmehiqAFE6il5tub4JYyslwqvO8UDeBdp3Y5lOjEIvzGhwK4yQS6lD5l2apTJZ1_oyUHWi43Zwa6if57em4YX07FIvQCmaF7bInTj4rbDoq78kqRliak26S9GFAmVtAkACNpxwgwBEHBi8e35Hsv8AUKql0wk18YShvmDg-71UYUSsB_PCSaNLfBpIW6-8td6MrJFHZ7evuVIBDwJ9gvc8yacoZ7pk598JcfhZODwfpi3-viLjjzxUUI1JgC0lMgHJfMW51TPeaA3q12PBeVB6OPkvnKK0NodZVpk2afDRasYFcOL-6Y4gHYZzimhl6DsiufYWX__wcUBLeC3mPZZB_BXlX9YNhJ-0MKhDeT2eKjLmGUKTm23FFZa7tJUHtDpGtYDXLf52UJ8UmwbC38REiiXJeIgkaJxWOdOVpc1w0yeObiCecthYAGtTcxkkI-J6JRCTfB6JdEFS0Mrn6zWwPzydVe0BXS5qoNd2zLkHbyr2p94AJT44Ae4w5qVNeyE4cwcKBG_2f2ccAMOFDFDSBgcOXhQE5xb4irpdi3-7jIv-Ta6xRrP0DJJN3WvjUEoxhw_5utSBZf7DuZzgCgRuBQI7tk__vN0bP5OtDaIUyDH4ZoCXRKUuGO2bGM83fxY5yQcdMl7zfAF5YG4vKHBnJ9t30iQyUPaj82gQA2ynUGpufczWZdc5nwkrfQ-HyVxKUNhSWD3mPOyTZYAMIturcu_8EzmD7pKtkAAmniJiBMpFGnUw3=w2050-h2722-no
tpZnpJzjJa5iPDe3kVwCZQWyRQtRDS1M_P91HLyv_zfgtk06Xa7DB_KBmt615hLT85mdCRUGha_YcRtcCYXxEEgpBDzPndMOdTx5LX7-SonbjagqjJJazHQ2oaIt2LF2P_Sf4kT6LvkMCQ4qWlEuiCmCajDbF0rro2znF9JW1IUGthFw1kvyP8izFB3qM3MNNC6zJvBL41mRQy86O3w0KSi6mu6l6PNDti1SAx3_W_nQEcyJTeWvlvF8LCaxK9_ldcq3Ywnqe0idvXBzGVERYpMmPlVYDemSlZr_kaSU9wrftsZHsTvS7ryClFTh1nTQTrtWE0zWgmLPbcJnrVpcO2NK4mnB6UMQGlnfZhyjHXzMUynL5F66-4n7XK8Pyx3Arp6YpVbmG5T5yER5zIyE3mWIU5EoS5ZneEQpIvI1c-7Pr_2_B3xElmeaBR8_VjHy_ZkdiP8MqQ0t6gdeCNBhynR6uzAsswMnRwNv_7SLC8cgekbDQe7_og2Ipo3GFRT2bE4KKf9kXpU4Q8LXrutiPXp_reyR57t6groINtPpsf2wN9TgO2oo-ZwDic-qjqWh5-PO3K1-R8bNGF8e2WHGo6RqO9qcN4WpEewzzrRZu-gki_MHQrRChh3bSLlobYCupsSwIk9RRU4dbRQtSPjRs2MBbKNI7vA6j7pBglUke2sFsBjo3fLdIa-13zD0kBeRxoLgTVmJmQNPGIwPdP97jC9DZUBEGjOLP1nxgKYuueG3LxcfwvX8FPqJ-FWaingsUZDLG_bq_EiFz3bcwscDjhqW9Wy_JxUBymUryu_pE4dJ7-XAEiZ7R1vkWdOL7xvFB_RwJK38swsQaFrPQXDjgC5glZr37Gj3VxwBF0leMMaAv1WLaVGhDysmqS8ZVcU6JoIJGmcU-YbqzIujlO_32Z50msyK-FXnLt3p8r0=w2050-h2722-no
na4v9u3DnS_NSWGrzzt1jC22gSYn7gwVSyli77T8TfAO0MoOAvvlU43DmqYoOj3yoIx873ttNDLO9Pzllwl-H3zsjznlWxH-POJ8iW0zL2GCje-njDuJWA8c0u3PghelJ7VWLeyfH6hlMJjd16M0uihSsxzgykNRtiZl9D1gSK6YJyZeVmutKzCAHa1jsm0hNzFksyRhOKLnxxN4hHVe-CWDskm5xKlW3cdR7f-mLZxusz6bRUJ0LwryWQWetueqJMttUFaw0LC7Tozrjz1G2YgM0wOqXV4MeJoFxZlQQuFYh7fx6gMt8NjNW4ag-M9upLDi70WZ81l4dVOH3TM_fZYa8tkzj8CLyDMBqP5r3WTomXg8L09LO5CDU_rSV9malvfjp3j53mKs7AFLyjP4v-wlqBLN6BFQ_SGEbQNX_Ei3EA3rRmYzzkrvlJR6tUQuWI9VlGJmtYSov5LAQX8DdMx6618lGzNRqXy3KUSrpJkZVYmNd0vspq8hyWUqw8CPhq6EUXdhlocjQXOusWq9FOjdROJovkIM1XRZx8yHYx5SaRZEiIVZE_yulmAcczdqp3_XoQBbyGJWGJXnymE5QuyAxo-AoTMA-qUeMZnxqJuSio9_CRG0MHUl7eybzIyWVRtKQ4idTqDG2hVeactbnKCvZsnx-buHvp88fDDp1mv_5yKjH57b95gtqO3_c2lV0E743wZYuklGrCzXrghyfG774uCc6sKGXS9kh4bwp8lguv-fVgcGZcKYxei9=w2050-h2722-no

Drawbars are simple enough, but there's lots to learn! In any case, I can now use my ER32 collets in the lathe. MT5 sleeve to hold the MT3 taper adapter and hauled on with the drawbar.
The big washer on the bar started life as a chunk of 2.75" cast iron that will become bearings in my indexing jig, and I was glad for the opportunity to take a slice and see how cast iron turns. That's remarkably slippery stuff.

Next is to finish up the miniature drawbar that holds the same MT3-ER32 adapter in the spindle of the indexer.
 

DPittman

Ultra Member
Premium Member
Here's a tool for my tools ;-)
NK_d8ARmaWmehiqAFE6il5tub4JYyslwqvO8UDeBdp3Y5lOjEIvzGhwK4yQS6lD5l2apTJZ1_oyUHWi43Zwa6if57em4YX07FIvQCmaF7bInTj4rbDoq78kqRliak26S9GFAmVtAkACNpxwgwBEHBi8e35Hsv8AUKql0wk18YShvmDg-71UYUSsB_PCSaNLfBpIW6-8td6MrJFHZ7evuVIBDwJ9gvc8yacoZ7pk598JcfhZODwfpi3-viLjjzxUUI1JgC0lMgHJfMW51TPeaA3q12PBeVB6OPkvnKK0NodZVpk2afDRasYFcOL-6Y4gHYZzimhl6DsiufYWX__wcUBLeC3mPZZB_BXlX9YNhJ-0MKhDeT2eKjLmGUKTm23FFZa7tJUHtDpGtYDXLf52UJ8UmwbC38REiiXJeIgkaJxWOdOVpc1w0yeObiCecthYAGtTcxkkI-J6JRCTfB6JdEFS0Mrn6zWwPzydVe0BXS5qoNd2zLkHbyr2p94AJT44Ae4w5qVNeyE4cwcKBG_2f2ccAMOFDFDSBgcOXhQE5xb4irpdi3-7jIv-Ta6xRrP0DJJN3WvjUEoxhw_5utSBZf7DuZzgCgRuBQI7tk__vN0bP5OtDaIUyDH4ZoCXRKUuGO2bGM83fxY5yQcdMl7zfAF5YG4vKHBnJ9t30iQyUPaj82gQA2ynUGpufczWZdc5nwkrfQ-HyVxKUNhSWD3mPOyTZYAMIturcu_8EzmD7pKtkAAmniJiBMpFGnUw3=w2050-h2722-no
tpZnpJzjJa5iPDe3kVwCZQWyRQtRDS1M_P91HLyv_zfgtk06Xa7DB_KBmt615hLT85mdCRUGha_YcRtcCYXxEEgpBDzPndMOdTx5LX7-SonbjagqjJJazHQ2oaIt2LF2P_Sf4kT6LvkMCQ4qWlEuiCmCajDbF0rro2znF9JW1IUGthFw1kvyP8izFB3qM3MNNC6zJvBL41mRQy86O3w0KSi6mu6l6PNDti1SAx3_W_nQEcyJTeWvlvF8LCaxK9_ldcq3Ywnqe0idvXBzGVERYpMmPlVYDemSlZr_kaSU9wrftsZHsTvS7ryClFTh1nTQTrtWE0zWgmLPbcJnrVpcO2NK4mnB6UMQGlnfZhyjHXzMUynL5F66-4n7XK8Pyx3Arp6YpVbmG5T5yER5zIyE3mWIU5EoS5ZneEQpIvI1c-7Pr_2_B3xElmeaBR8_VjHy_ZkdiP8MqQ0t6gdeCNBhynR6uzAsswMnRwNv_7SLC8cgekbDQe7_og2Ipo3GFRT2bE4KKf9kXpU4Q8LXrutiPXp_reyR57t6groINtPpsf2wN9TgO2oo-ZwDic-qjqWh5-PO3K1-R8bNGF8e2WHGo6RqO9qcN4WpEewzzrRZu-gki_MHQrRChh3bSLlobYCupsSwIk9RRU4dbRQtSPjRs2MBbKNI7vA6j7pBglUke2sFsBjo3fLdIa-13zD0kBeRxoLgTVmJmQNPGIwPdP97jC9DZUBEGjOLP1nxgKYuueG3LxcfwvX8FPqJ-FWaingsUZDLG_bq_EiFz3bcwscDjhqW9Wy_JxUBymUryu_pE4dJ7-XAEiZ7R1vkWdOL7xvFB_RwJK38swsQaFrPQXDjgC5glZr37Gj3VxwBF0leMMaAv1WLaVGhDysmqS8ZVcU6JoIJGmcU-YbqzIujlO_32Z50msyK-FXnLt3p8r0=w2050-h2722-no
na4v9u3DnS_NSWGrzzt1jC22gSYn7gwVSyli77T8TfAO0MoOAvvlU43DmqYoOj3yoIx873ttNDLO9Pzllwl-H3zsjznlWxH-POJ8iW0zL2GCje-njDuJWA8c0u3PghelJ7VWLeyfH6hlMJjd16M0uihSsxzgykNRtiZl9D1gSK6YJyZeVmutKzCAHa1jsm0hNzFksyRhOKLnxxN4hHVe-CWDskm5xKlW3cdR7f-mLZxusz6bRUJ0LwryWQWetueqJMttUFaw0LC7Tozrjz1G2YgM0wOqXV4MeJoFxZlQQuFYh7fx6gMt8NjNW4ag-M9upLDi70WZ81l4dVOH3TM_fZYa8tkzj8CLyDMBqP5r3WTomXg8L09LO5CDU_rSV9malvfjp3j53mKs7AFLyjP4v-wlqBLN6BFQ_SGEbQNX_Ei3EA3rRmYzzkrvlJR6tUQuWI9VlGJmtYSov5LAQX8DdMx6618lGzNRqXy3KUSrpJkZVYmNd0vspq8hyWUqw8CPhq6EUXdhlocjQXOusWq9FOjdROJovkIM1XRZx8yHYx5SaRZEiIVZE_yulmAcczdqp3_XoQBbyGJWGJXnymE5QuyAxo-AoTMA-qUeMZnxqJuSio9_CRG0MHUl7eybzIyWVRtKQ4idTqDG2hVeactbnKCvZsnx-buHvp88fDDp1mv_5yKjH57b95gtqO3_c2lV0E743wZYuklGrCzXrghyfG774uCc6sKGXS9kh4bwp8lguv-fVgcGZcKYxei9=w2050-h2722-no

Drawbars are simple enough, but there's lots to learn! In any case, I can now use my ER32 collets in the lathe. MT5 sleeve to hold the MT3 taper adapter and hauled on with the drawbar.
The big washer on the bar started life as a chunk of 2.75" cast iron that will become bearings in my indexing jig, and I was glad for the opportunity to take a slice and see how cast iron turns. That's remarkably slippery stuff.

Next is to finish up the miniature drawbar that holds the same MT3-ER32 adapter in the spindle of the indexer.
Nice. I think you will like having the accuracy of a collet system in your lathe. I made a similar setup for my lathe years ago and really like it. My collets are a bit of an oddball OZ25 but they have great holding ability.
 
Top