• Scam Alert. Members are reminded to NOT send money to buy anything. Don't buy things remote and have it shipped - go get it yourself, pay in person, and take your equipment with you. Scammers have burned people on this forum. Urgency, secrecy, excuses, selling for friend, newish members, FUD, are RED FLAGS. A video conference call is not adequate assurance. Face to face interactions are required. Please report suspicions to the forum admins. Stay Safe - anyone can get scammed.

Machine I hate my change gears!

Machine

PaulL

Technologist at Large
Premium Member
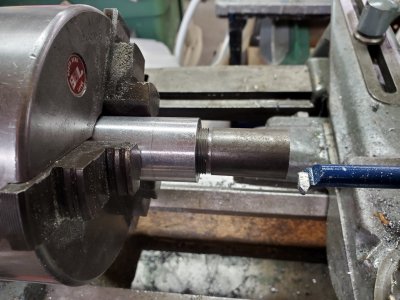
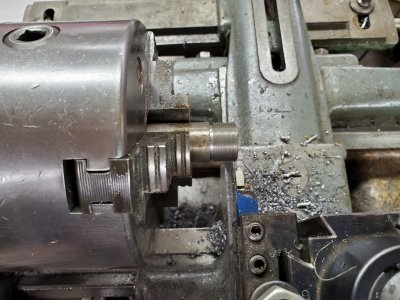
I'm at my kitchen table instead of at my lathe. I just want to cut the 1/2"-13 thread for a lead screw to hold my MT3-ER32 collet adapter. I tried with a die, but there's more tool pressure than I or my 3-jaw can hold. So I thought I'd single point it. I've done it before, it should be easy.
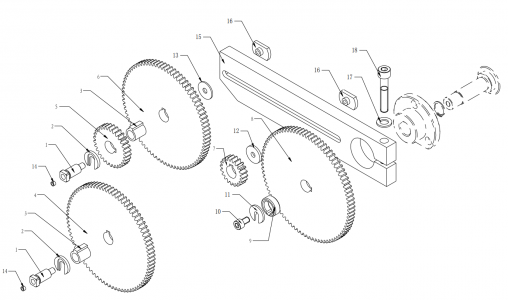
Except for this horrific contraption to set lead screw speeds:
1662309503177.png
Most of it seems quite harmless. It's covered in black mess, and the gears need their axle-holes reamed out before they fit on the shafts. I can almost live with that. There's even a safety interlock on the cover to keep my fingers out of the meat grinder. But clip "2" in the diagram is completely lost on me - I can't get the little buggers to stay on while allowing part "3" to rotate on the shaft - tighten down the nut on "1" enough to hold them and the shaft seizes up, don't do so and hear the clip get flung off after a minute or two.
The clip is recessed on the front to accept the nut. On the back (not seen in the diagram) there's a proud section that seats into the gear (or the spacer...don't get me started about the spacers "9").
Anyone have advice on how to deal with the clips? I've resorted to shims between the gears to take up slack, and though fussy it seems to help.
Mind you, today, after two failed attempts to cut these threads (spoiling the part the second time) from throwing the clips off halfway through the operation, I'm very much thinking of binning the whole lot and installing an electronic lead screw. Advice welcome in this direction as well.
 

gerritv

Gerrit
There is a right and wrong way to install those clips. The goove in it needs to be facing you. Otherway around it will bind. And you have to arrange things so that the clip drops down from top, gravity holds it in place.

I kept a pair of latex gloves nearby for handling the gears.
 

Proxule

Ultra Member
There is a right and wrong way to install those clips. The goove in it needs to be facing you. Otherway around it will bind. And you have to arrange things so that the clip drops down from top, gravity holds it in place.

I kept a pair of latex gloves nearby for handling the gears.
Exactly!

another option is a split die to sneak up on those threads vs. 1 shot full depth
 

gerritv

Gerrit
I snug up the shaft with a 10mm wrench at the outboard end, nothing super tight. At that point the gear rotates smoothly. The horseshoe keeper just drops down in its slot.
 

DPittman

Ultra Member
Premium Member
I'm at my kitchen table instead of at my lathe. I just want to cut the 1/2"-13 thread for a lead screw to hold my MT3-ER32 collet adapter. I tried with a die, but there's more tool pressure than I or my 3-jaw can hold. So I thought I'd single point it. I've done it before, it should be easy.
Except for this horrific contraption to set lead screw speeds:
View attachment 26162
Most of it seems quite harmless. It's covered in black mess, and the gears need their axle-holes reamed out before they fit on the shafts. I can almost live with that. There's even a safety interlock on the cover to keep my fingers out of the meat grinder. But clip "2" in the diagram is completely lost on me - I can't get the little buggers to stay on while allowing part "3" to rotate on the shaft - tighten down the nut on "1" enough to hold them and the shaft seizes up, don't do so and hear the clip get flung off after a minute or two.
The clip is recessed on the front to accept the nut. On the back (not seen in the diagram) there's a proud section that seats into the gear (or the spacer...don't get me started about the spacers "9").
Anyone have advice on how to deal with the clips? I've resorted to shims between the gears to take up slack, and though fussy it seems to help.
Mind you, today, after two failed attempts to cut these threads (spoiling the part the second time) from throwing the clips off halfway through the operation, I'm very much thinking of binning the whole lot and installing an electronic lead screw. Advice welcome in this direction as well.
Make sure those clips are in a position that if it rotates slightly as you tighten your gears in that the clip becomes more likely to hang on as opposed to more likely to fall out. Example because the clip relies somewhat on gravity to be held in place make sure the slot is a bit more counterclockwise than clockwise as when you tighten the assembly in the clip make rotate a bit cw and be more likely to fall out.
 

SomeGuy

Hobbyist
1/2-13 isn't too hard to die cut though? I wouldn't be trying to cut it in full in the lathe though, I'd be clamping in a vise (hopefully you have something to hold on to, otherwise ignore this reply), and just doing it by hand, 1/8 to 1/4 turn at a time before backing up. Slow but it will work.

That said, I agree, change gears are fiddly...have to muck with gear mesh, how tight things are, making sure the stack up is right, etc. it's easy enough once you get the hang of it, but it's not what I'd consider fun the few time I've done it now. I see why people say a quick change gear box is a must have...I'd still go with nice to have, since both lathes can accomplish the same thing, and with change gears you could theoretically make up your own ratios if you wanted lol
 

mickeyf

Well-Known Member
"allowing part "3" to rotate on the shaft"
I suspect this is not quite what you mean. That gear is keyed, and should rotate with the shaft, not on it.

<del>If/del> When you are able to single point, if you do it even "half way" you can then finish with a die easily. The problem with strictly using a die vs single pointing is that a die sometimes does not cut dead true, and twists around the axis of the piece. Once you have a true thread well started the die will follow it. That said, you can still get a more precise thread depth by single threading than by using a die, in cases where it may matter, such as a lead screw rather than just something you're going to screw a nut onto.

When I had a change gear lathe I never had these issues. But then, it was pretty old, and didn't have clips, only gears held on to the shafts with nuts, which worked just fine.
 

mickeyf

Well-Known Member
"with change gears you could theoretically make up your own ratios if you wanted"

But I've never seen a QCGB lathe that didn't also include at least a few critical change gears, at least those needed to cut metric threads if it was an imperial lathe.
 

SomeGuy

Hobbyist
"with change gears you could theoretically make up your own ratios if you wanted"

But I've never seen a QCGB lathe that didn't also include at least a few critical change gears, at least those needed to cut metric threads if it was an imperial lathe.
True point...I mean you could do really really odd ball stuff if you wanted, like 1/4-21 or something lol
 

gerritv

Gerrit
"allowing part "3" to rotate on the shaft"
I suspect this is not quite what you mean. That gear is keyed, and should rotate with the shaft, not on it.
Yes, that is what I meant :) The gears are keyed to Item 3, which then rotates on the shaft. Item 3 should spin regardless of how much the shaft/nut is tightened. The key serves to lock the 2 gears together, e.g. the 120 and 127 for metric threading. If 3 doesn't spin when things are tightened then that needs to be sorted before going further.
 

VicHobbyGuy

Ultra Member
When I had a change gear lathe I never had these issues. But then, it was pretty old, and didn't have clips, only gears held on to the shafts with nuts, which worked just fine.
That Craftex arrangement with the clips ..:rolleyes:.stuff I never seem to find in 'reviews' of machines. The 7x (much derided) lathes use socket head cap screws to fix the gears on the shafts, and it's not very difficult to change ratios. My recently-acquired 1941 Logan has a more troublesome gear setup. Change gear arrangements seem to be 'all over the place', to my novice eyes.
 

jcdammeyer

John
Premium Member
Couldn't resist the challenge. Boring and threading 1/4" is pretty tough. One would have to make a tap first which is a lot of work.
But take a piece of steel after cleaning up is about 0.85 diameter and a piece of aluminum already drilled to about 0.84. It's true the ID is a bit large for internal threading but that wasn't the point since the piece will be melted down the next time I run the foundry.

The goal was instead of 1/4-21 TPI to go about 0.85-21 TPI.
Easy peazy. Just set TPI to 21.0 on the ELS. Set the BEGIN/END positions. Zero the tool to the edge. Remember to turn the cross slide and compound the right direction at the start/end of each pass. Press START and wait for it to stop before retracting and setting the next depth of cut.

The result is:
Theaded-0.860x21_TPI.jpg

Using the cheap KMS threading tools.
Internal-0.866x21_TPI.jpg

It's a bit loose because the starting ID was too large but the thread pitch is fine.
 

VicHobbyGuy

Ultra Member
Easy peazy.
True..........once one gets past the hundreds (for me, thousands) of hours to climb up that learning curve and do the mod$ and programming, etc.... :)

Anyway, that would take the 'hobby' out of it for me...it's 'pastime' not 'production' .

That said, I think a Craftex CX701 (or similar) might change my mind....
 

gerritv

Gerrit
Indeed, once you go to an ELS you can thread at 400+ rpm to a shoulder without fear :) I haven't removed the change gear stuff because well it's easier to just leave it in place, just not used anymore.
 

Susquatch

Ultra Member
Administrator
Moderator
Premium Member
I'm at my kitchen table instead of at my lathe. I just want to cut the 1/2"-13 thread for a lead screw to hold my MT3-ER32 collet adapter. I tried with a die, but there's more tool pressure than I or my 3-jaw can hold. So I thought I'd single point it. I've done it before, it should be easy.
Except for this horrific contraption to set lead screw speeds:
View attachment 26162
Most of it seems quite harmless. It's covered in black mess, and the gears need their axle-holes reamed out before they fit on the shafts. I can almost live with that. There's even a safety interlock on the cover to keep my fingers out of the meat grinder. But clip "2" in the diagram is completely lost on me - I can't get the little buggers to stay on while allowing part "3" to rotate on the shaft - tighten down the nut on "1" enough to hold them and the shaft seizes up, don't do so and hear the clip get flung off after a minute or two.
The clip is recessed on the front to accept the nut. On the back (not seen in the diagram) there's a proud section that seats into the gear (or the spacer...don't get me started about the spacers "9").
Anyone have advice on how to deal with the clips? I've resorted to shims between the gears to take up slack, and though fussy it seems to help.
Mind you, today, after two failed attempts to cut these threads (spoiling the part the second time) from throwing the clips off halfway through the operation, I'm very much thinking of binning the whole lot and installing an electronic lead screw. Advice welcome in this direction as well.

The lathes I have worked on don't have a washer like that.

I've no idea why this is needed. All my own gears attach with a regular plain washer and a socket head screw in the end of the shaft. The washer holds the shaft key and the gear in place on the shaft.

When I look at your design, I conclude that the washer is designed to ensure that the gears don't slip off of the rotating sleeve and the shouldered bolt is not designed to clamp the clip at all. Any clip clamping would eventually cause it to walk.

My read is that the two gears rotate together on a common keyed sleeve. The sleeve rotates on the shouldered bolt. The bolt is supposed to tighten on the bracket and not rotate. The washer has a recess that fits the head of the shouldered bolt that stops the washer from turning.

I agree with others. The orientation of the shouldered bolt would either help or hurt the washer from coming off. If the washer is clamped, the design won't work. It must be loose and is only held on by gravity. As others have said, the orientation of the shouldered bolt is important. The end washer #13 might need to be a bit thicker or thinner to get both the orientation and the clamping right so the gears and sleeve rotate easily and the clip is retained by gravity. Seems really weird to hold the clip on with gravity. A spring clip would have been better.

The clip appears to be a convenience thing to make changing gears easier. But It might be possible to replace the whole arrangement with a new shouldered bolt and built in washer. That would require removal of the entire bolt and gears when changing gears though. But at least it would not fall off in use.

A few other thoughts. Grease on that clip is probably not a good idea. A really thin oil would be better. Similarly the end of the sleeve and the face of the gears that engage the clip prolly need to be polished. And oiled for low friction.

You might be able to make or find a rubber cup that goes over the end of the shouldered bolt and holds the washer in place.

I like single point threading and don't mind changing gears to do it. But I think if I had to deal with an arrangement like that I might feel otherwise.
 
Last edited:

jcdammeyer

John
Premium Member
True..........once one gets past the hundreds (for me, thousands) of hours to climb up that learning curve and do the mod$ and programming, etc.... :)

Anyway, that would take the 'hobby' out of it for me...it's 'pastime' not 'production' .

That said, I think a Craftex CX701 (or similar) might change my mind....
You just need a demo which I can do here in Victoria, to see that a single axis ELS is pretty well just like a manual gears except you don't have to hover to flip the half nut or wait for the right threading indicator to come around.

Or if turning metric retract the tool, stop the spindle, set it in reverse, track back to the start, set forward with new depth of cut.

Way more tedious.
 

PaulL

Technologist at Large
Premium Member
Just set TPI to 21.0 on the ELS
That's just boasting ;-)

But I think if I had to deal with an arrangement like that I might feel otherwise.
Yes, exactly.

I managed to get out to the shop before decamping to the country. Aligned the clips, which is annoying since they turn as you tighten the nut, until gravity holds them.
I suspect the proud section on the back is supposed to hold them in the bushing's opening somewhat but they are too short for the need.
I'll either make up new ones (easy with the mill, now) or go ELS.
More likely both!
 
Top