• Scam Alert. Members are reminded to NOT send money to buy anything. Don't buy things remote and have it shipped - go get it yourself, pay in person, and take your equipment with you. Scammers have burned people on this forum. Urgency, secrecy, excuses, selling for friend, newish members, FUD, are RED FLAGS. A video conference call is not adequate assurance. Face to face interactions are required. Please report suspicions to the forum admins. Stay Safe - anyone can get scammed.
  • The 2026 Calgary Area Meetup is set for Saturday May 30th at 10am. The signup thread is here! Robinhood has graciously offered to host the meetup again this year. Please note that you MUST RSVP to the notice linked above if you wish to come.

Tips/Techniques Filament Recommendations

Tips/Techniques
Don't forget that as the air cools the relative humidity rises. So by cooling the equilibrium you mentioned might shift towards moisture migrating back into the filament. This is why filament dryers are typically heaters not coolers.

I was not envisioning a sealed container on cooling, only on warming.
 
A freezer brings up new unknowns. Water expands below freezing. Doubtful even humidity saturated filament has enough water content to mechanically damage the material. But when you remove the (now frozen ) material I can see new issues just related to temp. Plastic becomes brittle so any jostling might induce cracking the printer wont appreciate. Also you have to keep it sealed for X time until fully room temp stabilized or its going to attract condensation on its surface which is what were trying to avoid.

Ya, that's why the thrust of my idea changed to focus on putting it in a fridge slightly above freezing.

Once dry though, and then opened, I think that a quick dunk in a freezer for some cold dry air might be a good idea.

And yes, I think any of the big dessicant packs you show would be capable of drying filament. But I also think that a visit to the fridge would be much faster and also increase the life of a dessicant pack before needing a refresh cycle.

Don't get me wrong, I'm not against dessicant. It's just that my experiences using them in a safe or tool cabinet are not great. They also require regular monitoring and maintenance. On the other hand, I have found that humidity control and heating are very effective and don't require frequent intervention.

At any rate, I found some brand name Bambu PLA on line and bought a few spools so I could play with it while I wait for availability to order a printer.

Does anyone know the dimensions of a spool of Bambu Filament so I can get a few containers?

 
Ya, that's why the thrust of my idea changed to focus on putting it in a fridge slightly above freezing.

Once dry though, and then opened, I think that a quick dunk in a freezer for some cold dry air might be a good idea.

And yes, I think any of the big dessicant packs you show would be capable of drying filament. But I also think that a visit to the fridge would be much faster and also increase the life of a dessicant pack before needing a refresh cycle.

Don't get me wrong, I'm not against dessicant. It's just that my experiences using them in a safe or tool cabinet are not great. They also require regular monitoring and maintenance. On the other hand, I have found that humidity control and heating are very effective and don't require frequent intervention.

At any rate, I found some brand name Bambu PLA on line and bought a few spools so I could play with it while I wait for availability to order a printer.

Does anyone know the dimensions of a spool of Bambu Filament so I can get a few containers?
Spool Dimensions for a 1kg 3D Printer Filament Spool:

  • Outer Diameter (Flange Diameter): Typically 200 mm (7.87 inches), though minor variations exist (e.g., 199–204 mm).
  • Inner Diameter (Arbor Hole / Center Hole): Commonly 52 mm (2.05 inches), but can vary (e.g., 32 mm for Hatchbox, 85 mm for newer 3DFuel spools).
  • Spool Width (Outside Width / Depth): Usually 67–70 mm (2.68–2.75 inches), with some brands using 65 mm or 74 mm.
  • Spool Weight (Empty): Varies significantly by brand—typically 155–319 grams, depending on material and design (e.g., 155g for recycled HIPS, 306g for Atomic Filament).
 
On the Bambu site there is a downloadable split spool model. Ready to print in your favourite soggy filament!

Or this one on Printables: https://www.printables.com/model/270804-improved-bambu-lab-reusable-spool-holder
Key words are "soggy filament"! As I understand it moulded versions are far less hygroscopic and more desirable.

I could also add that I intend to shy away from fibre board reels in future because I suspect they could also be an undesirable reservoir of moisture.
 
. I'm 90% sure that's what this does:

I'd guess that's what the built in dryer in the combo unit does too. I'll know more when I get the printer.

I bought one of those little Peltier units to try a few years ago. It's surprising how well they work as long as you are not expecting them to work like they are a thousand watts.
 
It will vary slightly by manufacturer but not by much unless you are buying bambu refills. The do not come on a spool at all and require a 2 piece reusable spool.

Thanks again. I ordered Bambu brand filament pre-loaded on spools. Had to figure out how to do that. I just didn't know the size. I want to order some containers that will hold whole numbers of the spool size and hope they get here reasonably fast so I can test the moisture process before the printer comes.
 
Thanks again. I ordered Bambu brand filament pre-loaded on spools. Had to figure out how to do that. I just didn't know the size. I want to order some containers that will hold whole numbers of the spool size and hope they get here reasonably fast so I can test the moisture process before the printer comes.
Everybody seems to do it differently.
If I was starting again I would start with the same large tubs I use now. I currently have 17 rolls in one tub with one spool sized container of desiccant in it. I have 3 tubs. Keeps all of the filaments dry enough to print on a moments notice. I would get the heated AMS, possibly 2, to keep an assortment of different filaments in different colors at the ready to fire up the printer from the app on your phone for when you are visiting the grandkids and they want to print something or for when you are in the house and don't want to walk to the shop. Have a filament dryer to use separately for any special filament that just arrived and may need drying before putting it into the storage bin.
 
Be interesting how to quantify dehydration success. I suppose a decently accurate scale is in order. 2g on a new of spool 1000g weight represents fully saturated filament in my (dry) area but as mentioned above it may well be more in humid climates. Not sure I believe my scale resolution though. Measuring the before & after weight of desiccant seems more reasonable, 2g of water absorption represents a much higher proportion of 5-10g of desiccant. At least I think that's how it should work. I didn't know one can recondition desiccant just putting it in the oven or microwave. Seems like a better use of electrons. LOL
 
Be interesting how to quantify dehydration success.

My mind has gone to the same places. I also thought about deliberately saturating it, and deliberately drying it 100%. Weight is probably the best method available to us mere mortals. But I'd also like to see how those numbers affect a humidity meter in the air beside it so the humidity meter could be used to infer moisture in the Filament. Pretty sure that's what the dryer in the unit does, but regardless it would be interesting to see what happens. Might provide insights into how well a fridge would dry it too.
 
@Susquatch - while you are waiting - you will also need some Bedweld or similar adhesive. PLA will stick nicely to clean PEI. PETG, ABS, ASA, etc usually have adhesion problems due to the shrinking plastic pulling away from the bed. These come in either a roll-on glu-stick or a liquid. Look for the liquid type with a sponge top on the bottle. A bottle will last a couple of years unless you make a living from 3D printing.
 
@Susquatch - while you are waiting - you will also need some Bedweld or similar adhesive. PLA will stick nicely to clean PEI. PETG, ABS, ASA, etc usually have adhesion problems due to the shrinking plastic pulling away from the bed. These come in either a roll-on glu-stick or a liquid. Look for the liquid type with a sponge top on the bottle. A bottle will last a couple of years unless you make a living from 3D printing.

Jeez, I feel like a baby in the woods. So much to learn.

I'll see what I can find.

What is PEI? I didn't see that in any of the filament types. I'm nowhere near thinking of mixing filaments just yet.

As far as I can tell looking at various 3D printers, I think the P2S is a relatively big machine for a first one. 10x10x10. That's a good thing cuz I wanted a bigger machine because my first few projects will be stuff like drawer organizers and kitchen/sewing organizers for my bride. She is a filer. Does that mean I have to paint the whole bed?

How easy is it to glue PLA together to get bigger assemblies? Will that need bowties or something to tie them together? Does a slicer do that automatically?

If you are spreading glue all over the bed, I'm guessing you also have to clean it from time to time. If that is true, how do you do that?

And if the part ends up glued to the table, how do you get the part off the table when it's all done? Say a big 10 x 10 tray with compartments? I can almost smell a smashed up and mutilated bed....

I know I just have to dive in, but should I be getting a book for 3dp dummies?
 
Jez, I feel like a baby in the woods. So much to learn.

I'll see what I can find.

I think that the P2S is a relatively big machine for a first one. 10x10x10. I wanted a bigger machine because my first few projects will be drawer organizers and kitchen/sewing organizers for my bride. She is a filer. Does that mean I have to paint the whole bed?

How easy is to glue PLA together to get bigger assemblies?

If you are spreading glue all over the bed, I'm guessing you also have to clean it from time to time. How do you do that?

And if the part ends up glued to the table, how do you get the part off the table when it's all done? Say a big 10 x 10 tray with compartments? I can almost smell smashed up and mutilated beds....

I know I just have to dive in, but should I be getting a book for 3dp dummie
The print bed has a build plate on it. They are magnetic and once the print is done and cooled, you can grab the corner of the build plate and pull it off the print bed. Flex it and your print should pop off easily. There are different styles of build plate for different materials. What plate you put on the bed and what material you are printing, determines on what you apply to the build plate. Sometimes it is for adhesion to get the prints to stick. Sometimes it is more of a release agent to get the print off. I use hair spray most often but a standard glue stick works as well. Cleanup is nearly always just soap and hot water. Fingerprints are your enemy.
 
I use PETG and PLA the most. I have a spool of PCTG which is supposed to be better than PETG. I cannot answer that.
Humidity in the Great Lakes area is an issue in the summer. Not so much during the heating season. I still find that PLA needs some drying especially after hanging clothes to dry in the house, even in the winter.

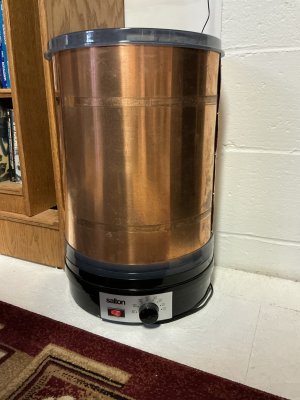
I have built a modified food dehydration machine to hold a few spools at the same time.
IMG_0993.jpeg

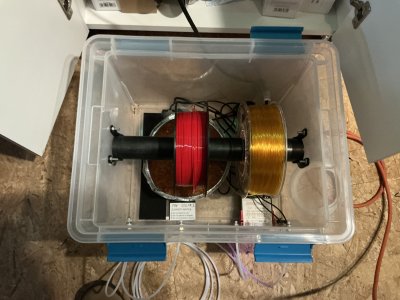
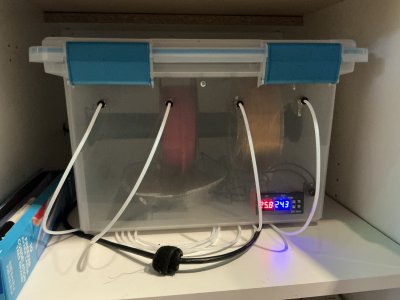
After that I needed a storage box which there are multiple builds in Printables etc.
I used a reptile heater and silicone gel beads. This works very well and similar to having a Golden Rod in a gun safe.
IMG_0990.jpegIMG_0991.jpeg

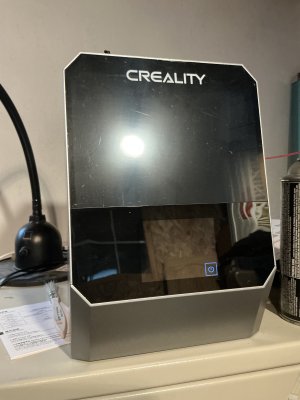
I also bought on a sale a Creality dryer.

IMG_0992.jpeg

I want to rearrange my print station to better integrate the storage boxes with my printer.
Pierre
 
How easy is it to glue PLA together to get bigger assemblies? Will that need bowties or something to tie them together? Does a slicer do that automatically?

If you are spreading glue all over the bed, I'm guessing you also have to clean it from time to time. If that is true, how do you do that?

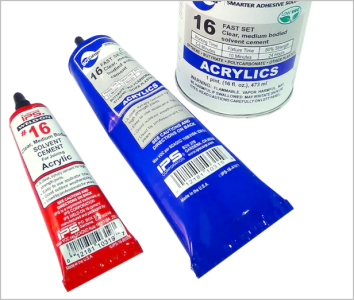
PLA can be bonded permanently with a variety of adhesives. I think this was discussed quite a bit elsewhere. I bought a dedicated plastic adhesive Weld-On 16. These adhesives etch (soften) plastics which is a different mechanism to normal bonding. Having said this I have an arsenal of glues & PLA lends itself to all kinds of CA glues, regular, plastic-formulated, black-rubberized. They will all hold beyod where the PLA will fail.

Beware the glue on the bed thing. Here I am speaking from limited experience but on my Bambu A1 with textured bed. I have never used glue, ever. I have had prints fail but they were always resolved by slicer settings - part orientation, support structure, support pads, initial layer settings, speed/temp. This gets deep & specialized, most of which I have not had to tweak much. And I am only scratching the slicer settings. But if you hop on any Bambu forum & read any 'failed print' question, the very first thing that comes up is dos & dont's of your bed. Don't touch it with your fingers because that tiny amount of oil is enough to create problems. Always wipe & clean with mild water detergent, no chemicals (read the manual). I've been using a spritz of lens cleaner & wipe with KimWipe. It takes 2 seconds. I put a trash bag over the printer so the bed doesn't get dust on it. Your enclosed chamber side steps some of this stuff but not all. When the bed is cool I remove the part, no twisting the metal required. My buddy has had printers spanning many generations & showed me many examples where glue was a requirement on printer-X but his A1-mini just banged it out, no glue, no flex, at 2x the speed. This is a gross generalization but I'm trying to say there are many experiences out there that may not apply to your specific printer, or only to some degree... My advice is ease into it. Start with PLA because its cheap & get a handle on what you are doing. The issues related to other filaments & challenging parts will come up soon enough as they do for everyone.

1771606684274.png

This channel is pretty good. Familiarizing yourself with Bambu slicer & your specific printer is time well spent.
 
Back
Top