I thought sagging might be a problem too but it seems to work ok. Definitely saves filament and it seems plenty sturdy for this use case.Have to head out. Will check when I get back. I'm not sure when I see the large gaps that 5% is all that useful although if it prevents the top layer from sagging...
-
Scam Alert. Members are reminded to NOT send money to buy anything. Don't buy things remote and have it shipped - go get it yourself, pay in person, and take your equipment with you. Scammers have burned people on this forum. Urgency, secrecy, excuses, selling for friend, newish members, FUD, are RED FLAGS. A video conference call is not adequate assurance. Face to face interactions are required. Please report suspicions to the forum admins. Stay Safe - anyone can get scammed.
-
Several Regions have held meetups already, but others are being planned or are evaluating the interest. The Calgary Area Meetup is set for Saturday July 12th at 10am. The signup thread is here! Arbutus has also explored interest in a Fraser Valley meetup but it seems members either missed his thread or had other plans. Let him know if you are interested in a meetup later in the year by posting here! Slowpoke is trying to pull together an Ottawa area meetup later this summer. No date has been selected yet, so let him know if you are interested here! We are not aware of any other meetups being planned this year. If you are interested in doing something in your area, let everyone know and make it happen! Meetups are a great way to make new machining friends and get hands on help in your area. Don’t be shy, sign up and come, or plan your own meetup!
You are using an out of date browser. It may not display this or other websites correctly.
You should upgrade or use an alternative browser.
You should upgrade or use an alternative browser.
DavidR8's shop shenanigans
- Thread starter David
- Start date
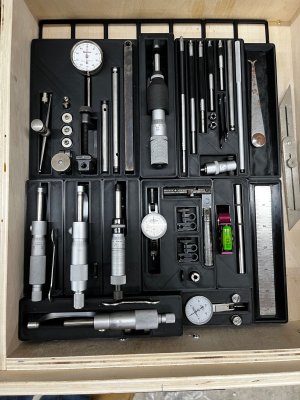
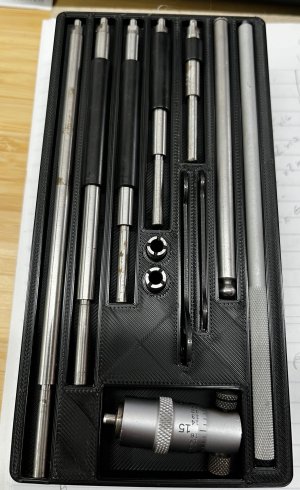
Another tray done. 2"- 8" bore gauge set.
@jcdammeyer note there's no sagging with the gyroid infill at 5%.
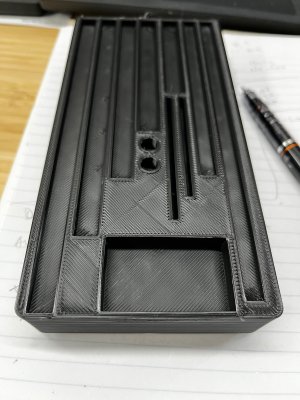
@jcdammeyer note there's no sagging with the gyroid infill at 5%.


140mower
Don
Madness, I tell ya, pure evil madness. 🙄
Nice job leaving the one piece loose, it shows that the dark side doesn't have complete control yet. 😛
Okay, maybe just a little jealous, but don't tell @Susquatch😉 ..... Nice job.
Nice job leaving the one piece loose, it shows that the dark side doesn't have complete control yet. 😛
Okay, maybe just a little jealous, but don't tell @Susquatch😉 ..... Nice job.
There’s a plugin for Fusion 360 that lets you create the boxes.Can you elaborate on your process to make your custom fitted trays? I'm all ears!
You can make them hollow, like a bin, with or without a stacking lip, or solid like these are.
They are measured in grid increments, so a 1 X 4 bin is 1 grid space wide by 4 grid space tall. One grid space is 41mm square.
You also specify the height.
I would take all the pieces in a given set, for example the bore micrometer (top right box).
I laid the pieces on a 4 X 4 grid that I had printed and arranged the pieces in as space efficient a manner as was practical. This gave me how many grid squares the box required.
The bore mic required 2x4 grid spaces.
To get the box height I measured the biggest piece and took half its height, say the piece was 20mm tall and I was going to sink half of it into the box I would make the box 10mm + 2mm for a total of 12 mm tall. Then I measured the basic dimensions; length and width of the rods for example and drew them on the top of the box as one sketch. I extruded them to half their thickness. If a rod was 6mm in diameter I extruded down 3mm.
I didn’t bother trying to make a perfect outline of the part as that just seemed too fussy for my needs.
We have a few days below 0 but only like -3 or -5 and typically only for a few hours.You don't really 'hard freeze' out there.... I would love to locate my compressor outside and save shop space, but at -35C I'm sure to have problems.....
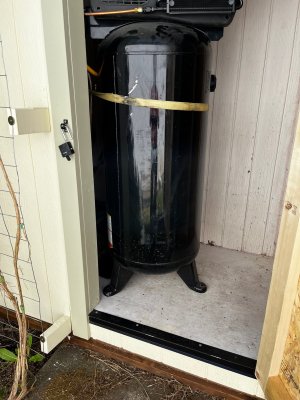
I’m going to insulate the lean-to so that should keep the interior above 0.
Doggggboy
Ultra Member
I'm not sure you would.You don't really 'hard freeze' out there.... I would love to locate my compressor outside and save shop space, but at -35C I'm sure to have problems.....
I had my compressor in an unheated shop for 15 years here in SK and never had any issues.
I changed the oil to full synthetic and never had any problems with it starting or running, even in the winter.
wow I am impressed!I'm not sure you would.
I had my compressor in an unheated shop for 15 years here in SK and never had any issues.
I changed the oil to full synthetic and never had any problems with it starting or running, even in the winter.
I assumed the ice formation in the drain valve would cause leaks or a rupture...
Doggggboy
Ultra Member
That's the nice thing about -35.wow I am impressed!
I assumed the ice formation in the drain valve would cause leaks or a rupture...
Not a lot of humidity.
In all honesty, I can't ever remember trying to use the drain valve in the winter🙄
Dust collector progress.
That’s a Wynn P181038 diesel truck air filter on top.
It’s 17.5” diameter x 23” H.
P181038 Dust Collector Filter for... https://www.amazon.ca/dp/B0CXG8GMPS?ref=ppx_pop_mob_ap_share
There’s a 3/8” all-thread running up from a piece of 1/4”x2” aluminum bolted into the center of the collector ring with washers and a wing nut on top for easy filter removal.
Underneath is a 5-gallon bucket with a Gamma Seal lid on top. The lid is screwed to a plywood bottom bolted to the bottom of the collector ring.
72HRS Ready Seal Lid(Bucket Not... https://www.amazon.ca/dp/B0935MCDZK?ref=ppx_pop_mob_ap_share
Behind the filter assembly is a Jet 1.5hp collector on top of an Oneida Super Dust Deputy cyclone with 5” inlet.
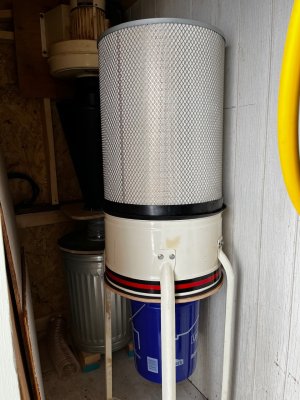

Last edited:
After suffering through the past few weeks of +27C to +30C temps in my flat roofed, no ceiling insulation shop where interior temps exceeded +37C one day I have decided to have the roof replaced with trusses so I can have an insulated ceiling.
5/12 attic trusses so I have some overhead storage space. Not a lot but all I need is storage for long lumber and such. Trying to match the house roof but also trying to stay away from the overhead power line.
Was prepared to have some serious sticker shock at truss quotes but was pleasantly surprised to be quoted $3500, delivered with tax for 13 trusses. 2x6 chords with 2x4 webs.
As a major bonus I will be able to remove the blasted 2x12 beam that runs the length of the shop and it's mid-span support post.
Just waiting for my contractor to come back with a quote to do the work.
Attachments
Just waiting for my contractor to come back with a quote to do the work.
Won't you be right back into permit issues doing that?
A building permit may be required but we could always use the "had to do this as the roof was unrepairable" reason which would negate the permit requirement here.Won't you be right back into permit issues doing that?
The only clearance height reference I can find from BC Hydro is this:
BC Hydro clearance requirements are generally greater than Code requirements.
1. Across highways, freeways, and expressways: 7.1 m (written permission required)
2. Across streets, lanes, alleys and pipeline ROW: 5.5 m (18 ft)
3. Across driveways to commercial and industrial premises: 5.5 m (18 ft)
4. Across driveways to residential garages: 4.5 m (15 ft)
5. Across ground normally accessible to pedestrians only: 3.5 m (12 ft)
Now what's confusing is that on pg. 4 of the attached pdf they note that the clearance over the garage roof is too low. Except the #5 clearance requirement says "Across ground normally accessible to pedestrians only". I would argue that a roof is neither ground nor normally accessible to pedestrians.
Fact of the matter is, the house was completely re-wired and upgraded to 200A service which necessitated a new aerial drop over the garage. And there's no way there's 12 ft of clearance above the garage roof now.
If push comes to shove I may investigate running the service to the garage first. But that's a heck of a lot of expense.
Attachments
Last edited:
If push comes to shove I may investigate running the service to the garage first. But that's a heck of a lot of expense.
For some reason, I thought you already looked at that......
I did when we were looking to build the carriage house as that definitely required moving the service to the new building.For some reason, I thought you already looked at that......
Basically I would have to bury conduit from the shop to the house, reconfigure the house entrance from overhead to underground and have a service entrance installed on the garage. No idea on cost.
There are ways to save substantially. If you do all the trenching, and install the correct size/grade of pipe for the electrical pull, you can easily save $1000.
I always recommend pulling in pipe rather than burying the cable directly. This leaves your options open. It is not code, but I bury a PT 2X6 on top of the pipe during the refill, as an added anti-digging measure. Cheap insurance.
I always recommend pulling in pipe rather than burying the cable directly. This leaves your options open. It is not code, but I bury a PT 2X6 on top of the pipe during the refill, as an added anti-digging measure. Cheap insurance.
Yup, I'd definitely do the work myself.There are ways to save substantially. If you do all the trenching, and install the correct size/grade of pipe for the electrical pull, you can easily save $1000.
I always recommend pulling in pipe rather than burying the cable directly. This leaves your options open. It is not code, but I bury a PT 2X6 on top of the pipe during the refill, as an added anti-digging measure. Cheap insurance.
If push comes to shove and I have to move the service I may have shot myself in the foot as I built my lean-to over the area where the trench would have to go 🙁
And the gas line goes down that side of the garage as well...
Last edited:

